
How to Make a Simple and Beautiful DIY Pinecone Wreath
Spruce up your front door with this beautiful wreath made from painted pine cones. This lovely DIY pinecone wreath is easy to make using natural elements and can be completed with just a bit of time.
Making your own pine cone wreath is a fun project to do each year. This is a great way to decorate for the fall season without a lot of extra cost. Most of the supplies you might already have one hand.
pine cone wreath easy tutorial
Fall is a great time for crafting. Making your own fall home decor is a great way to celebrate the season. Using natural decorations like pinecones brings fall to the indoors. This easy tutorial will help you to get your fall decorating started. You will love how easy it is to assemble and how gorgeous it will look on your front or your back door.
The following post may contain affiliate links. That means if you click and then buy something, I will make a small commission at no additional cost to you! Thank you for supporting my blog. full disclosure here.
This post is sponsored by Dixie Belle. All opinions are my own!

supplies
- wire wreath form
- hot glue gun and glue sticks
- natural pine cones (both small and larger pinecones)
- raffia
- wire cutters
- floral wire (I like the brown paper-covered wire)
- floral snips with a pointed end
- paint (I used Dixie Belle chalk paint colors listed below)
- small paint brush
- faux greenery (optional)
pine cone wreath step-by-step
step one: gather the pine cones
The first step is to gather a variety of pinecones. I used several sizes of my own pinecones. Eastern white pine trees are among the most common pine trees in our area here in Delaware. We bought this one years ago for our Christmas tree. I love the medium pinecones it makes.
They have a slight curve and are long a slender. They also get sap on the ends of the pine cone petals which turns white. Try to find pinecones with open spaces to separate the pinecone flowers and to paint them easily.
Last year I collected a bunch of pine cones and they stayed in our garage until now so I didn’t need to worry about bugs. If you are concerned, then place your pinecones in a warm oven.
To do this, preheat your oven to 170* and then turn it off. Put the pinecones on a cookie sheet covered in parchment paper and allow the pinecones to stay in the oven for 45-60 minutes. That should take care of any critters that might be hanging out within the pinecones petals!
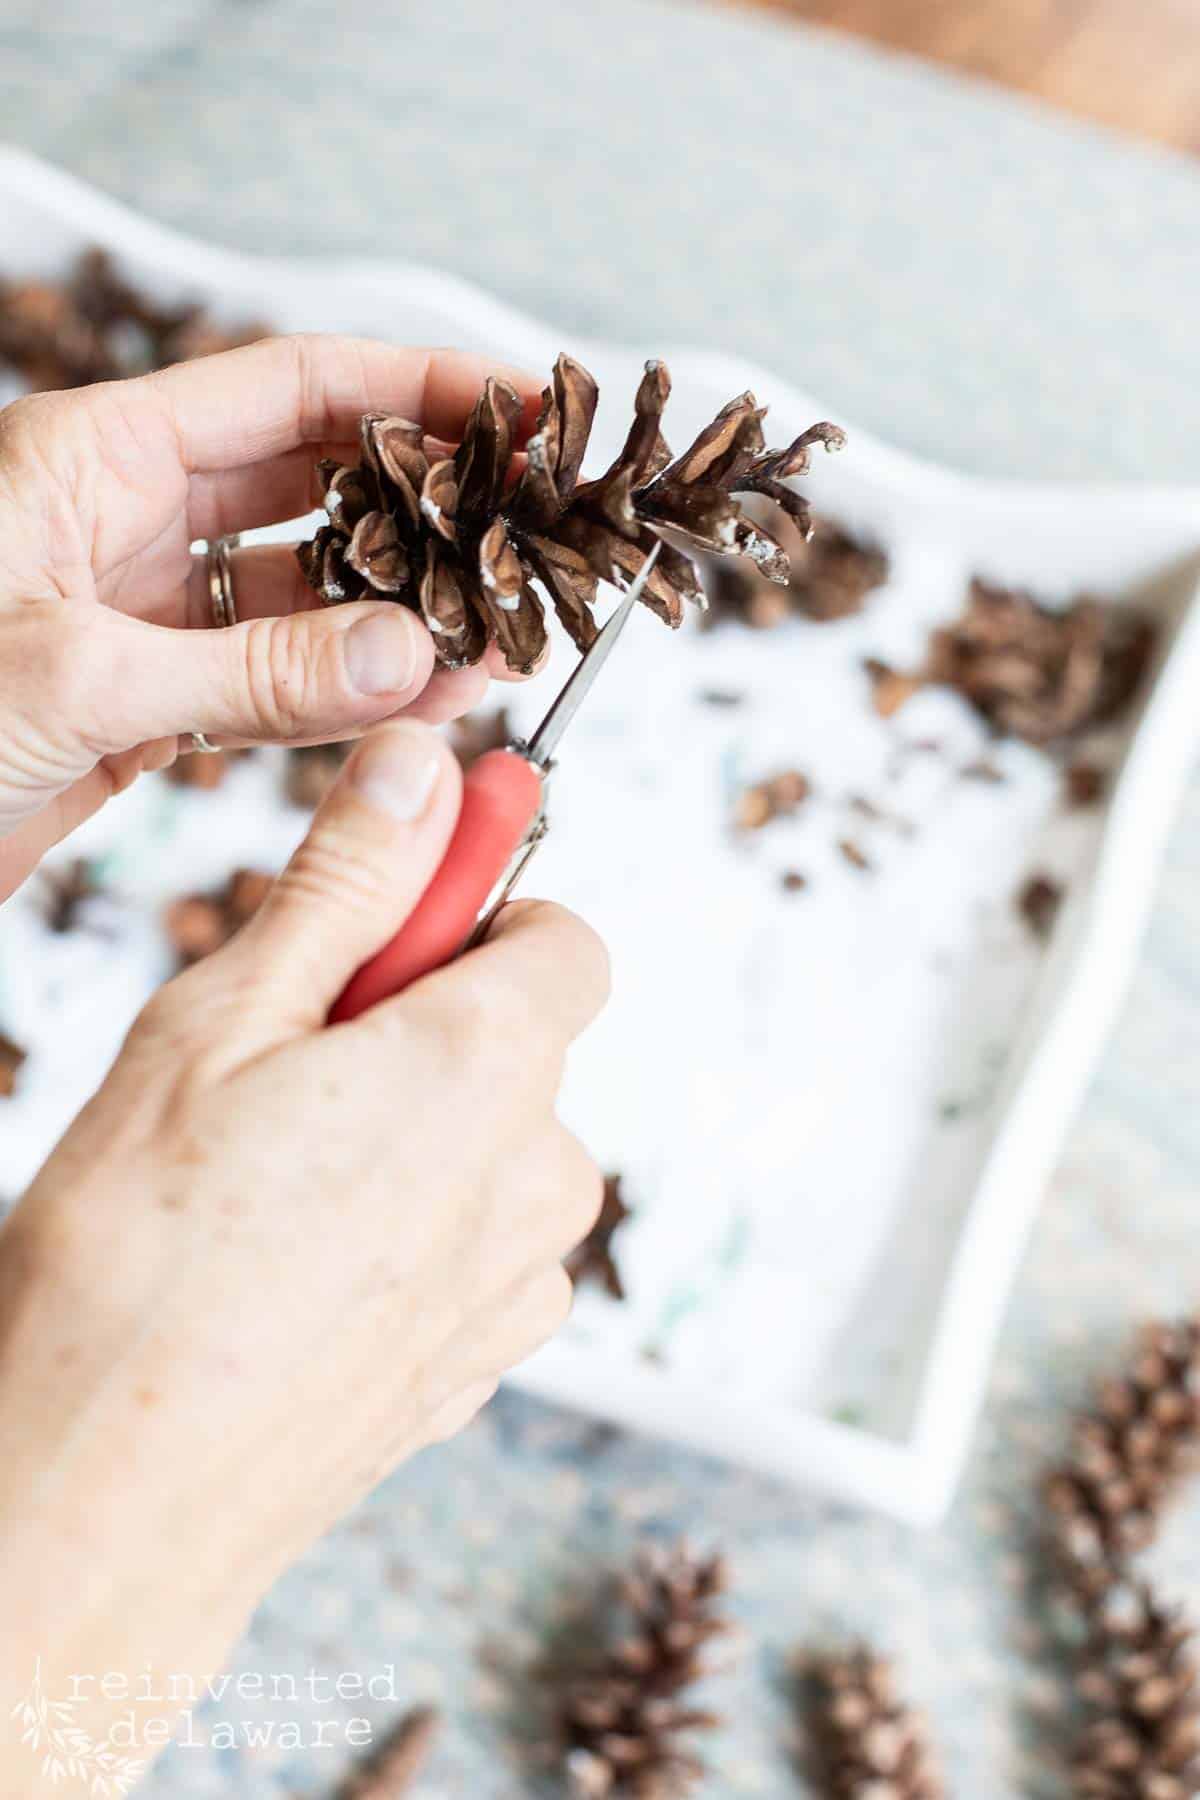
step two: cut the pine cone flowers
The next step is to cut the pinecones into flowers. I’ve done this so many times and it is still so much fun!
Using the floral snips and stick the pointed end between the pinecone petals and clip at the stem of the pine cone. Some of the petals will fall off but for the most part, the pine cone flowers will stay intact.
I can usually get 3-4 flowers from the largest pinecones and then 2-3 from the medium pinecones. The small pine cones can be hard to clip so they can be saved for the pinecone clusters on this fall wreath.
Cut a bunch of these pinecone flowers. It’s best to cut more than you think you will need so that you make the mess once and then clean it up! Ask me how I know this to be true!

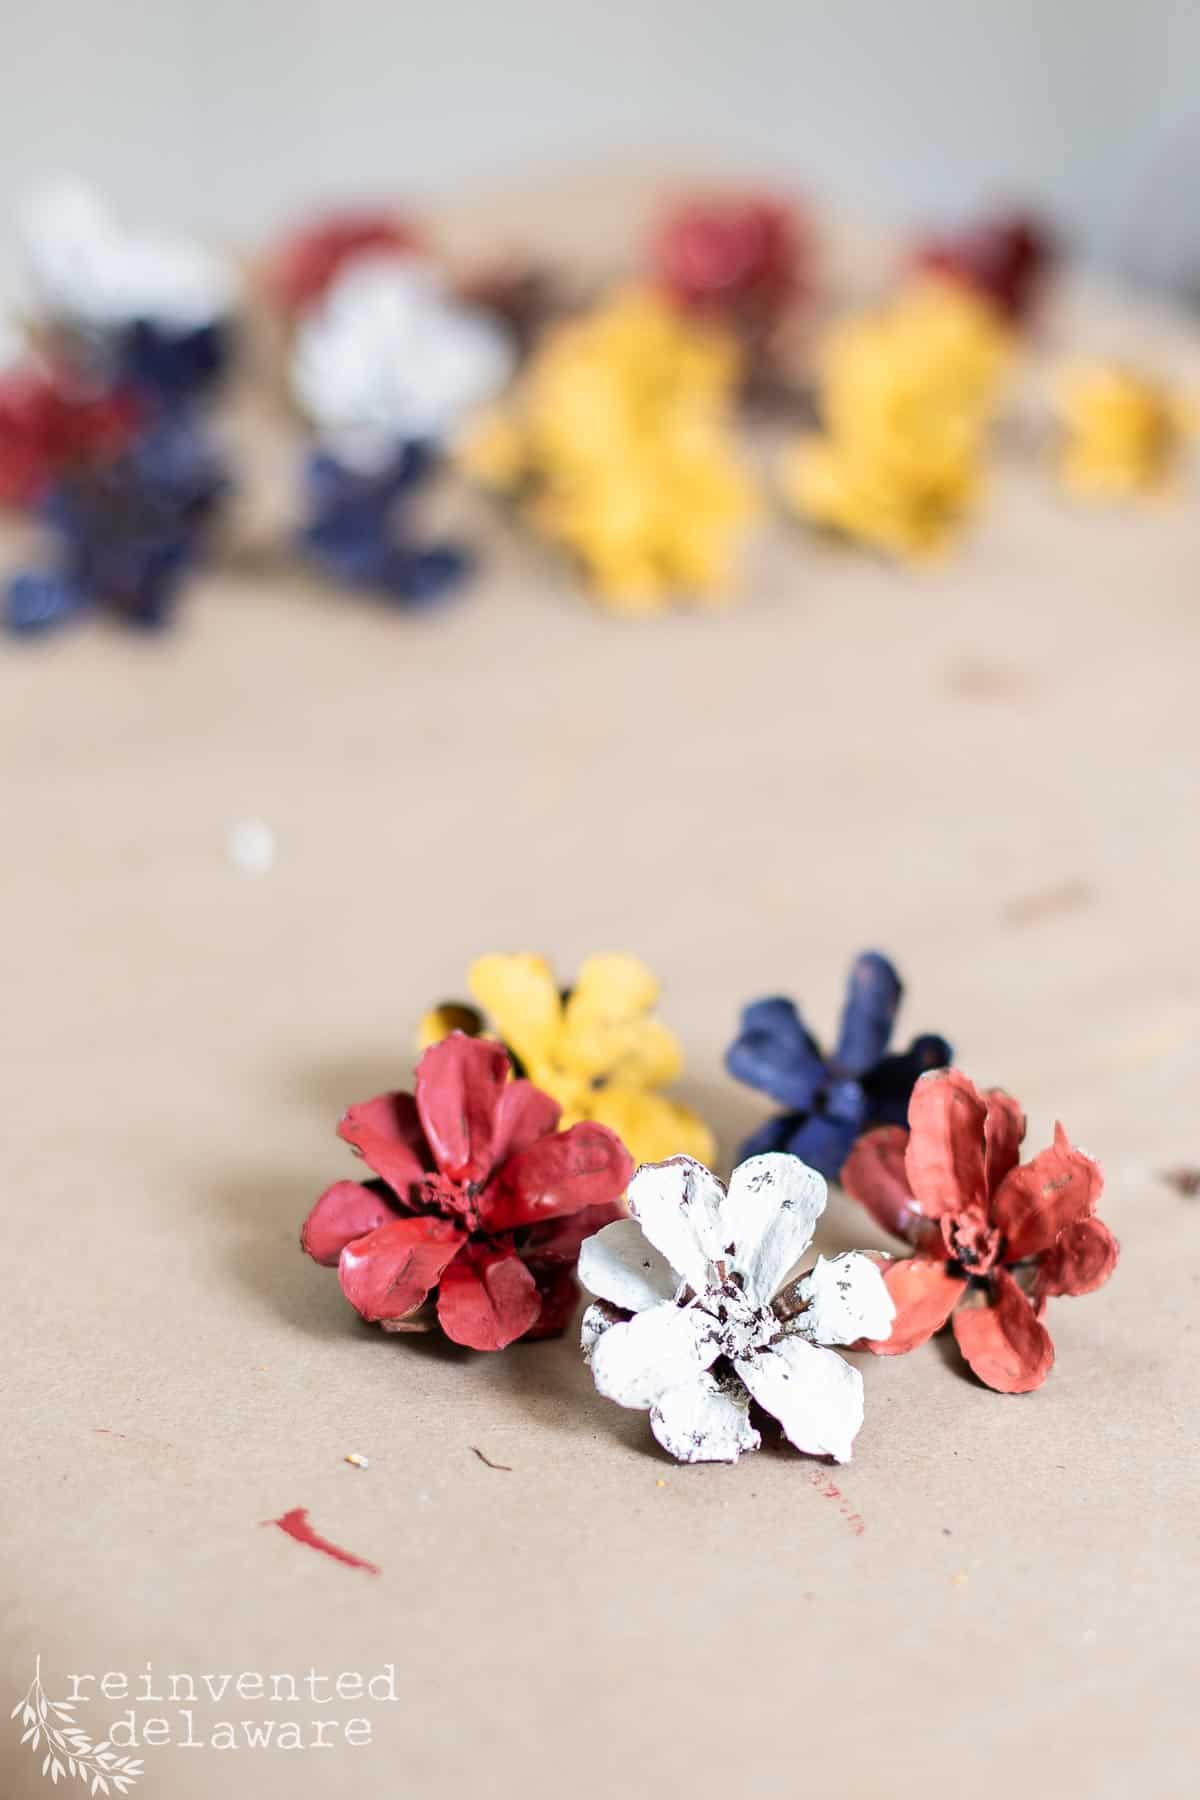
step three: paint the pine cone flowers
Do you love to paint projects? It’s always the best part of any DIY project in my opinion! Grab the small craft brush and start painting using fall colors. I will have the chalk paint colors I used listed below. I also used white paint to add interest to the entire wreath.
When painting the pinecone petals, use a small craft brush to get into the individual petals. Don’t worry about complete coverage. Allowing some of the natural beauty of the pinecones to show will only add to the look of this lovely wreath!
Paint as many as you think you will need for your wire frame. I chose a large wire frame – 18″. Choose the size metal frame that will work best for your home.
Handy tip: Prepare Ahead!
Gather extra pinecones for more projects! Leave them in a box in a protected area like your garage and you will have pine cones for other projects when you are ready to craft!

Paint colors for fall DIY projects:
I mixed Barn Red and Colonel Mustard to create the orange color you see below.
step four: assemble the DIY fall wreath
Wrap the raffia around the circle of the wire frame and secure it with a piece of floral wire. I like the floral wire that is covered in brown paper because it disappears into the pine cones.
Cut enough of the wire to have excess for attaching the pinecones. Then space out the areas you will attach the raffia to the frame.
Think of the numbers on a clock face and that should help you to space the brown floral wire. Don’t be too fussy with this part! It should not be perfectly spaced 🙂

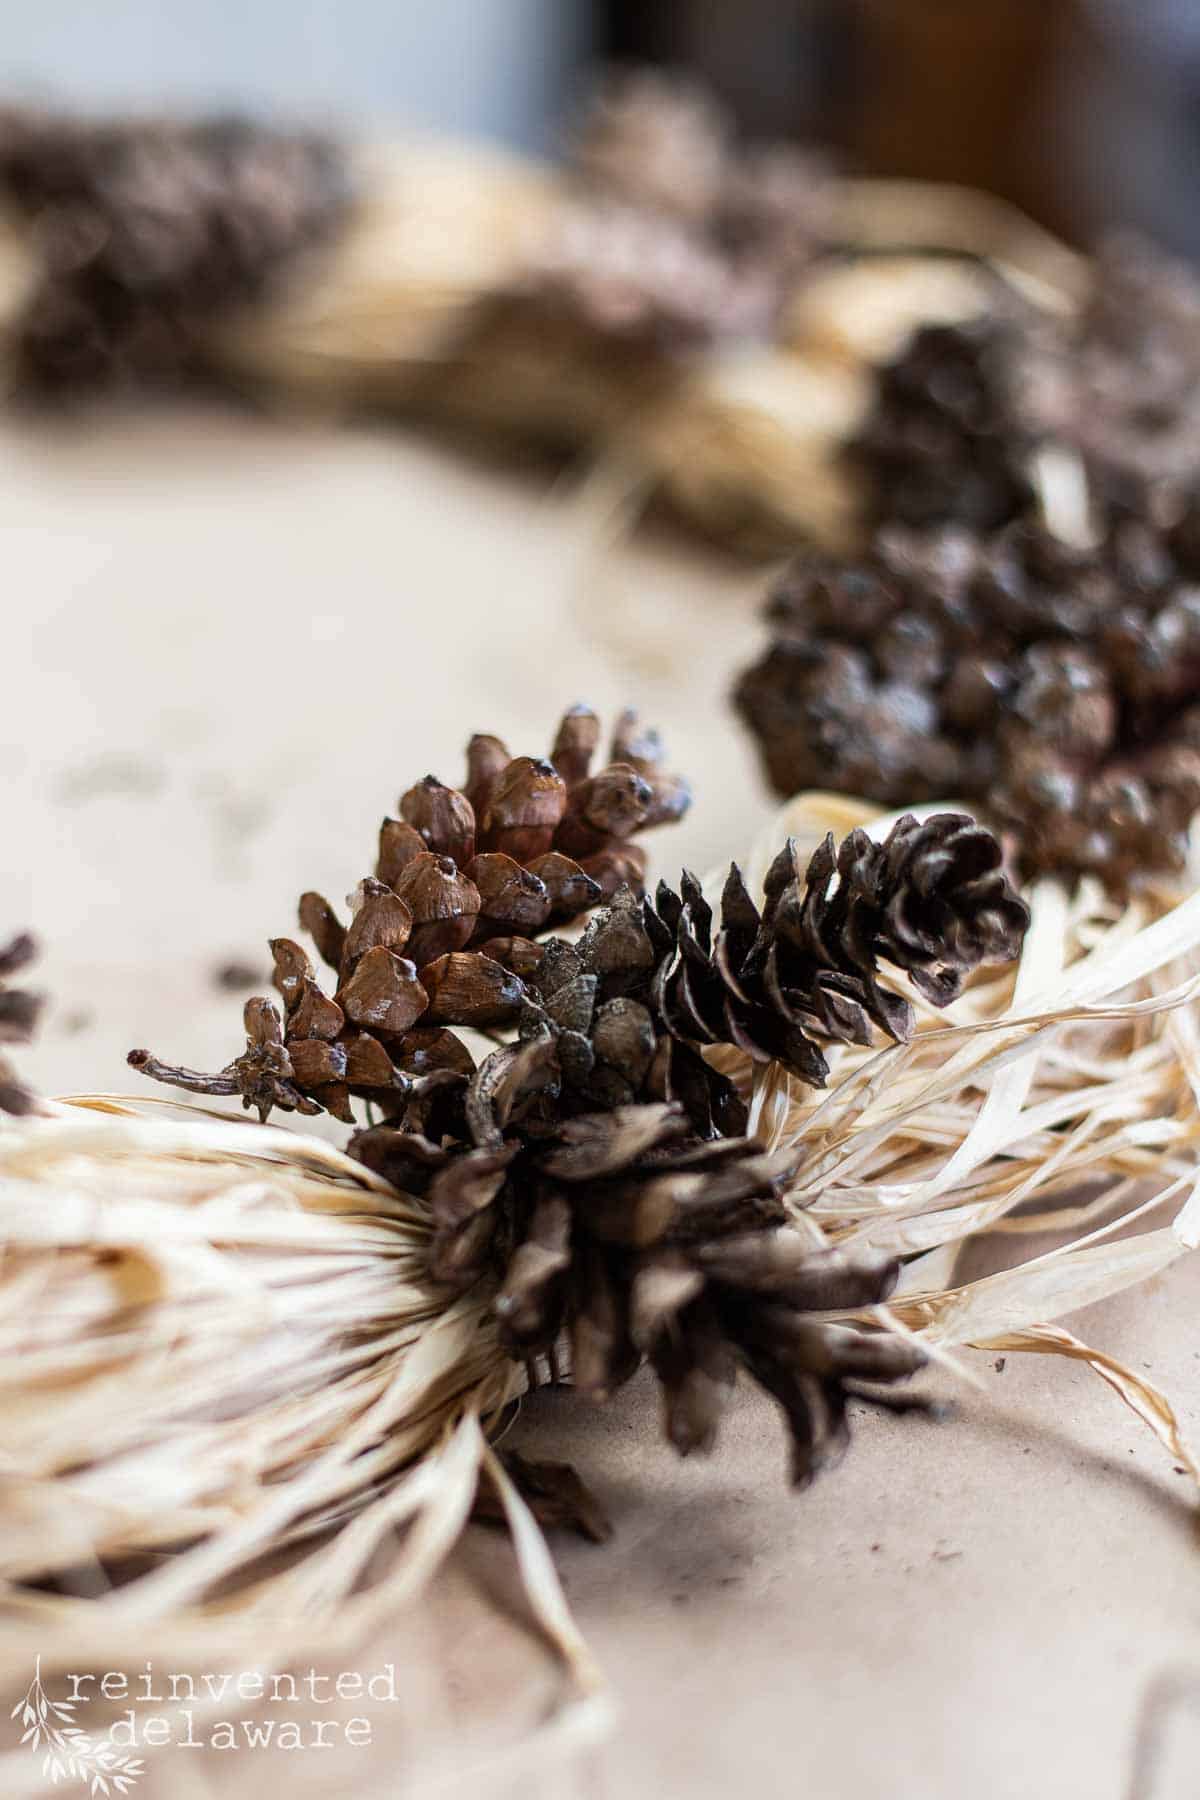
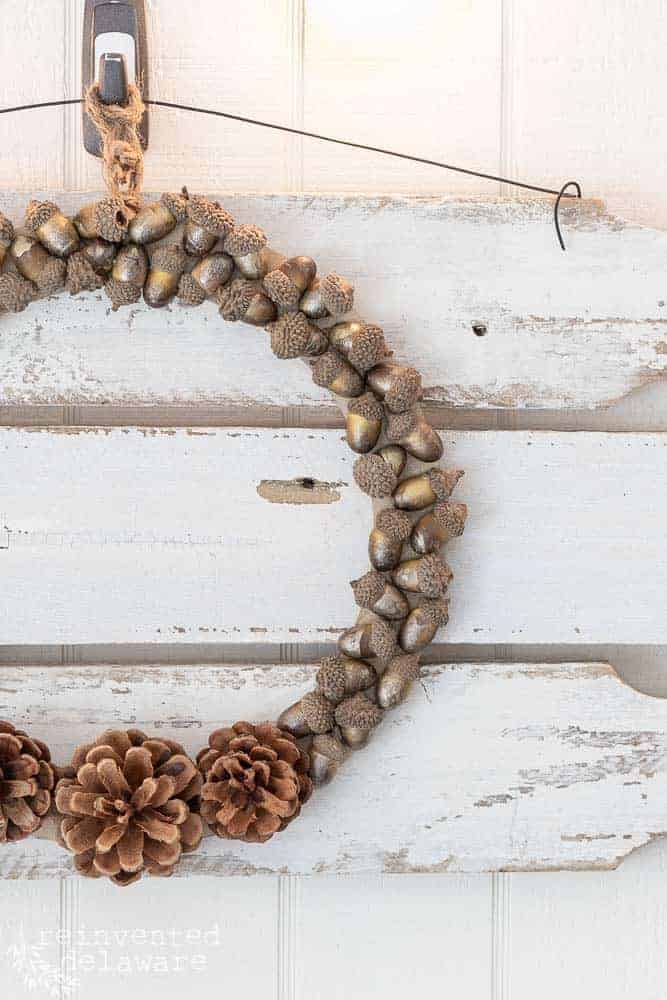
Use the long pieces of wire to attach clusters of pinecones to the raffia-covered wire frame. Simply wrap the wire through and around the pinecones and twist it here and there to secure it. Then grab another pinecone and do the same with the other tail end of the craft wire. The last pinecone in each cluster is a small pinecone so I used hot glue to attach it.


Next glue on clusters of the painted pinecone flowers between the clusters of large pinecones. Try to include some of each of the colors you paint the pinecone flowers but don’t be too concerned about perfection here! This is meant to be one of your favorite pine cone crafts and you don’t want to spoil it with perfection, my friend!
I also added these adorable mini pine cones that had not opened. Aren’t they adorable?? A little bit of hot glue was all they needed to join the wreath-making party!

The last addition is faux fall-colored greenery leftover from another project. I just stuck the ends into the wire that secured the raffia. You could use pine evergreen cuttings from the same pine tree that you gathered the pine cones from.
The last step is to cut a long piece of brown craft wire to create a wire hanger long enough to hang the wreath at the perfect spot on our front door.
easy DIY pinecone wreath
Wasn’t that an easy way to make a new wreath to make for fall decor? Here are some options to consider when making your holiday wreaths:
- use a 12″ wire frame if you want to hang the wreath indoors in your dining room
- use the larger wreaths to create a table centerpiece and place a riser (or a DIY cake riser) in the center of the wreath with a candle
- add a festive touch to the pinecone wreath by adding battery-powered twinkle lights
- change the colors to coordinate with your Christmas decorations and then use it all winter long
- make several wreaths and give them away as a handmade gift
- search your local thrift stores and craft stores for supplies on sale

FAQs
what kind of pine cones make the best wreath?
The best pine cones for wreath making are the free ones! Gather them from your yard, or your neighbor’s yard or put out a call on your Facebook page! Use pinecones that are open so that you can easily cut the pine cone flowers.
how long will a pinecone wreath last?
A pinecone wreath will last for years as long as you store it properly. Avoid storing it in the attic because of extreme temperature changes. Store in a wreath container under a bed or somewhere it won’t be damaged.
how do you get bugs out of pine cones for crafts?
Place pine cones in a preheated 170* oven for 30-40 minutes after turning the oven off. Line the baking sheet with parchment paper to catch any debris or sap that may come from the pine cones.
how to clean pine cones for crafts
Fill a large bucket with water and add a cup of vinegar. Submerge the pine cones in the water for 30-40 minutes. Lay out in the sun to dry thoroughly
how to bleach pine cones for crafts
Fill a large 5-gallon bucket with water and add a couple of cups of bleach to the water. Stir well then add the pine cones and allow to soak for at least 24 hours. Remove and allow the pinecones to dry in the sun. My friend Michele from Vintage Home Designs has a great tutorial about this process!

beautiful DIY pinecone wreath
Let me know what you think of this gorgeous DIY fall wreath! Would you use the same colors for fall decorating? Maybe you are more of a neutral color kind of person – wouldn’t this be so pretty in shades of white, burlap, beige, and brown? It sounds amazing!
I’m already thinking about Christmas – wouldn’t this pinecone wreath be lovely in bright white pine cones with diamond dust glass glitter creating sparkly pinecones? Omgoodness it would be so pretty!
Or if you like color – reds and greens with a gorgeous plaid red ribbon would be so festive! Add a string of battery-powered white lights for an additional touch of twinkly to your holiday decor!
DIY pine cone wreath video tutorial
Here is a video tutorial of this project that I am sure you will enjoy! Be sure to subscribe to my YouTube channel while you are there. It is totally free and I upload a new video each week!
Just tap the image below to watch!


Easy DIY Painted Pinecone Wreath Step by Step
Equipment
- wire wreath form
- hot glue gun and glue sticks
- natural pine cones (both small and larger pinecones)
- raffia
- wire cutters
- floral wire (I like the brown paper-covered wire)
- floral snips with a pointed end
- paint (I used Dixie Belle chalk paint colors listed below)
- small paint brush
- faux greenery (optional)
Instructions
- Gather pinecones from nature. Allow to dry out in a box in your garage. You can also dry them in a preheated 170* oven that has been turned off. Place pine cones on a parchment paper lined baking sheet and leave them in the warm oven for 45-60 minutes.
- Use pointed floral snips to clip the pine cones in sections that look like flowers.
- Paint the pinecones using a variety of fall-colored paint. Change the look for other seasons by changing the paint colors! Allow to dry completely.
- Attach raffia to the wire wreath frame using brown paper-covered thin wire leaving long tails of wire for the next step.
- Use the ends of the wire from step four to secure clusters of pine cones to the wire frame.
- Use hot glue to help hold the pine cones on the raffia covered wire frame.
- Attach the painted pine cones to the raffia with hot glue. Place the painted pinecone flowers around the wreath in a pleasing way.
- Add a hanger to the back of the wreath by looping a long piece of the wire in the desired length. Then hang the wreath from the wire!
Video
how to make pine cone wreaths
Here is a printable version of this DIY pine cone wreath. Print it out for yourself or for your friends!
Links to my other pine cone projects:
How to Make DIY Pine Cone Flowers
Make a Twig Wreath with Sparkly Pinecones
DIY Pinecone Wreath with Acorns
Simple Gift Wrapping Ideas with Pinecones
Cheap DIY Christmas Ornaments with Pinecones
one more fall wreath idea!
One of my blogging buddies made a gorgeous wreath for fall using wheat! I’m sure you will enjoy her project!


Thanks for joining our journey!
Thanks so much for joining us for this post! Join our journey so you don’t miss any of the fun projects, tutorials, and inspiration that we share with you each week! You can follow us on Instagram, Facebook, and YouTube. We share even more inspiration on Pinterest!
click below to purchase supplies!
Visit my Amazon Storefront!
Click the button below and head over to our online shop on Amazon!


This wreath is beautiful Cindy! just perfect for fall.
Thanks Wendy! I love making pinecone projects!
Beautiful use of one of my favorite items to decorate with. I love how you created the flowers from the pine cones to add that special touch. I’ll be making me on of these for sure! Thank a for a great tutorial, Cindy.
Pinned. 🙂 😘
Pinecones are so useful! I’m sure your pinecone wreath will look amazing Do!
Looks fabulous Cindy! Pinned!
Thanks Anna! It’s got me in the mood for fall!