
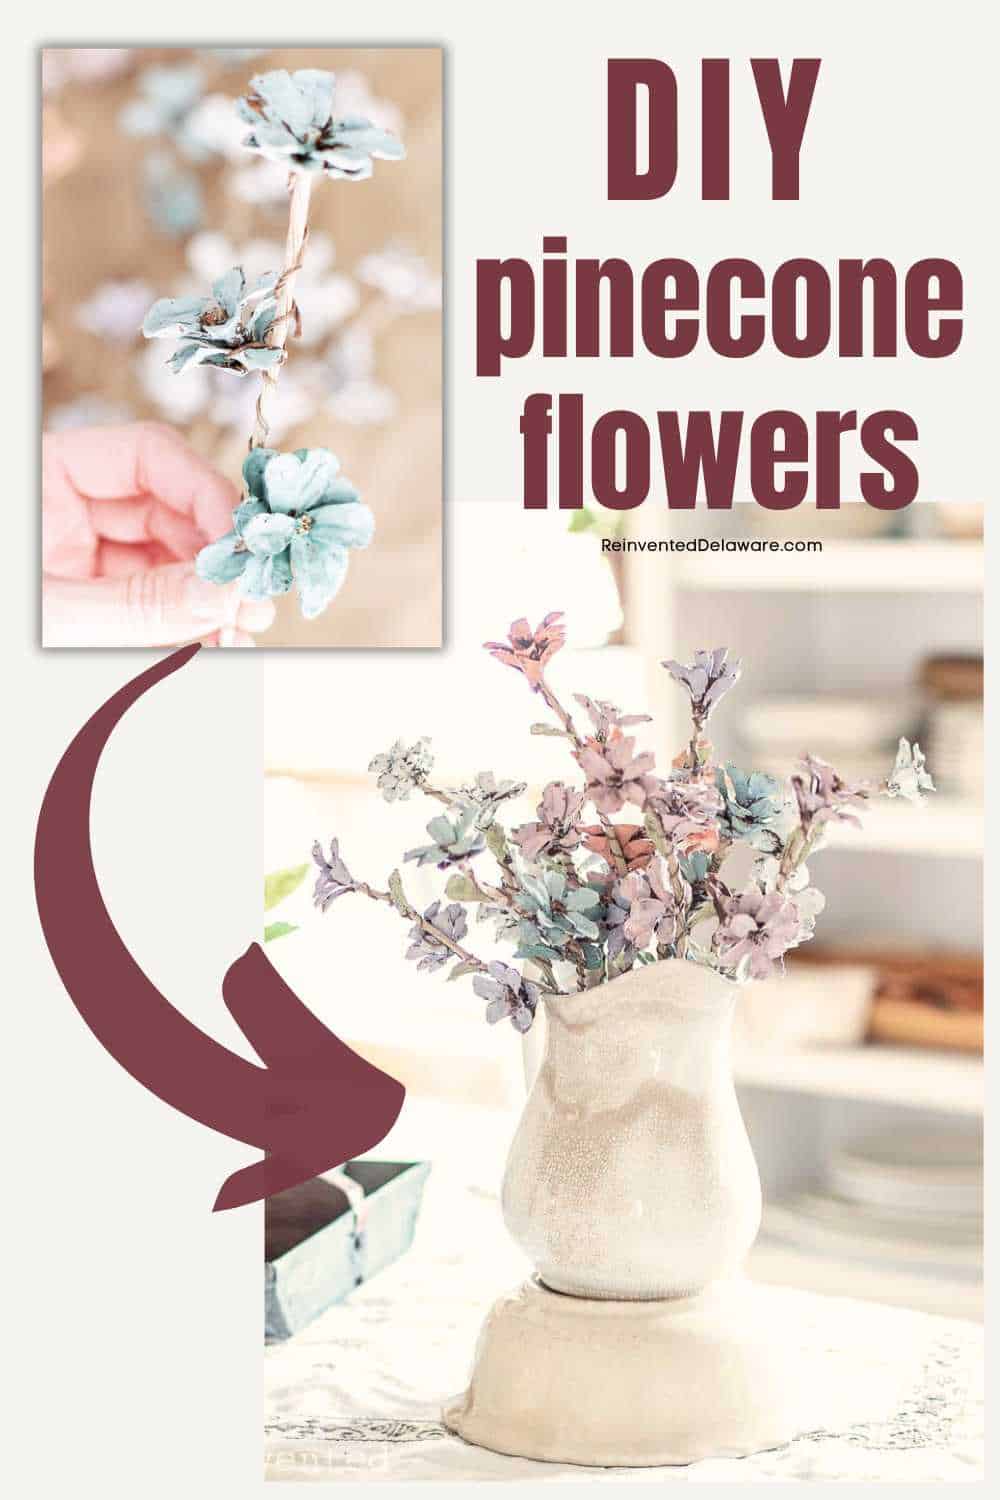
How to Make DIY Pine Cone Flowers for a Timeless Bouquet
Are you looking for some adorable handmade pine cone flowers to add to your table this spring? This easy nature craft is perfect for you!
These painted pine cones are one of my very favorite projects. Although we normally think of pine cone decor around the holidays, they can really be used year-round! These pine cone roses are a perfect centerpiece to display for Mother’s Day, Valentine’s Day,or Easter.
You can even paint these DIY pinecone flowers with gold, white, or jewel tones for a stunning winter pine cone project. They’re gorgeous all year long!
The following post may contain affiliate links. That means if you click and then buy something, I will make a small commission at no additional cost to you! Thank you for supporting my blog. full disclosure here.

how to make pine cone flowers: step-by-step instructions
Let’s go over the supplies you will need for this pine cone flower craft. Many of these supplies are easy to find, and you may even have some tucked away in a cabinet or cupboard somewhere.
If there are any supplies you can’t find at home, the links below are available for your shopping convenience.
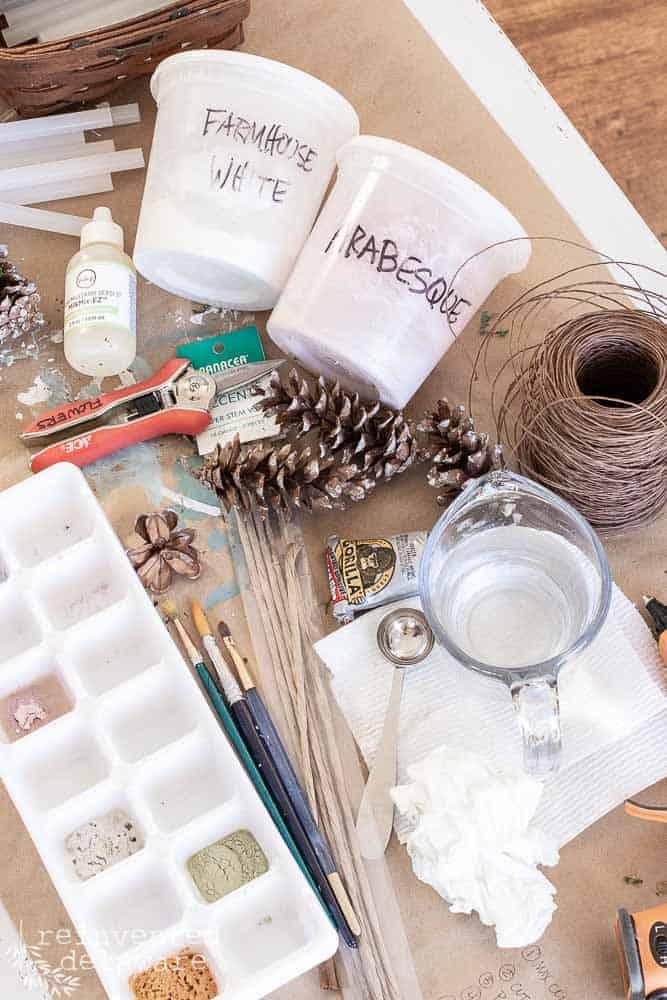
list of supplies:
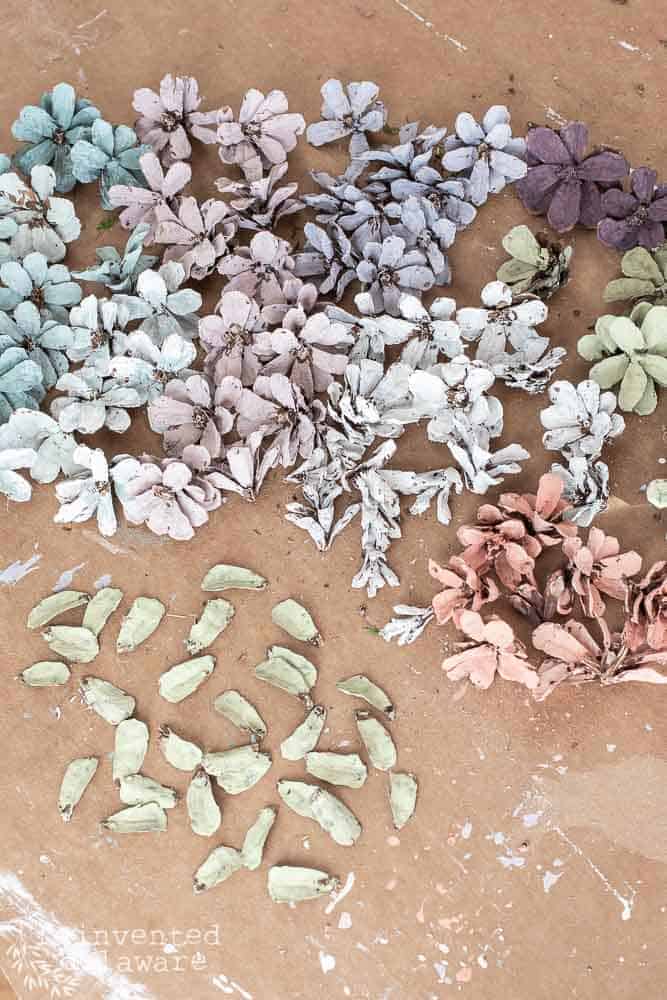
- pine cones (one pine cone makes 3 flowers; mine are from my yard)
- paper-covered 18 gauge craft wire 18″ long (not exactly what I found at my local Walmart – check your Walmart for the exact wire I used!)
- thin brown craft wire
- pointed floral clippers
- heavy wire cutters
- artist paintbrush
- floral foam
- floral moss
- Miss Mustard Seed’s Milk Paint in the following colors:
- Bergere
- Dried Lavender
- Arabesque
- Mustard Seed Yellow
- Layla’s Mint
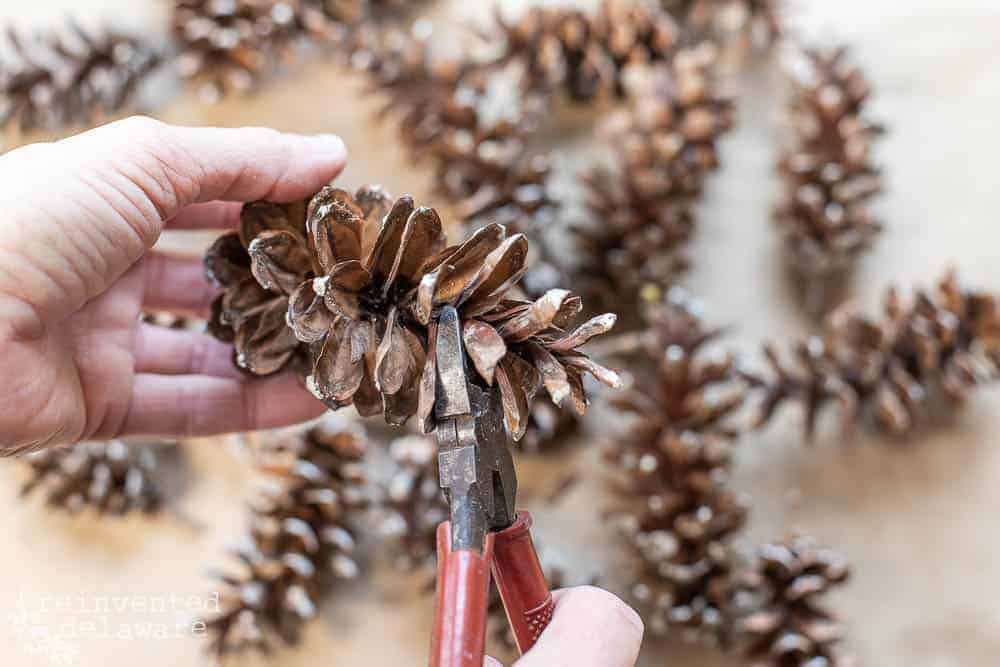
Using the pointed floral clippers, cut the pine cones into about 3-4 sections creating pine cone flowers. This step is messy, so be prepared to clean up with your shop vac!
how to mix milk paint
Milk paint is easy to mix using a one-to-one ratio of water and dry milk paint. You can use Milk Mix EZ to reduce the foaming that can happen with milk paint. If you stir the paint slowly, you won’t have much problem with foaming.
An ice cube tray is a perfect container to mix small amounts of milk paint. You’ll only need one teaspoon of milk paint to one teaspoon of water. Add the water first, then the milk paint. If you let it sit for a minute or so, the milk paint will absorb the water, and mixing will be easy!
how to paint pine cones to look like flowers
These detailed instructions will help you make beautiful flowers people won’t even be able to tell are from pine cones! You can paint them in the colors of your choice to fit your color scheme or to make different flowers for different holidays!
step one: cut apart the pine cones
BTW, I started using the regular wire cutters to cut the pine cones, as you see below. Take my word for it; the pointed floral clippers linked above in the supplies list work much better!
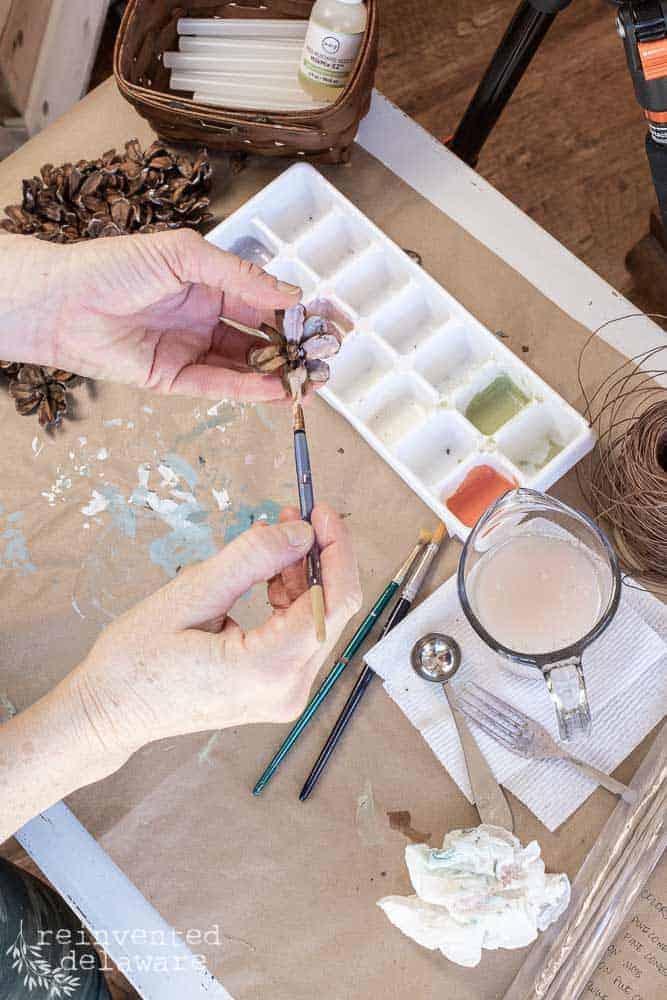
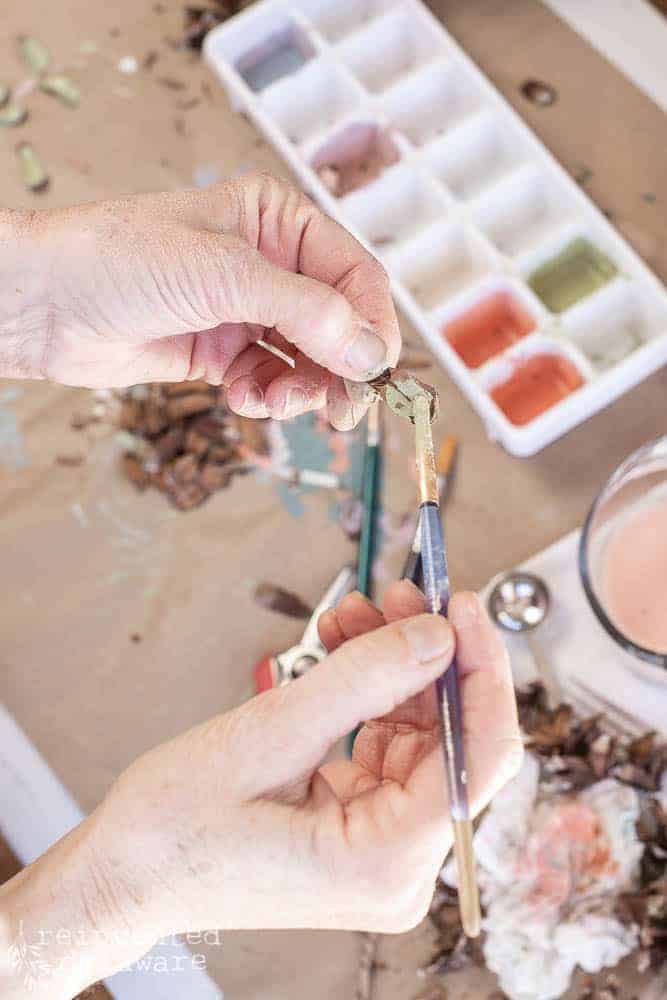
step two: mix your paint together
After cutting all of your pine cone flowers, stir the paint and grab your artist’s paintbrush! And prepare to be a little messy. Holding the pine cones while you paint them gets your fingertips covered in paint!
But Joanna Gaines says that in the kitchen if you are not making a mess, you are not having fun!
Let’s use the same mindset with this project, ok? 😊
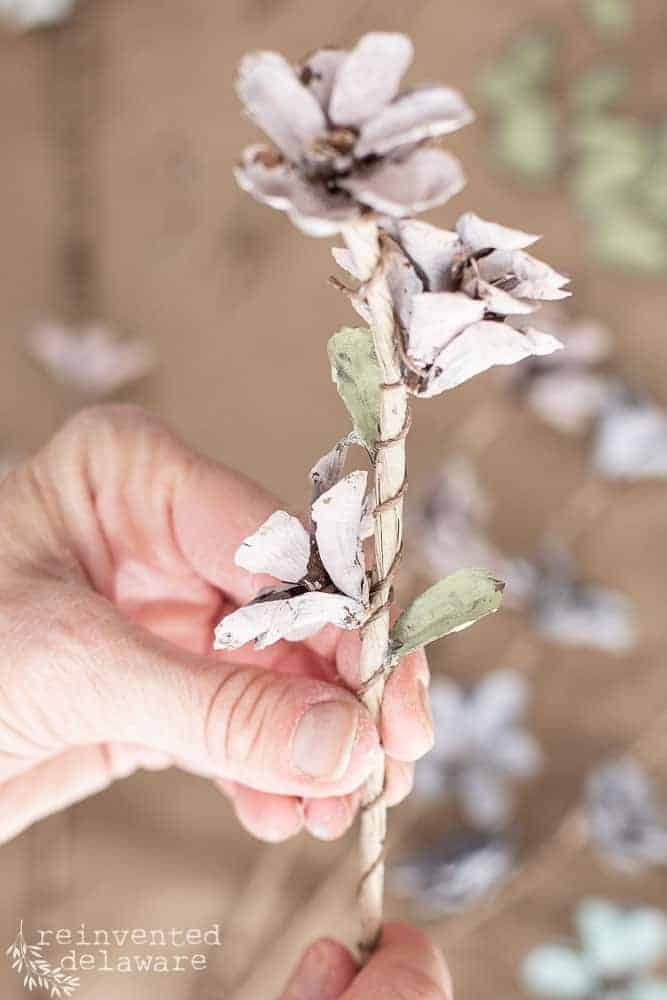
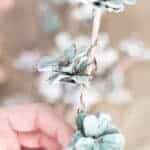
Paint as many pine cone flowers as you need in a variety of colors. Separate some of the pine cone petals and paint them in Layla’s Mint (green) to represent leaves for the floral stems.
step three: prepare the stems
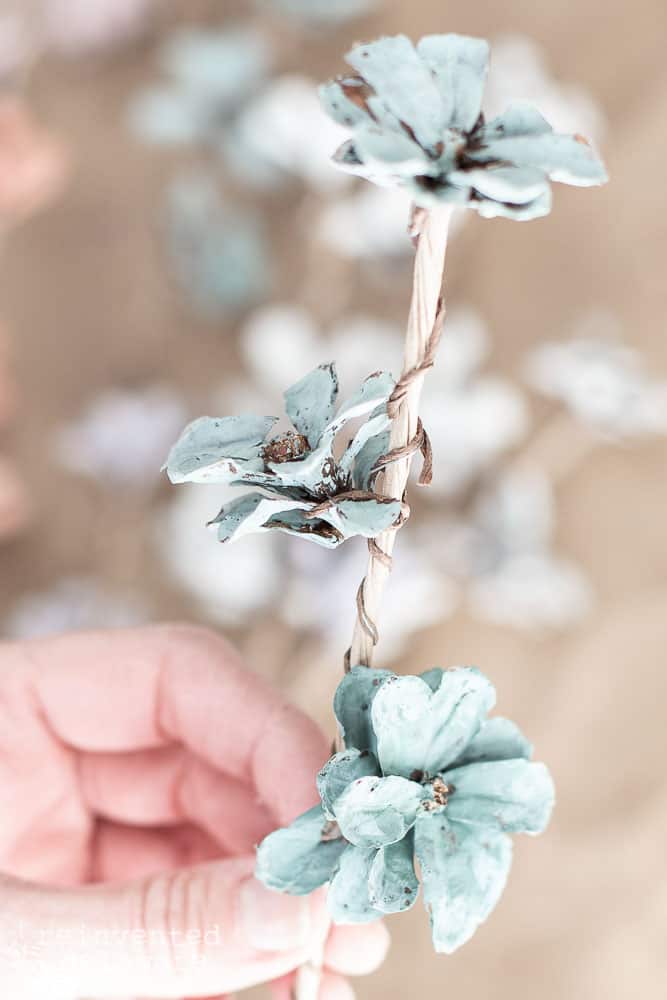
Once you have painted all of your pine cone flowers, it’s time to assemble them. Cut the 18 gauge wire stem in half with heavy wire cutters creating about 8-9″ lengths.
step four: assemble the painted pine cone flowers
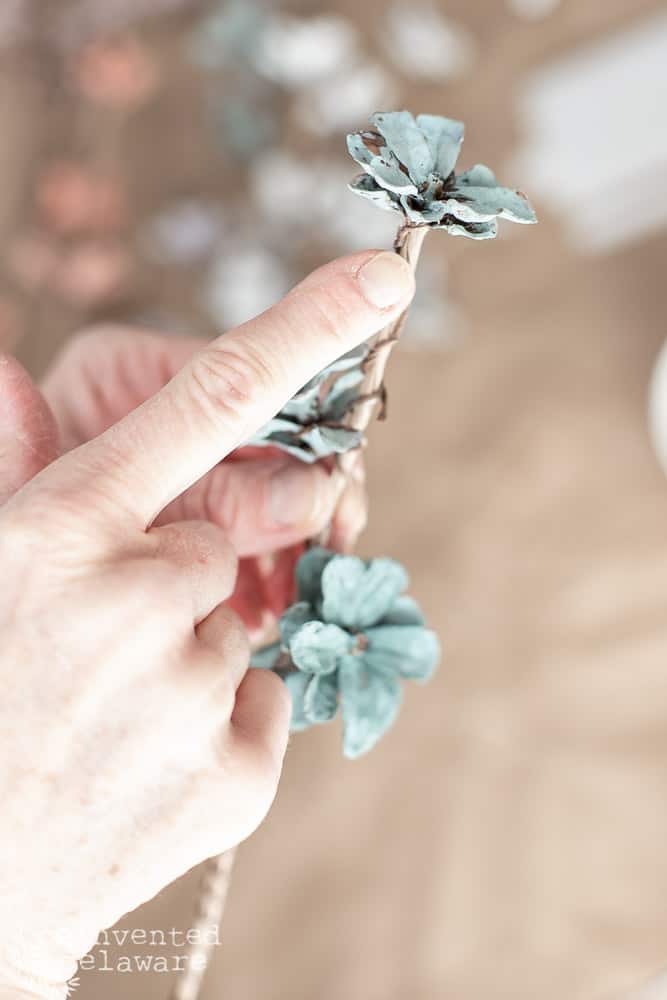
You might want to watch this step in the video towards the end of this post. Basically, you are going to thread the thin brown wire through some of the pine cone petals and then wrap the thin wire around the 18 gauge wire stem.
Twist the thin wire down the stem to the next spot where you want to add a flower, thread the thin wire through the petals and then wrap the wire on the stem again.
Three flowers fit the flower stem well if you place them 2- 2/12″ apart. The top bloom should sit directly on top of the stem. You might have to use some hot glue to hold it there.
step five: make a DIY pine cone bouquet
Once all of the pine cone flowers are secured to the stems, bend them slightly to create a more natural-looking flower stem.
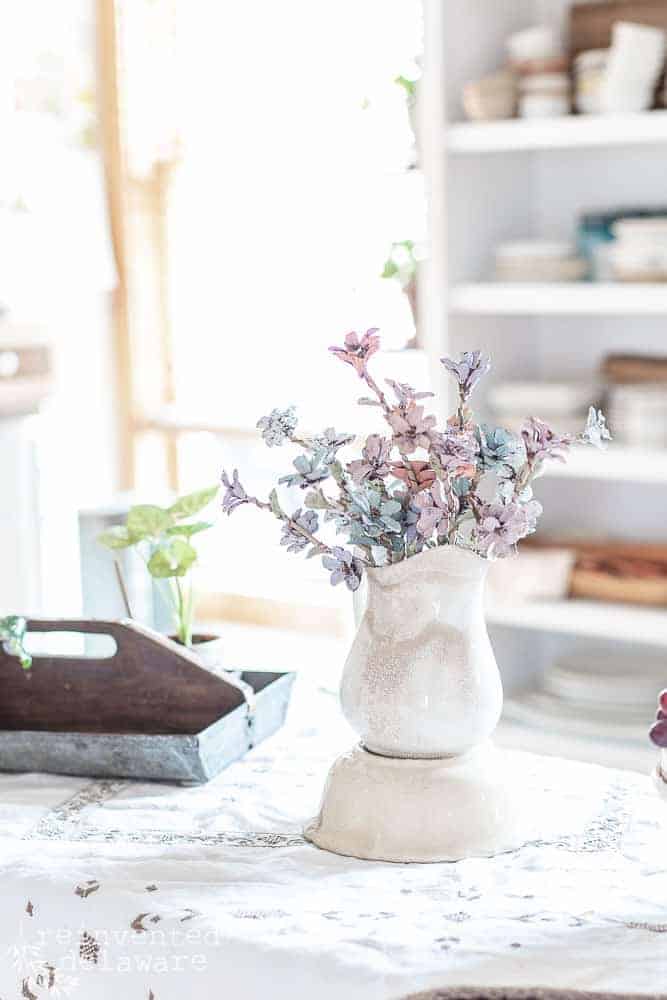
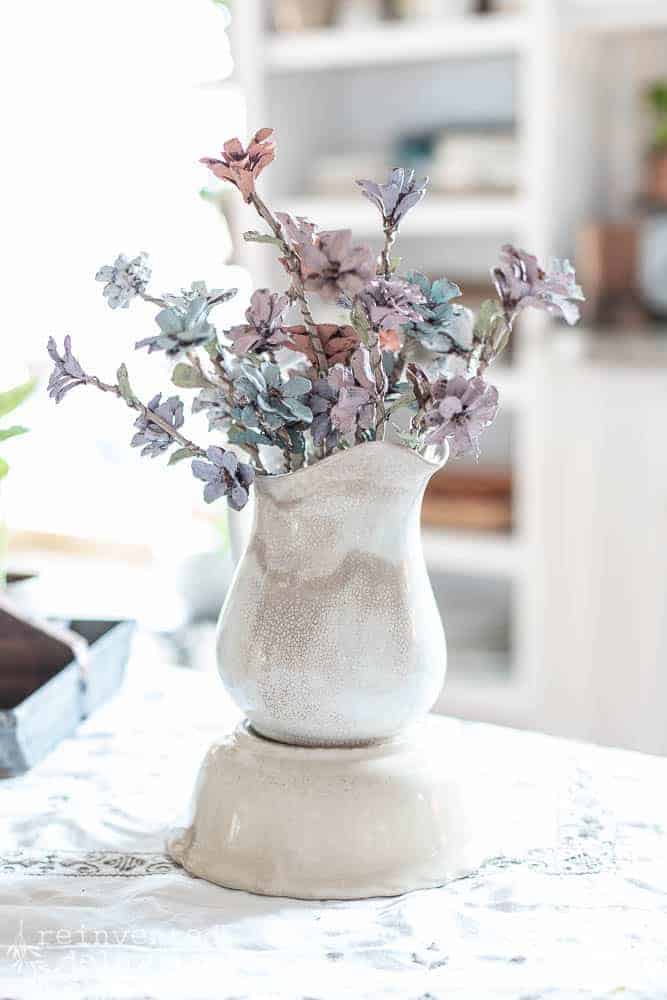
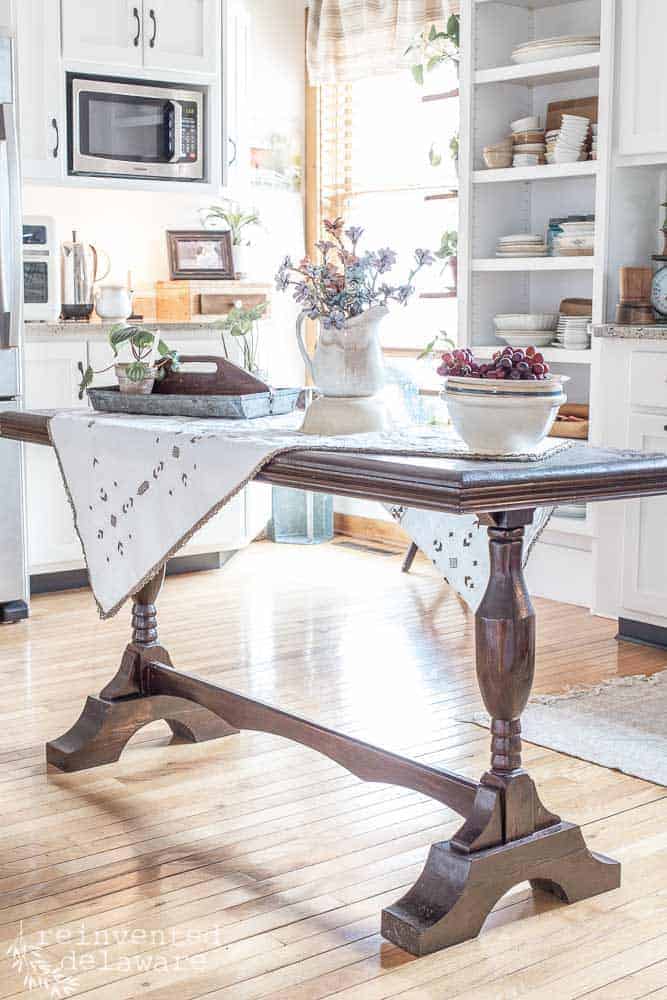
Then grab the container you want your arrangement in – I used an ironstone pitcher – add a piece of floral foam inside the pitcher and cover it with floral moss to hide the foam. A vintage floral frog would work great for these delicate flowers, too.
Floral arranging is not my strong suit, that’s for sure! Fortunately, the free-form aesthetic is popular! When you add your floral stems to the foam, arrange them how you see best, bending the stems as you need to.
So, what do you think? Isn’t this pine cone table centerpiece perfect for spring? This sweet little arrangement is sitting on our $2 communion table in the kitchen currently, and it makes me smile every time I pass through the kitchen.
Simple decor like this is my favorite. How about you? Do you like simple decor for your home?
BTW, that table will be painted in the next few weeks – sign up for our email so you don’t miss it!
decorating with pine cones
You can make so many projects with pine cones, but most of them are Christmas or winter-themed. That’s one of the cool things about these pine cone table decorations – these floral stems are intended for spring and summer!
Here’s another great thing about these pine cone flowers – change the paint colors for different seasons! Can’t you see these in all the fall colors that mums come in?
And for winter?? They could be painted in a variety of whites and add a little glitter! That sounds like another post!

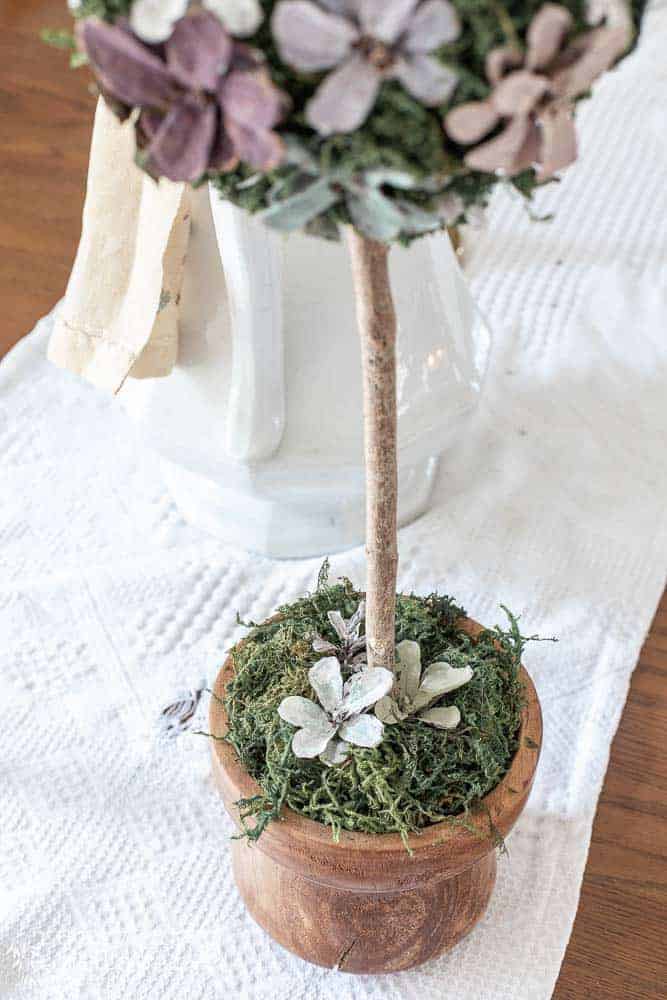
DIY pine cone table decor centerpiece
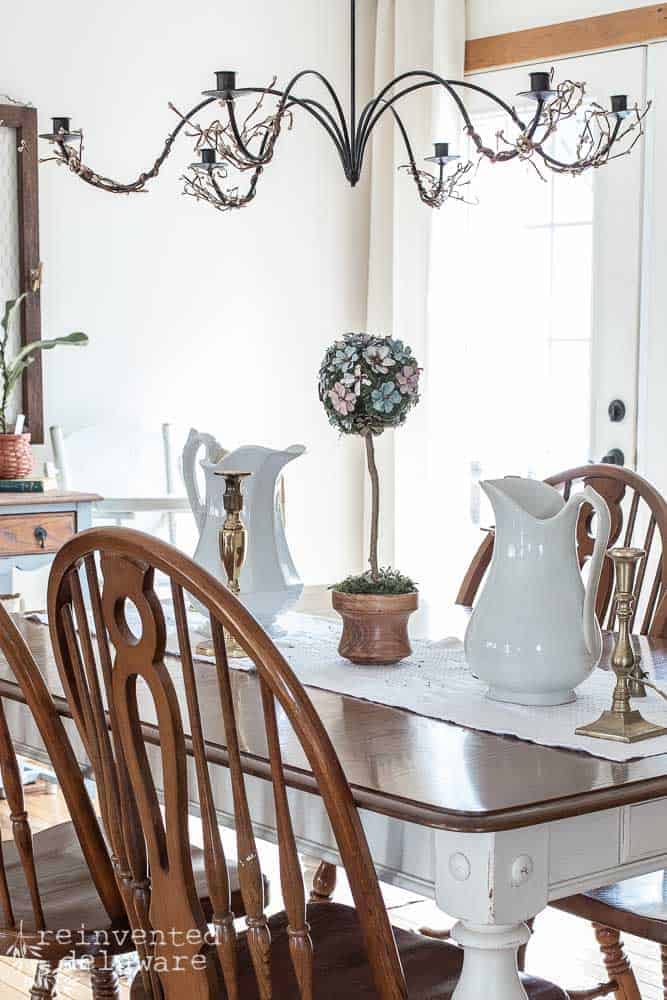
There was a lot of pine cone flowers leftover and they had to be used up. You will never believe what the sphere is made from!
It’s a balled-up piece of heavy craft paper covered in floral moss! My craft cabinet was empty in the styrofoam ball department!
Isn’t this pine cone topiary adorable? And it cost next to nothing – pine cones from my yard, a stick from my yard, leftover moss from several projects, and hot glue!
Btw, my hubby hand-carved the wooden bowl it sits in. He makes them in his workshop in the evenings after work. Isn’t is gorgeous??
how to decorate pine cones for spring
If you love decorating pine cones, incorporate them in your decor all year round! My favorite way to use pine cones in the spring is to make these hand painted pine cone flowers and paint them in a bunch of different colors.
They can also be attached to a spring pine cone wreath, or you can make a topiary like the design above!
FAQs
do you need to bake pine cones for crafting?
My pine cones were collected last Christmas from our yard and sat in a box in my garage for a year before making anything with them. If you collect pine cones for this project, you should take some time to clean your pine cones to get rid of the little critters that can live inside. Just soak them in a sink of water with about half a cup of white vinegar, then bake them at 200 degrees on a tray for 2-4 hours or until fully dried before using them in your DIY project.
how do you make flowers with pine cones?
There are two techniques to make the perfect pine cone flowers. My favorite technique requires you to remove the individual petal-sized pieces of the pine cones and then paint them before adding them to a wire stem. They are moldable and look surprisingly realistic!
Another option is to cut the pine cones in half, then paint the pine cone bottoms to look like zinnias and the tops to look like pretty daisies. Then, attach them to a wooden skewer with a glue gun. This technique is faster and works well especially if you want a fun craft for kids, but the first method looks like something you’d buy from an upscale home decor shop.

more ideas with pine cones
If you love decorating with pine cones, be sure to save these pine cone projects for the holiday season:
DIY Pinecone Wreath with Acorns
Cheap DIY Farmhouse-Style Christmas Ornaments
How to Make a Twig Wreath with Sparkly Pinecones
Simple Christmas Gift Wrapping Ideas
more inspiring posts!
Miss Mustard Seed’s milk paint has been used a lot in our workshop over the years. Here are two furniture makeovers that are popular on Pinterest.
flower pine cone table decorations
Did you enjoy this pine cone table decoration tutorial? Let me know in the comments if you would like to make these florals for your home! What kind of container will you put your floral arrangement in? Tell me about it in the comments – I would love to hear your plans!
DIY pine cone flowers YouTube video
Some of us like to watch projects unfold before our eyes, so here is the video I made for you about this colorful pine cone craft!
Be sure to subscribe to my YouTube channel while you are over there. We make a new video each week!


Pin the image below to your home decor and spring decorating boards! Just click the pin button at the top left corner!
DIY Pine Cone Flowers
Equipment
- Miss Mustard Seed’s� Milk Paint – Shop
Materials
- pine cones one pine cone makes 3 flowers; mine are from my yard
- paper-covered 18 gauge craft wire 18″ long not exactly what I found at my local Walmart – check your Walmart for the exact wire I used!
- thin brown craft wire
- pointed floral clippers
- heavy wire cutters
- artist paintbrush
- floral foam
- floral moss
- Miss Mustard Seed’s Milk Paint in the following colors:
- Bergere
- Dried Lavender
- Arabesque
- Mustard Seed Yellow
- Layla’s Mint
Instructions
- Cut apart the pine cones using pointed floral clippers. Cut each pine cone in 3-4 flower-like sections.
- Mix the milk paint and allow it to sit for a few minutes to allow the dry paint to absorb the water. No need to mix if you are using pre-mixed paint. Paint the pine cones in a variety of colors to match the season.
- Prepare the stems by cutting the heavy 18 gauge wire with heavy wire cutters into 8-9" lengths.
- Assemble the flowers by wrapping the thin craft wire through the petals of the pine cones and then around the heavy gauge stems. Wrap enough to secure the pine cone flowers firmly.
- Make as many flower stems as you need and use them to make a free-form floral arrangement.
Video
Notes
Thanks for joining our journey!
Thanks so much for joining us for this post! Join our journey so you don’t miss any fun projects, tutorials, and inspiration we share with you each week! You can follow us on Instagram, Facebook, and YouTube. We share even more inspiration on Pinterest!

Visit my Amazon Storefront!
Click the button below and head over to our online shop on Amazon!


Hi Cindy! I am totally smitten with this cute idea. Pine cones are my go item to decorate with all year around and now I have another way to repurpose them. Thanks for sharing this beautiful diy decor idea. Pinned X2 because it’s phenomenal.
xo, Do 😘
Aren’t pine cones the best?? So glad you enjoyed the post and thank you so much for pinning two times!! I appreciate it my friend!
How smart to create a bouquet with pinecones! Love this idea, and the colors you chose are so pretty!
Aren’t they fun to work with? So glad you enjoyed the post Julie!
This ENTIRE site is just a dream! Oh my goodness!
Omgoodness, thank you so much! Blogging is alot of work but so rewarding 😊
Thus fantastic. I have seen these as Zinnias before. For me these soft colors are perfect.
Pinned and now I’m going to try this idea!
The pine cone flowers could be painted for any season! That’s what I love about them 😊 Happy crafting Cindy!
I LOVE the colors you chose for this project. I am so inspired to try this at home. Thank you for sharing another wonderful idea with your readers.
So glad you enjoyed the project, Anna! Thanks for stopping by! 😊
Cindy, this is a really great craft project. Love the flowers and how you created it out of pinecones. Pinned!
Thanks for pinning Tammy! 🥰
GENIUS!!! These are BEAUTIFUL, Cindy!!! Man, you are SO creative. I’m obsessed with these. You have them styled so lovely.
Thanks Rachel! I’m excited to make more for other seasons 😊
Thanks, Cindy, for posting this project using pine cones. I have quite a few that I have used in various ways but have always wanted to make flowers from some without being able to quite figure out how to put them together. The suggestion for the pointed floral clippers is really what I needed. My clippers are short and I’ve tried to use them with much frustration and no success! I’ve placed my order for the pointed ones and now look forward to adding some new “flowers” to my areas.
The pointed floral clippers were a game-changer for this project! I tried using regular wire cutters and they made a mess! So glad you enjoyed this project – if you make them for your home, email me a picture! I would love to see them 😊