DIY Beatrix Potter Toy Cabinet Makeover
Create a charming Beatrix Potter inspired diy toy furniture makeover with this easy to follow tutorial. Add a touch of nostalgic charm to a child’s wooden toy china cabinet with this budget-friendly upcycling project.
In this tutorial, I’ll guide you through the step-by-step process of breathing new life into miniature wooden furniture with a Beatrix Potter-inspired makeover that captures the nostalgic charm of these timeless stories.
Whether you’re creating a special nursery piece or a treasured play item, this simple upcycling project promises to delight both children and the young at heart.
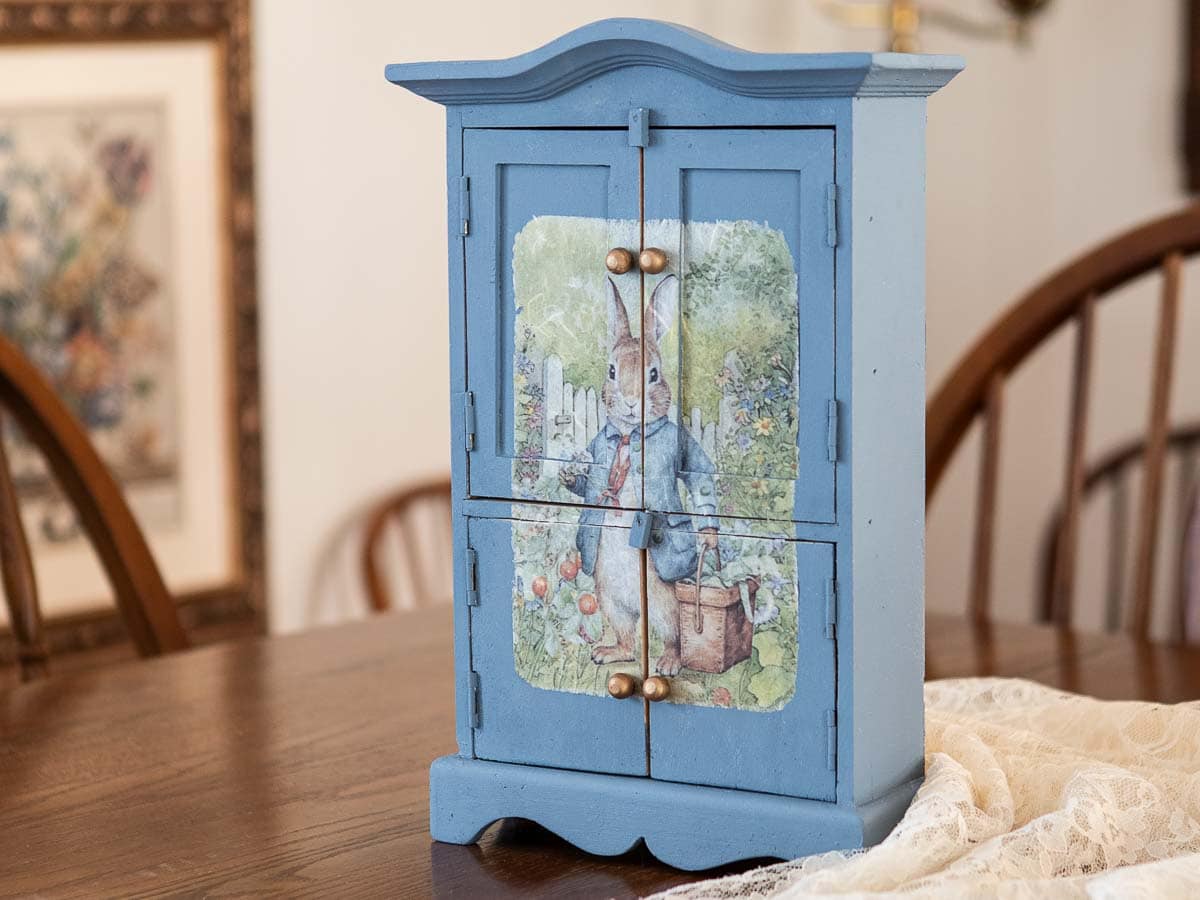
diy toy cabinet makeover
When I discovered an old, forgotten toy china cabinet at the thrift store, I immediately envisioned it transformed into something magical from the pages of a beloved children’s classic.
There’s something irresistibly charming about Beatrix Potter’s whimsical world of Peter Rabbit, Mrs. Tiggy-Winkle, and Jemima Puddle-Duck that translates beautifully into children’s home décor and playroom furniture transformation.
Upcycling thrift store finds is a great way to bring a one-of-a-kind look to your home. You can also create the cutest toy items for your children with these sustainable toy makeover techniques!
The following post may contain affiliate links. That means if you click and then buy something, I will make a small commission at no additional cost to you! Thank you for supporting my blog. full disclosure here.
This post is sponsored by Dixie Belle. All opinions are my own!
Supplies for a Peter Rabbit Themed Cabinet Makeover
Here are the supplies I used to create this adorable Peter Rabbit themed toy cabinet makeover and restoration:
- Peter Rabbit themed decoupage paper
- thirfted children’s toy furniture (mine was only $4!)
- custom mixed chalk paint (Dixie Belle Nautical & Serenity)
- Clear Top Coat in Flat
- Antique Gold Gilding Wax
- Bonding Boss
- paintbrushes
- fine grit sanding pad
- utility knife (this one is ergonomic)
- small flexible hand saw

Step by Step Toy Furniture Restoration Process
These are the easy steps I took to upcycle this children’s toy hutch into a beautiful painted toy furniture DIY project.
step one: clean and sand the wood
The small toy wooden furniture piece seemed pretty clean but I wiped it down with a damp microfiber cloth. Then I gave it a light sanding with a fine grit sanding pad. I removed the dust with my dustbuster (a must have in the craft room!)
While I was cleaning and sanding, I saw that the veneer on the back of the toy furniture was peeling away. I added some wood glue using a small paintbrush and blue painters tape to hold it down while it dried. You could also use hot glue for this easy toy furniture repair.
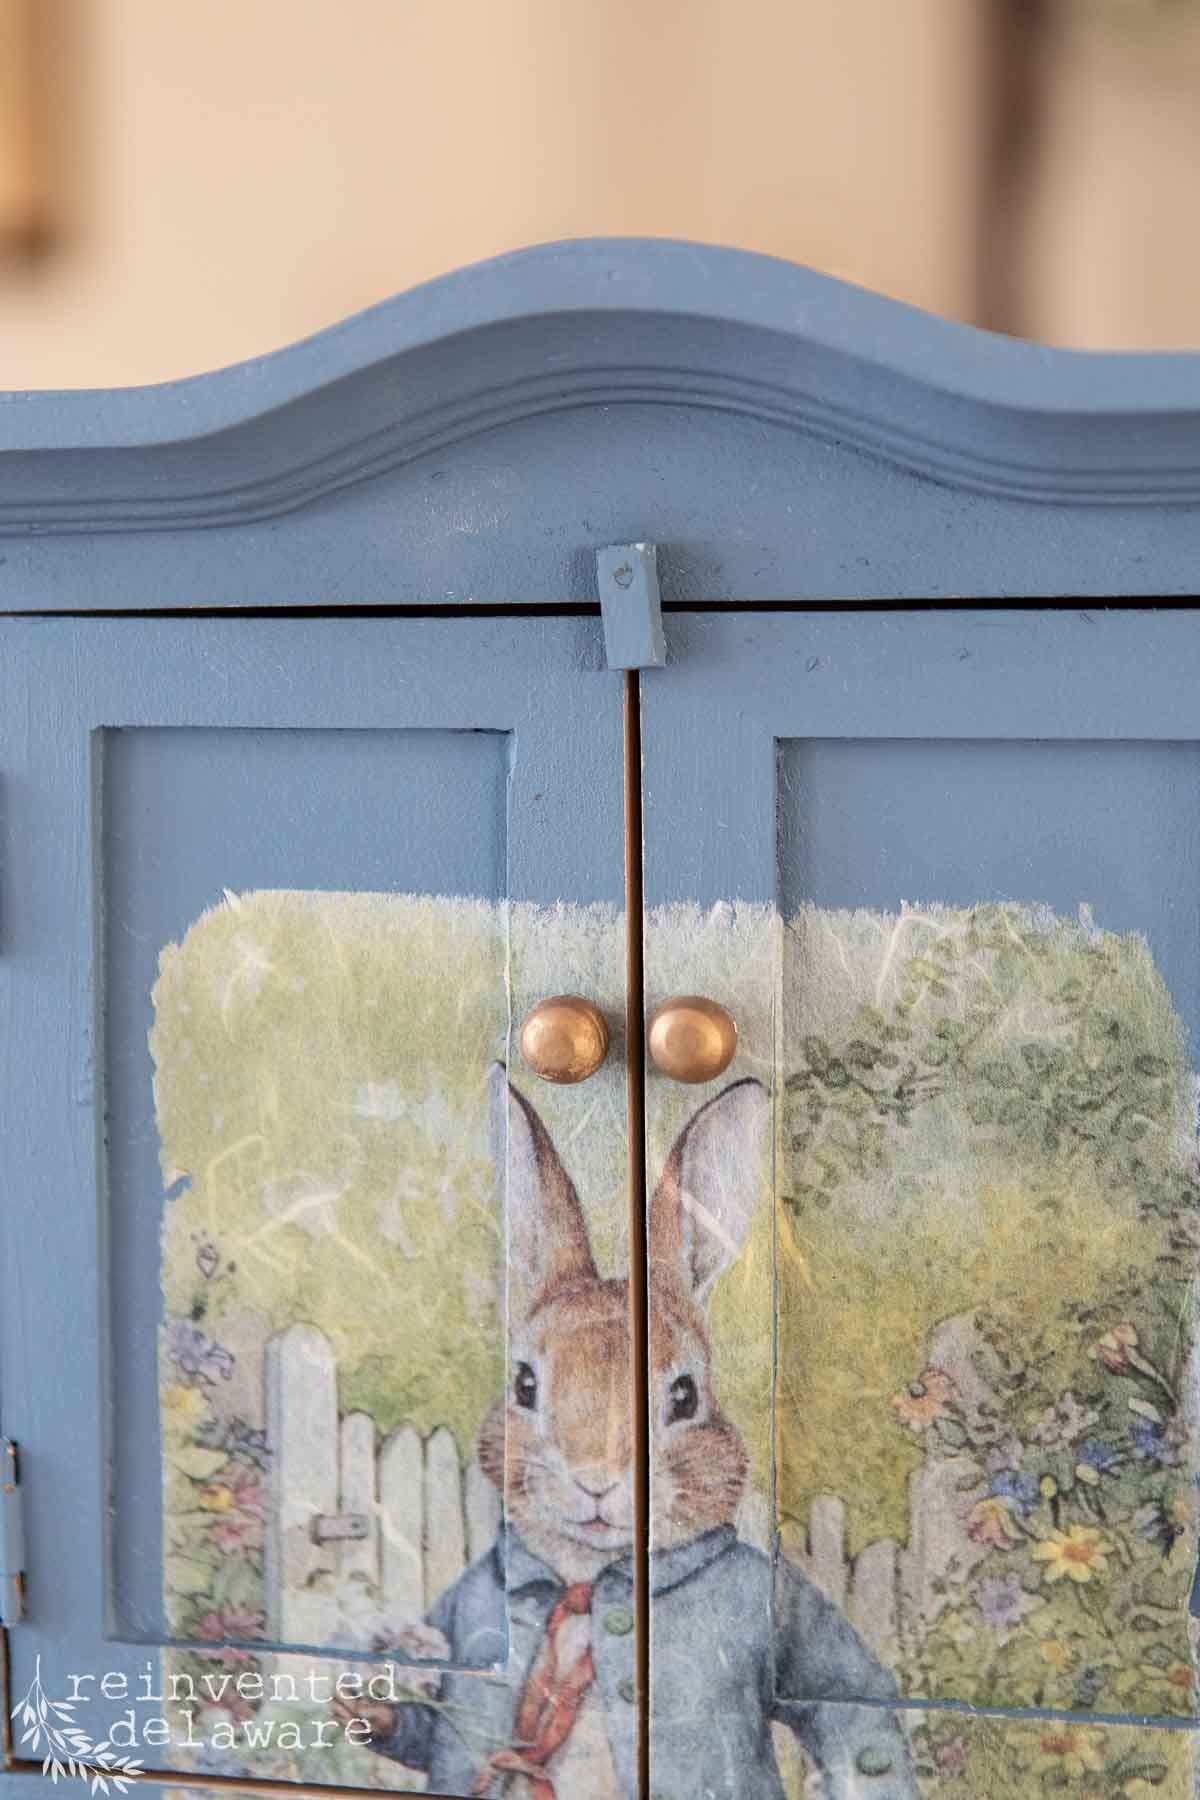
Before I primed and painted, I removed the tiny wood door pulls. I wanted them to look like brass and this was the easiest way to accomplish that. Also, the door ‘hardware’ would be in the way of the Peter Rabbit design.
A small flexible saw is the perfect tool for this DIY toy furniture transformation! I simply laid the saw flat on the surface and with a couple of pulls, the knobs were off. I set them aside for later.


step two: prime and paint the wood toy furniture
Next I applied one coat of primer for this child’s furniture paint tutorial. The wood is pine and I didn’t want any bleedthrough or knots showing.
If you choose a very light color of paint, you may want to add two coats of primer to insure the knots will not show through. If you choose a dark color of paint, you could skip this step in your toy furniture refinishing process.

While the primer dried, I dug into my paint stash. I didn’t have any of the blue color I wanted to go with this Peter Rabbit decoupage paper! Agh! Then I remembered that Dixie Belle has an online color mixing tool.
All I needed to do was upload the image that I wanted to coordinate the paint color with. In this case it was the Beatrix Potter decoupage paper. I grabbed a screenshot from the Dixie Belle site and uploaded it into the Color Mixer. Next, I grabbed two paint colors I had on hand and entered the information for the paint colors.


The Color Mixer gave me several options to choose from. Once I made my color choice, the Color Mixer also told me the quantities to use of each color to reach the desired color I wanted. Isn’t that amazing? I didn’t have to buy additional paint – I could use the Dixie Belle colors I already have on hand to get the perfect color for this children’s toy hutch makeover and play furniture upcycling project!
The miniature furniture piece got two coats for perfect coverage in this toy furniture makeover.

choose decoupage paper to suit the children’s toy furniture you purchase!
step three: apply the Peter Rabbit decoupage paper
The decoupage paper I chose came with three different coordinating designs. I was able to make two different projects from this paper, one for each of our granddaughters! The other project is a thrifted frame art piece that is to die for!
First, I separated each of the three designs. Then I positioned the Peter Rabbit design over the miniature toy furniture to get an idea for the layout for this vintage toy furniture update.
I wanted a distressed edge on the decoupage paper design so I used a fine grit sanding pad to sand away the clean cut edge. This creates a torn look for an authentic children’s furniture before and after transformation.


thanks for being here!
I hope you are enjoying this project! Let me know if you have any questions. Or leave me a comment to tell me about your project and ideas!
thanks, Cindy 😀

The bottom section of the wooden toy hutch is flat so I applied the bottom section of the decoupage paper first. One thin coat of clear top coat will act as glue. Once the thin coat was on, I carefully laid the decoupage paper down and smoothed it out.
The top half of the toy cabinet has a recessed area so I needed to cut the paper to fit. A utility knife made this task so easy. I created a video for this project on YouTube so I suggest you watch it. It’s much easier to watch how I did this on video for your own toy furniture painting techniques! You will see the video link later in this post.
Once the decoupage paper was completely on the surface, I applied a clear top coat to protect the whole design and painted toy cabinet.
I also added decoupage paper to the inside of the bottom section of this toy cabinet. It adds a little surprise when the doors are open in this kid’s wooden furniture refresh!


step four: add the hardware
This miniature furniture piece had wooden ball knobs. I wanted them to look like brass so I applied one coat of Antique Gold Gilding Wax. When I was finished, I used wood glue to reattached them to the toy hutch for a complete refurbished doll furniture look.
Miniature Furniture Makeover Results
This children’s toy furniture piece was so much fun to work on! Don’t you just love this playroom furniture transformation?? Our 2 year old granddaughter is going to love it too! I’m currently on the hunt for tiny dishes to place in this sweet upcycled china cabinet.
She will have years of playing with it as a little girl. I also think she will enjoy using it for girlie things like jewelry storage or other treasures as she grows up – truly a sustainable toy makeover project that grows with your child!


Let me know what you think of this toy cabinet makeover in the comments below. Have you upcycled something similar? Tell me about your own DIY toy furniture makeover!
YouTube video
Spring Thrift Flips
watch the video for this project and more thrift store makeovers!
Recreate and Decorate
Join the Facebook Group and Share Your Projects With Us!


Thanks for joining our journey!
Thanks so much for joining me for this post! Join my journey so you don’t miss any of the fun projects, tutorials, and inspiration that I share with you each week! You can follow me on Instagram, Facebook, and YouTube.


Cindy Rust
Cindy has been decorating her home with thrift store finds for 40 years. She is an avid thrift store shopper who loves to makeover the items she finds into vintage-inspired home decor and furniture. When she isn’t thrift shopping or painting a piece of furniture, you can find her making homemade butter, working in her garden, or painting with watercolors.
click below to purchase supplies!
Visit my Amazon Storefront!
Click the button below and head over to our online shop on Amazon!