Upcycled Serving Tray: Cheap Christmas Diy Project
Transform an old serving tray into a stylish and functional piece with this simple and budget-friendly DIY project. Follow these easy steps to create your own upcycled serving tray.

The following post may contain affiliate links. That means if you click and then buy something, I will make a small commission at no additional cost to you! Thank you for supporting my blog. full disclosure here.
the benefits of upcycling
Upcycling and repurposing continue to grow in popularity. It is a great way to decorate your home on a budget. If you are a re-seller and have a vendor booth, it’s also a great way to earn a side income.
Not to mention that upcycling saves waste in landfills! It’s amazing that with simple supplies like paint and decorative elements like transfers, you can create a whole new look for a thrift store find like a wooden tray!
Let’s get started!

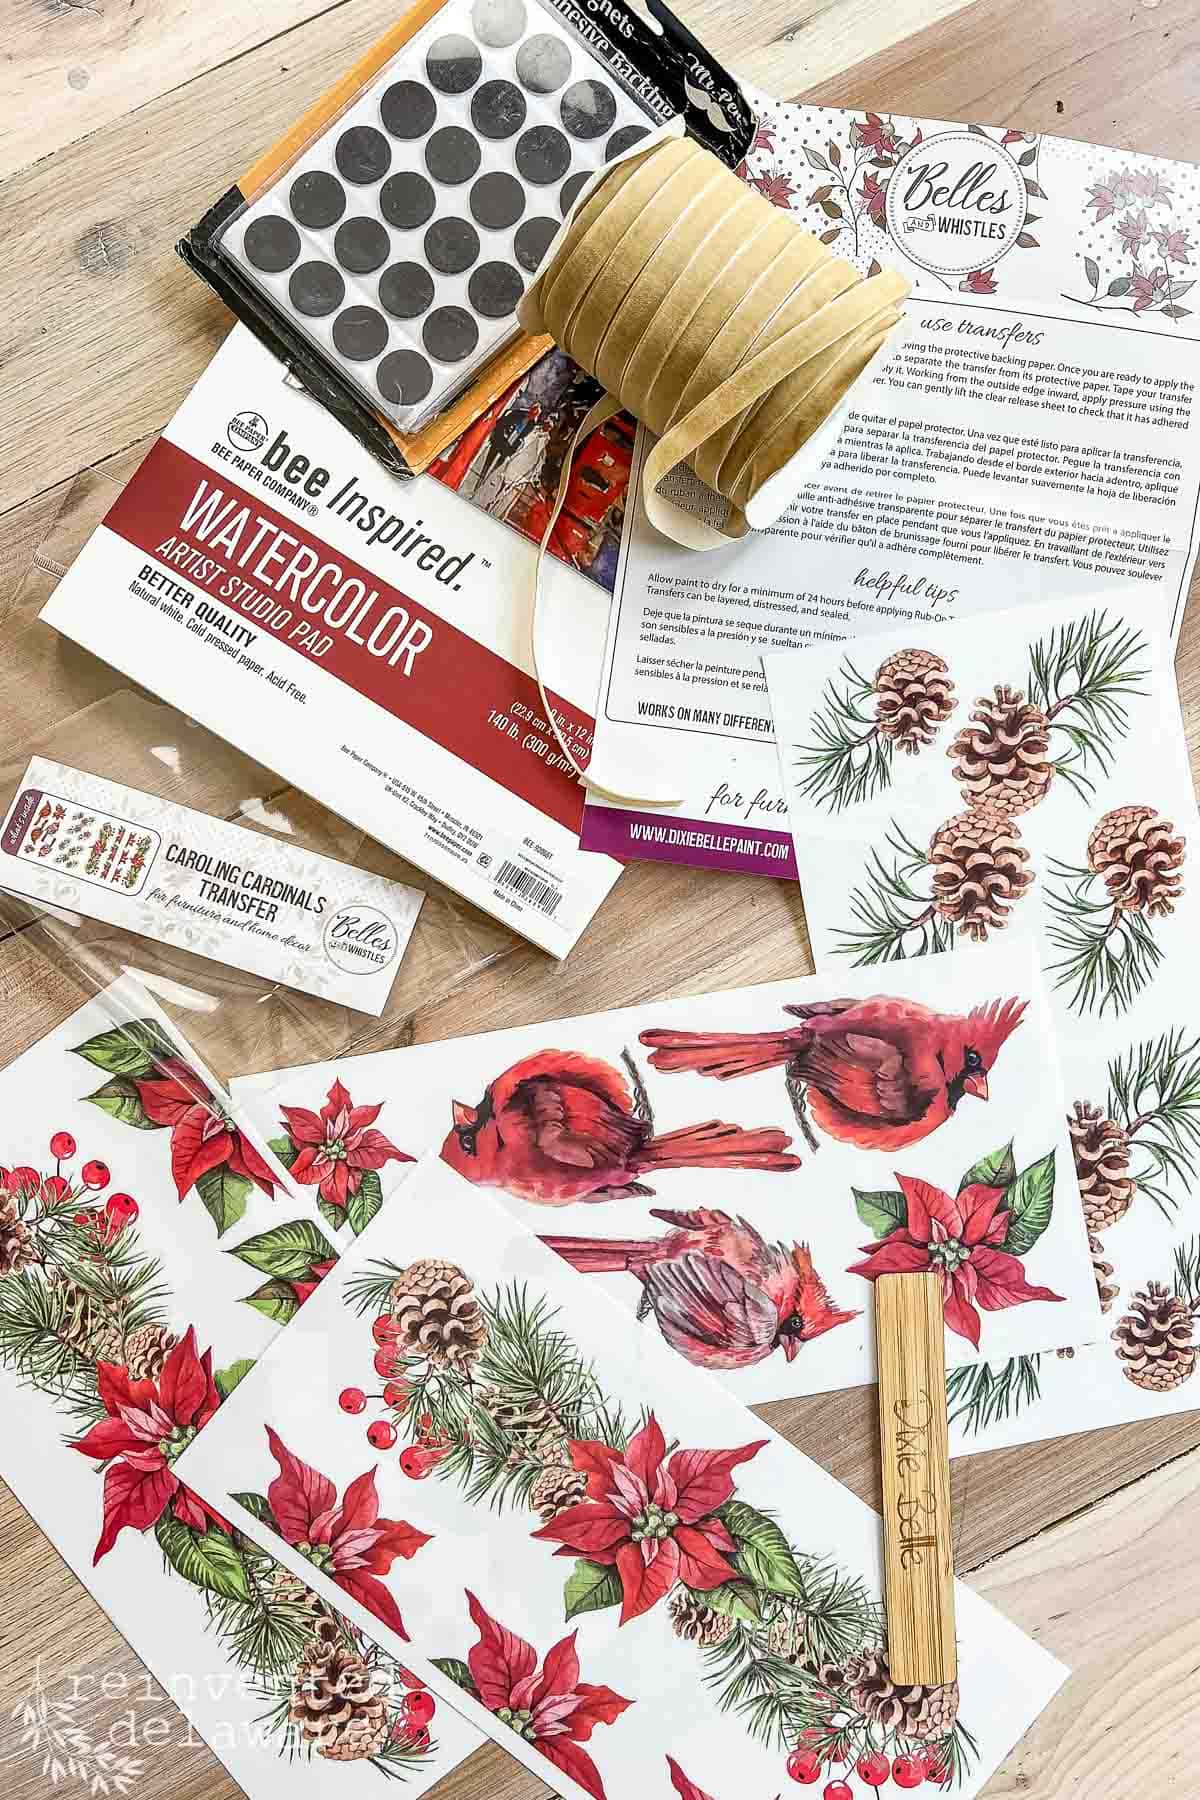
supplies for the project
Here are the supplies I used to repurpose an old painted tray I had in our home. I’ve provided links for your convenience. Wooden trays can be purchased at your local thrift stores.
- wooden tray
- cleaning supplies
- Goo Gone
- sandpaper
- Scrubb Daddy sponge
- paint of your choice (I used Dixie Belle Silk Paint in ‘Glacier’)
- paintbrush
- clear top coat (I used Dixie Belle Extra Coat in Satin)
- decorative transfers (Caroling Cardinals for my tray!)
step by step instructions
The look you are going for will determine some of these steps. My tray has been used in our home for several years so I knew the kind of use it had. If you purchase a used serving board at a thrift store, be sure you follow these simple steps!
preparing the serving tray
Cleaning is always first on the agenda with a thrift store makeover. Even though I have had this tray for years, it needed some prep work. I had recovered the surface with peel-and-stick vinyl wallpaper so that had to come off! (By the way, that’s a great way to use leftover vinyl wallpaper!)
After peeling the wallpaper off, I discovered a sticky residue left on the surface. Goo Gone works great at removing stickiness like this! I sprayed it on and then scrubbed it with a Scrubb Daddy sponge. Once the residue was completely removed, I washed it well with soap and warm water to remove the oily substance of the Goo Gone.
Next, I gave the surface a quick scuff sanding with 150 grit sandpaper. A little sanding will help with paint adhesion. You could also use a Dewalt sander if your tray needs more sanding.


painting the tray
Like I mentioned, this wood tray has been around awhile. I had painted it with a couple of coats of white paint years ago. I used Dixie Belle Silk paint and it has held up so well!
The existing white paint looks amazing but it is time for a change. It’s amazing what a little paint can do for a home decor piece!
I chose the color Glacier in the Silk line. It has a built in primer, paint, and top coat making it a durable paint for an item that will get heavy use.
Using a qualtiy paintbrush, I applied each coat of paint in even strokes. For the second coat, I painted in the opposite direction to create a slight texture. I allowed plenty of drying time between coats.

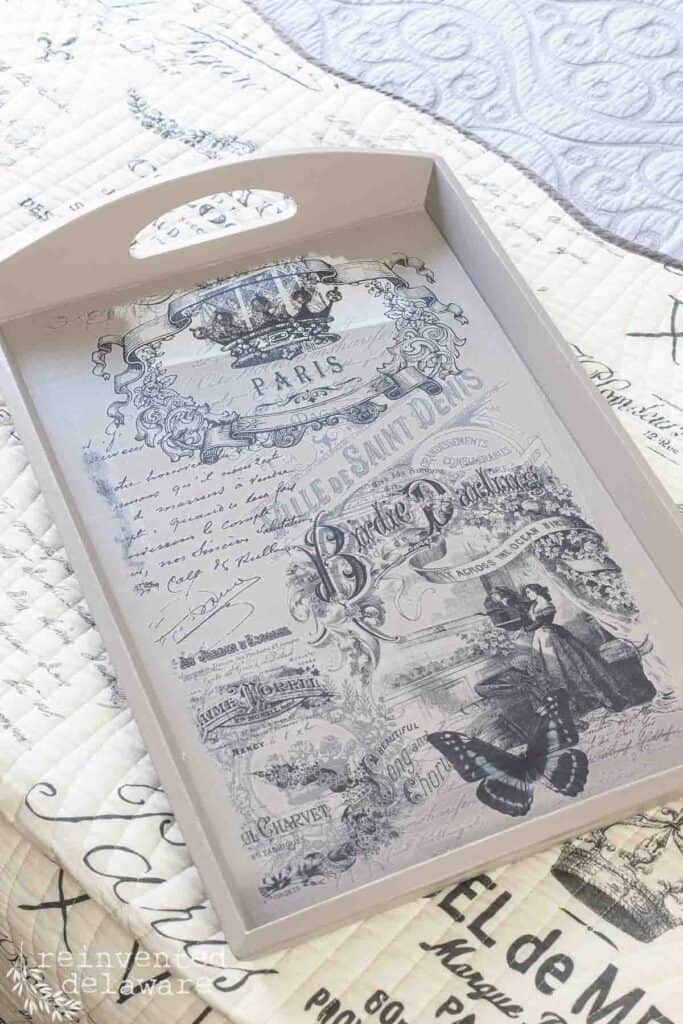
adding decorative elements
Once the paint was completely dry I decided it was time to turn this old boring piece into a beautiful Christmas tray! More than likely I will give this piece another makeover in the future. Change is certain in our home!
I’m using some pieces leftover from a transfer I used on a thrift store breadboard project as well as handmade paper ornaments. The transfer comes with so many different sections that can be used for many projects. It’s a great bang for your buck!
thanks for being here!
I hope you are enjoying this project! Let me know if you have any questions. Or leave me a comment to tell me about your project and ideas!
thanks, Cindy 😀

I measured the center of the piece so that I could line up the design. Then I used the leftover transfer pieces and laid them out the way I thought they would look nice. I kept the white backing sheet intact until I decided on the placement of each piece.
The main design of the transfer, Caroling Cardinals, is a poinsettia design. I found the center of the design and lined it up with my pencil mark on the bottom surface. The bottom corners of the tray have pine cones and pine branches for a festive look.


Here are the steps to apply a transfer:
- Decide on the placement of each transfer section.
- Peel off the white backing sheet.
- Lay the clear sheet face down on the piece.
- Use the rubbing tool over the top of the clear sheet to transfer the design onto the surface.
- Lift the clear sheet slightly to make sure all of the design is transferred. If it hasn’t, lay the clear sheet down and rub over the design again until it is completely transferred.
- Use the clear protective sheet over the design to burnish it onto the surface.
Adding decorative elements like transfers will create an amazing look to an ordinary piece. Choosing the design can be the hardest decision because there are so many possibilities!

applying a protective finish
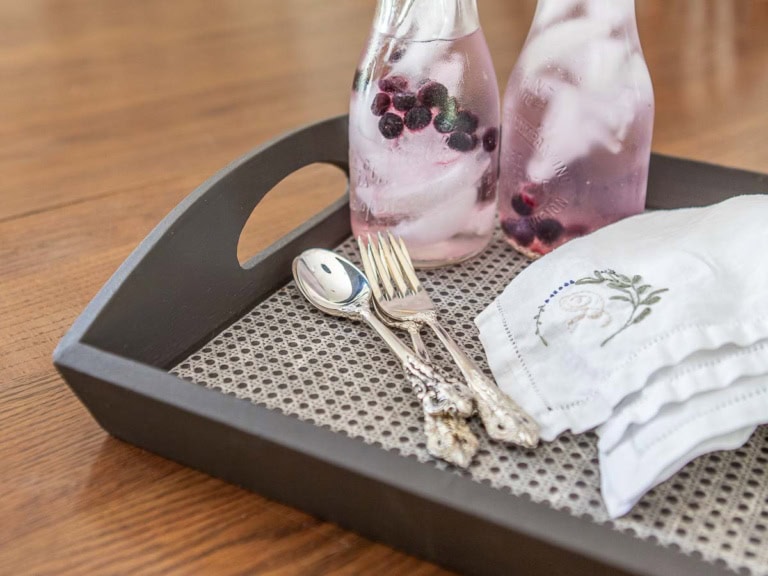
This tray will get a lot of use so an additional protective top coat is important. Two coats would add optimal protection but in the case of this wood tray makeover, I only used one.
It is important to allow the top coat to cure for a couple of days before using this serving board.

tips for a successful serving tray upcycle
Here are some tips to help you with your tray makeover. My best advice is to keep an open mind when you see old serving trays at thrift stores.
They can look pretty rough when you first see them and you might not give them a second look. But I encourage you to browse slowly so you can see the potential in these pieces.
Use these ideas to stir your creativity! I’m sure you are going to create something beautiful!
- Thoroughly clean the wooden tray to remove any grime.
- Sand the surfaces as needed and wipe away the dust.
- Choose the placement of the transfer design carefully to ensure a lovely result.
- Apply a protective clear coat to the surface for lasting results.
- Remove ugly ceramic tiles that are outdated.
- Glue feet on the bottom of the tray to create wood tray risers. Paint feet to match the tray.
- Cut spindles from an old chair spindle to create cute feet. Use wood glue to attach them to the serving tray.
- Add a variety of transfer designs to create the look you like
- Use a stencil to add a nice touch to the bottom of the tray.
- Add peel and stick paper to the tray to match your kitchen decor.
- Be sure to give this piece a good wipe down after each use.

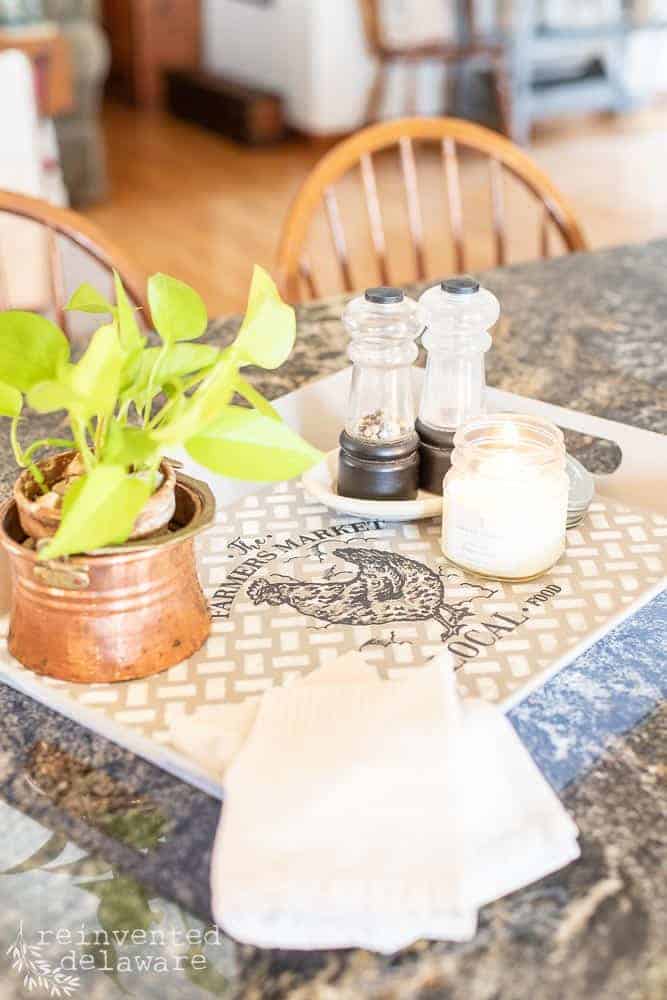
ideas for using a diy wood tray makeover
We’ve made several trays here at Reinvented Delaware. I’ve also given thrifted trays and makeovers on my YouTube channel. The links for those posts and videos are below!
I’m also sharing some other tray makeovers I found online! I’m sure you will be inspired by these talented people who love to upcycle and repurpose!
- The Easiest Upcyled Wooden Tray Makeover
- Thrift Store Makeover – Patriotic Serving Tray
- 16 Creative Thrift Store Makeovers
- Amazing Flea Market Flip Upcycle Ideas and Makeovers
- Creative Thrift Store Makeovers Full Video
- Upcycled Serving Tray
- DIY Wood Tray Christmas Style

wood serving tray FAQs
How can you use a decorative tray?
A serving tray isn’t just for the kitchen! You can use this tray in a guest room to hold towels, a bar of soap and other items your guest might need.
You can also use a serving tray in the bathroom to hold toiletries on the counter.
Can you decorate with a wood tray?
Yes! Use the serving tray on a coffee table to hold a pretty stack of books, candles and a small plant. If it is the holiday season, add a bowl of ornaments on top of the book stack!
Can you put a wooden tray in the oven?
No, you cannot put a wooden tray in the oven! This would be a fire hazard. Be sure to know what your tray is made of. Do not put a melamine tray, a plastic tray or a basket tray in the oven!

share your projects with me!
I’m excited to see the ideas you come up with for your upcycled serving tray! I’ve created a Facebook group so you have a place to share and inspire others.
Upcycling and repurposing is a great creative outlet that also benefits our planet. Let’s encourage others to repurpose by sharing our projects. I hope to see you in our group!
You’ll find more ideas for upcycling on my Pinterest page. Be sure to follow me there for more inspiration.
Merry Christmas to you and happy upcycling!
Recreate and Decorate
Join the Facebook Group and Share Your Projects With Us!
YouTube video
YouTube Video
Watch this makeover and more over on YouTube!


Thanks for joining our journey!
Thanks so much for joining us for this post! Join our journey so you don’t miss any of the fun projects, tutorials, and inspiration that we share with you each week! You can follow us on Instagram, Facebook, and YouTube. We share even more inspiration on Pinterest!


Cindy Rust
Cindy has been decorating her home with thrift store finds for 40 years. She is an avid thrift store shopper who loves to makeover the items she finds into vintage-inspired home decor and furniture. When she isn’t thrift shopping or painting a piece of furniture, you can find her making homemade butter, working in her garden, or painting with watercolors.
more serving tray makeovers!
Upcycling Junk: 3 Easy Ideas
You won’t believe what this serving tray looked like when I found it at the thrift store!
Melamine Serving Tray Makeover
Update a thrift store melamine tray with this makeover tutorial!
click below to purchase supplies!
Visit my Amazon Storefront!
Click the button below and head over to our online shop on Amazon!