
How To Make A Diy Advent Calendar (With Free Printables)
Countdown to the holiday season with a DIY advent calendar! This step-by-step guide includes free printables and fun ideas for creating an advent calendar your family and friends will love.
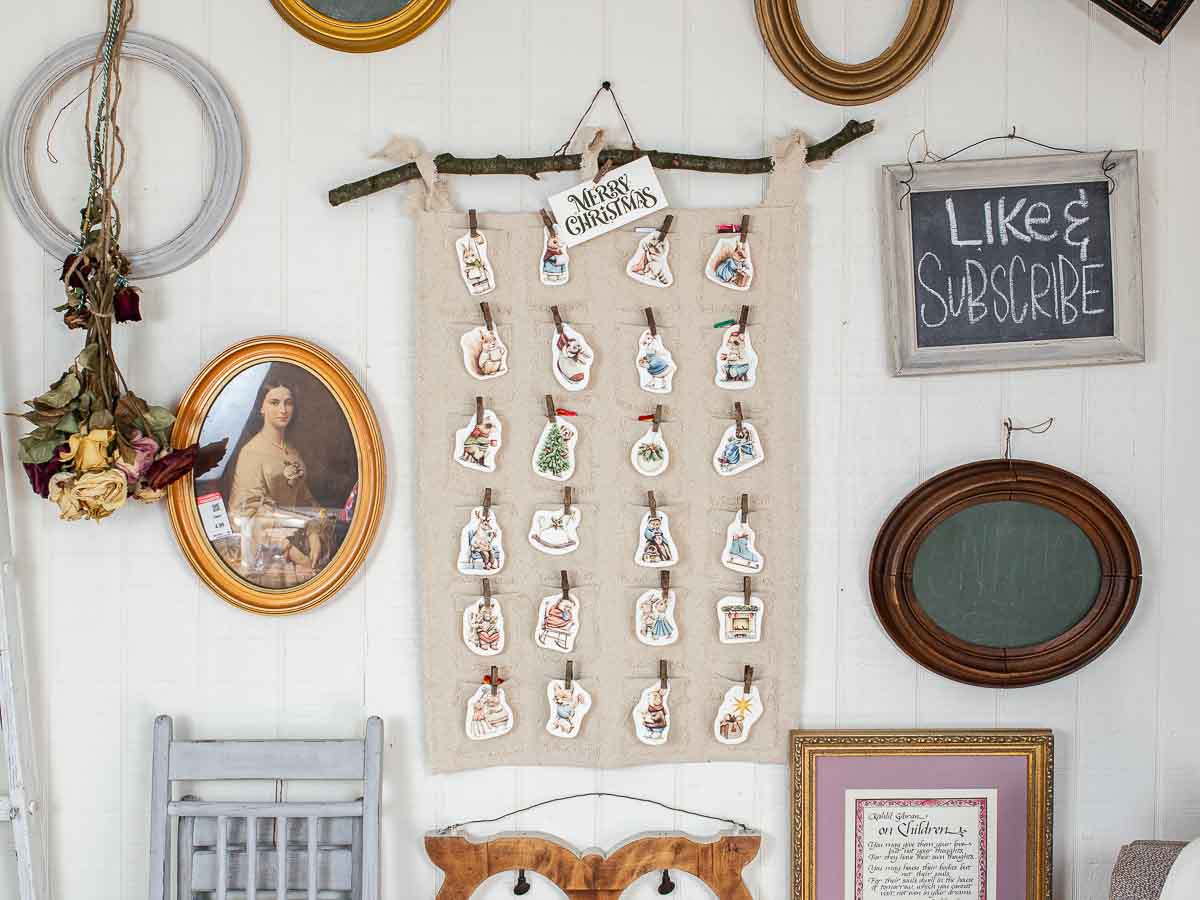
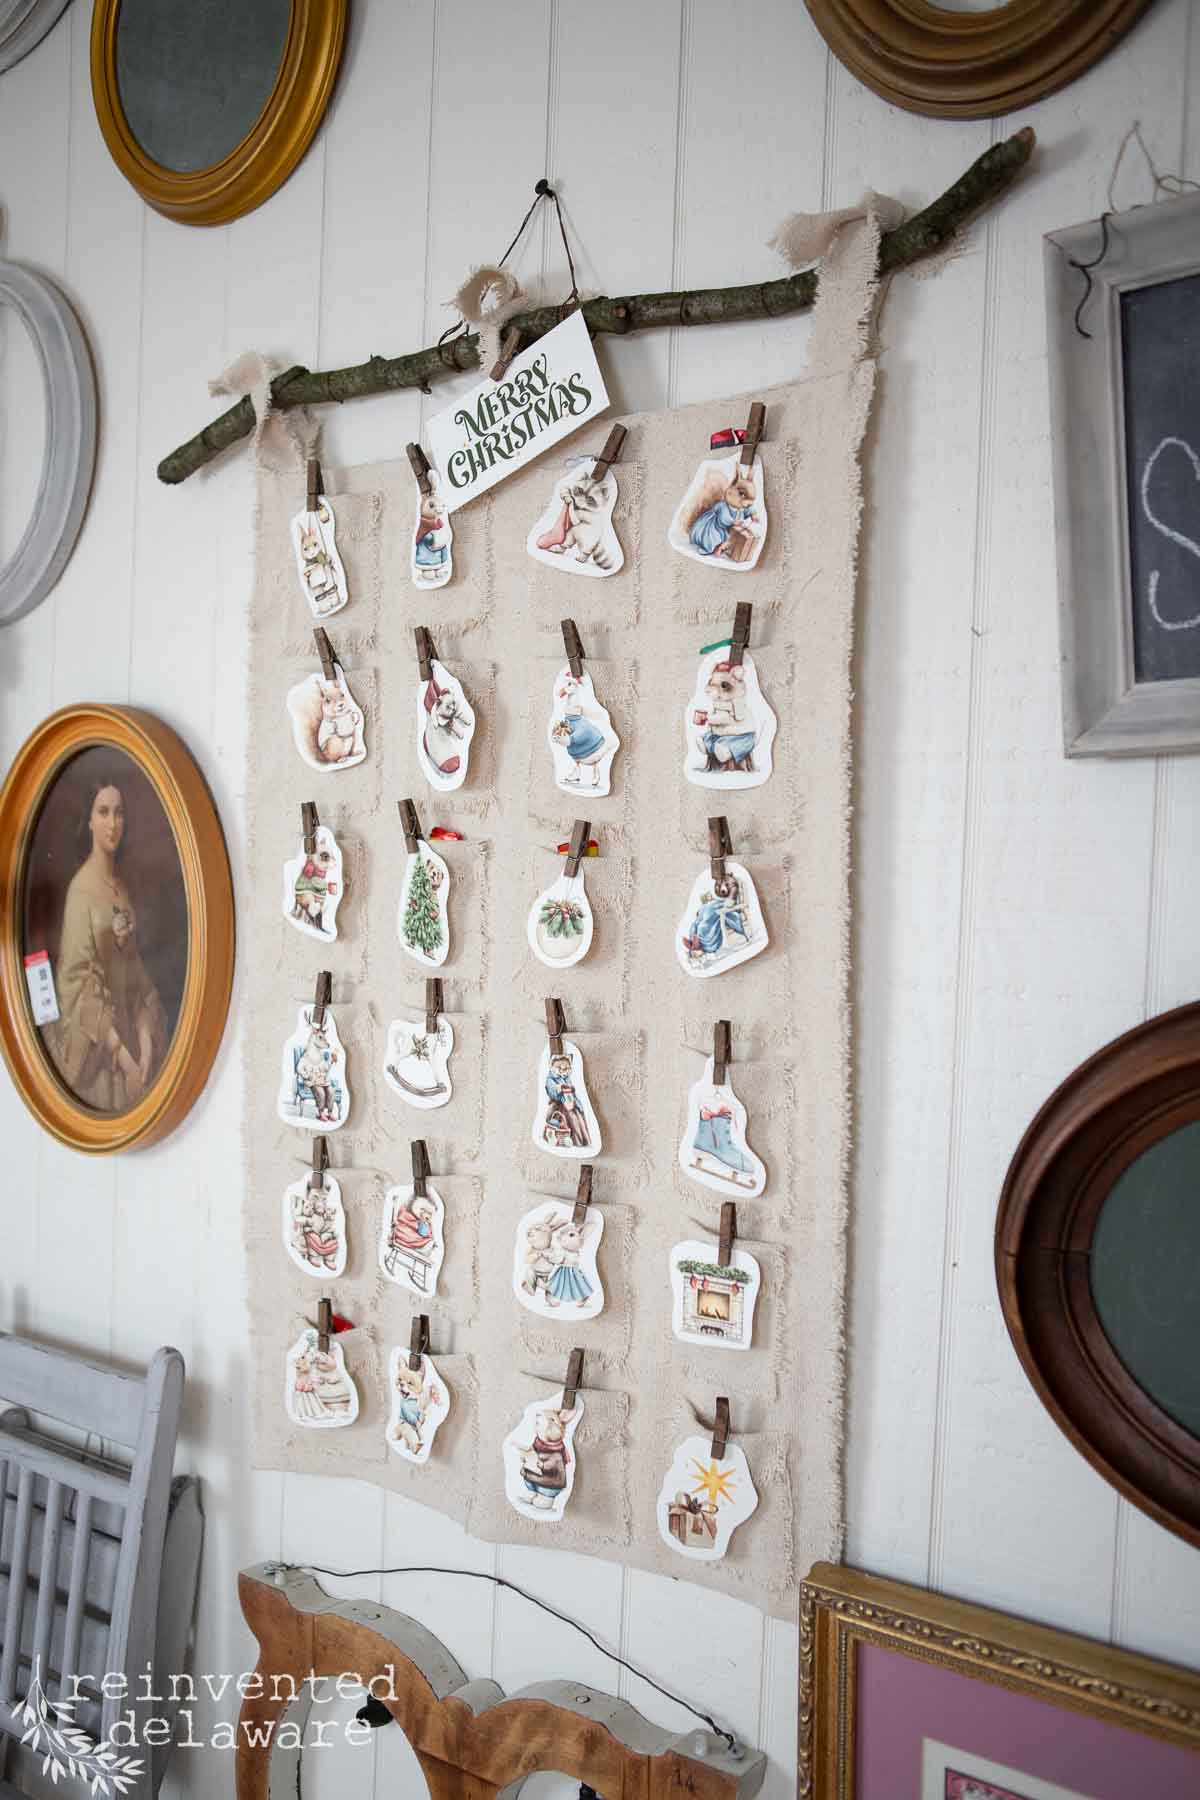
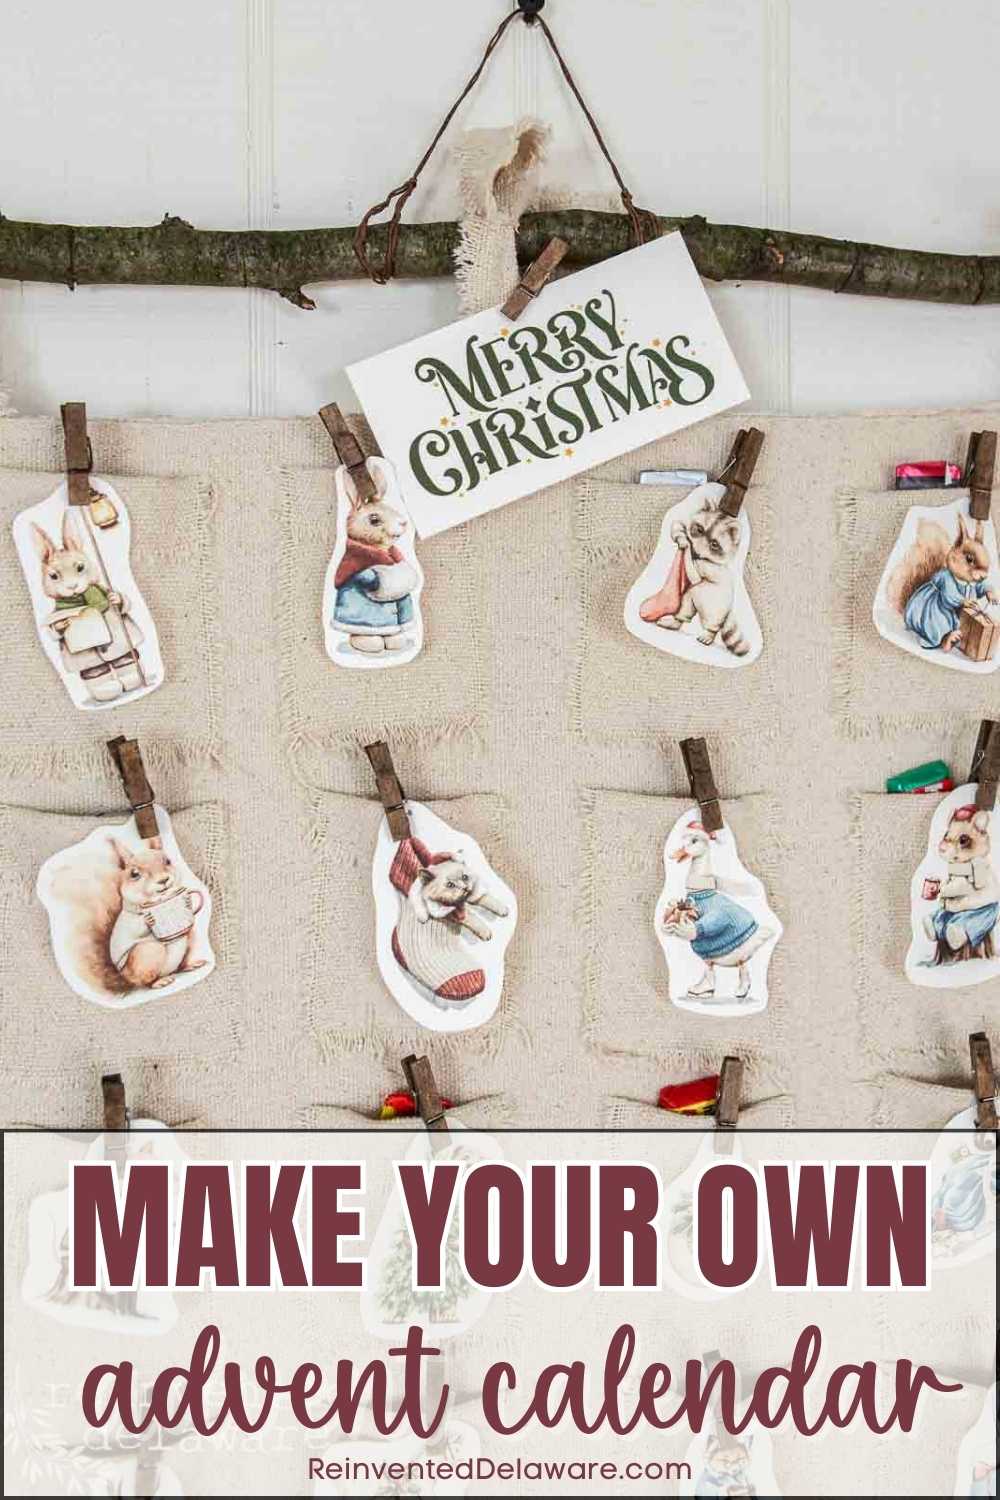
Begin the tradition of counting down the days until Christmas with this easy-to-make wall pocket calendar!
In this post, I will show you how to make a budget-friendly, no-sew advent calendar for your children or maybe for your grandchildren! I’m also sharing ideas for the grands from my blogging friends that you will enjoy!
Let’s get started!
The following post may contain affiliate links. That means if you click and then buy something, I will make a small commission at no additional cost to you! Thank you for supporting my blog. full disclosure here.
the tradition of advent calendars
The season of Advent began as a German tradition in the 1800s. Often, candles were lit to count the days until Christmas Day. Many people made simple marks on the doors and walls of their homes to count the days!
In the early 1900s, printed advent calendars became popular. They were similar to the page flaps found in children’s books with one flap for each day in the countdown. Sometimes there were scripture verses and scenes from the Bible portrayed under the flaps.
I found this article, The History of the Advent Calendar, very informative if you are looking for more info!
family traditions and inspiration
Having an advent calendar hasn’t been one of our family Christmas traditions. But I thought it was high time to start this tradition for our grandchildren!
By the way, several of my blogging friends are sharing how they celebrate the holiday season with their grandchildren. I’ll be sharing their posts at the end so be sure to go all the way to the end for more inspiration!
I decided that I needed an advent calendar idea that I could make quickly and easily. My advent calendar(s) would need to be inexpensive since I’m making three of them, one for each of our children’s families!
Another design detail I needed to consider was the color of the advent calendar. Our children’s homes are all decorated in different styles so this calendar needs to coordinate with each. The handmade advent calendars needed to fit in a box for mailing too.
supplies for an easy DIY advent calendar
Here are the supplies I used to create this adorable, neutral advent calendar. You will read more about the supplies as I move through the step-by-step tutorial.
- 1-yard grain sack fabric or drop cloth
- craft clothespins
- brown craft wire
- watercolor paper
- printer with color ink
- paper trimmer
- sharp paper scissors
- fabric scissors
- hot glue gun and glue sticks
- individual candies or your choice
step 1: choose your fabric
The fabric is one of the main features of the calendar. I wanted a neutral-colored panel with neutral-toned pockets. I happen to have some leftover reproduction grain sack fabric from one of my reupholstery projects so it was an easy decision.
You could also use dropcloth that has been laundered, heavy drapery weight fabric, heavy canvas, or even denim. Heavy muslin is another choice but you will need to add an iron-on stabilizer to give the fabric additional body.
Whatever fabric you choose, keep in mind that it will hold a bit of weight. The pockets will have candies or small gifts in them. Lightweight fabrics would sag and we don’t want that!

step 2: create the base and pockets
Let’s create the base of this wall-hanging advent calendar! The best part is it’s so easy to make and no sewing is required!
measurements:
- 1 section 18″ wide by width of fabric selvage to selvage
- 24 sections 4.5″ x 3″ for pockets
- 3 sections 1.5″ wide by 17″-20″ long for tie-ons
prepare the base panel
Rip the cut edge of the fabric across the width from selvage to selvage. Simply make a 1/2″ snip in the selvage edge and tear the fabric across to the other selvage edge.
This is kinda fun to do! Ripping the fabric this way creates a perfectly straight edge because the fabric will rip along the grain of the fabric.
Next measure over 18″, make another snip, and rip the fabric from selvage to selvage. This section is the back piece of the calendar.
prepare the pockets
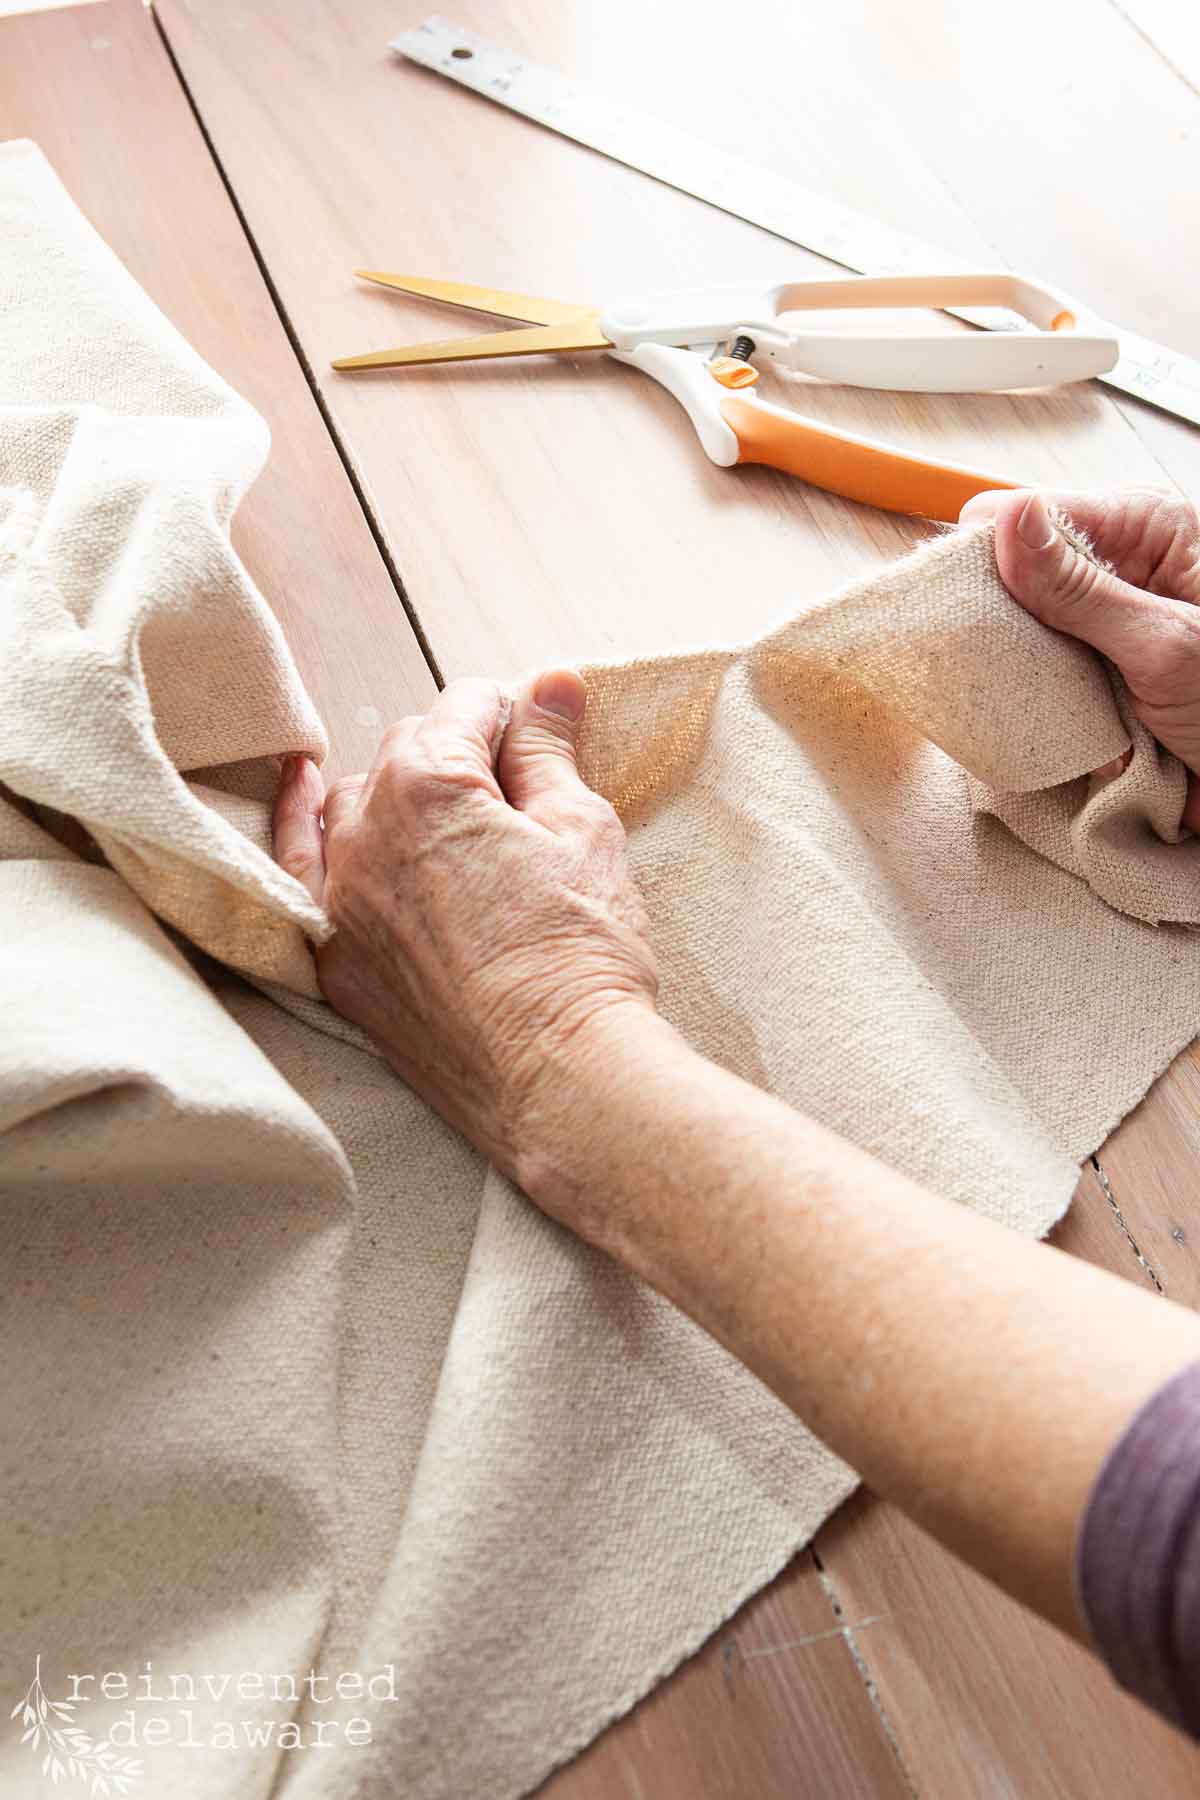
Using the same ripping method, rip two strips, selvage to selvage, 4.5″ wide. Then rip smaller sections from those strips measuring 3″. These are the rectangles that will become pockets to hold the goodies and woodland animal shapes.
Ripping all of this fabric will leave you will lots of threads all over the place! But trust me, it’s the easiest and fastest way to get the sections you need!

prepare the hanging strips
The last sections to rip will be the hanging strips. You can use leftovers or rip new strips: 1.25″ wide by 17″-21″ long depending on the look you want.
Keep any leftover fabric you have to create a small bag to hold the woodland creature designs I’ve created for you. You could also use a ziploc bag to store the little animal shapes until you are ready to add them to the advent calendar.
step 3: assemble the pocket wall hanging
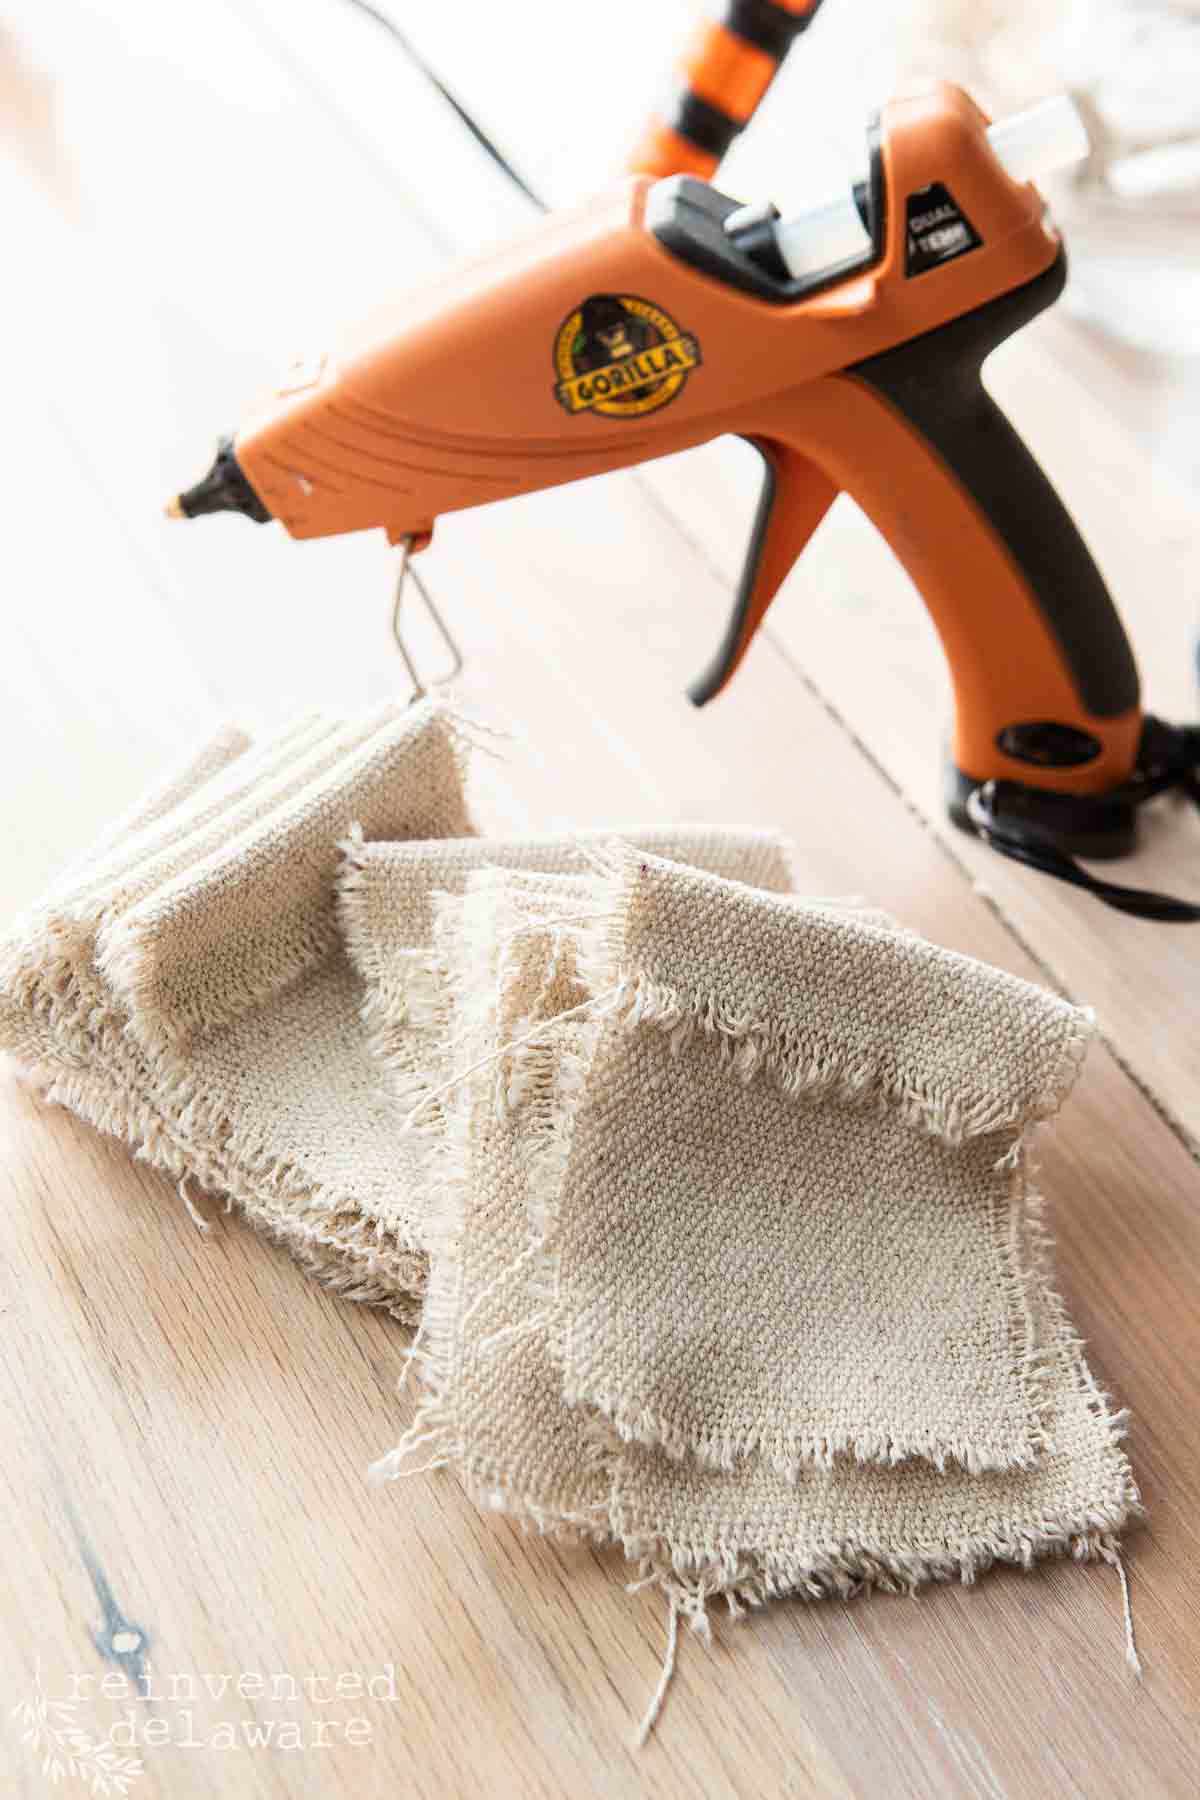
Heat up the glue gun and let’s put this beautiful advent calendar together!
assemble the back piece
Lay the back piece on the work surface and keep it folded in half. The folded edge will be the bottom of the calendar while the selvage edge will be the top. This short edge will also be the area where we attach the hanging strips.
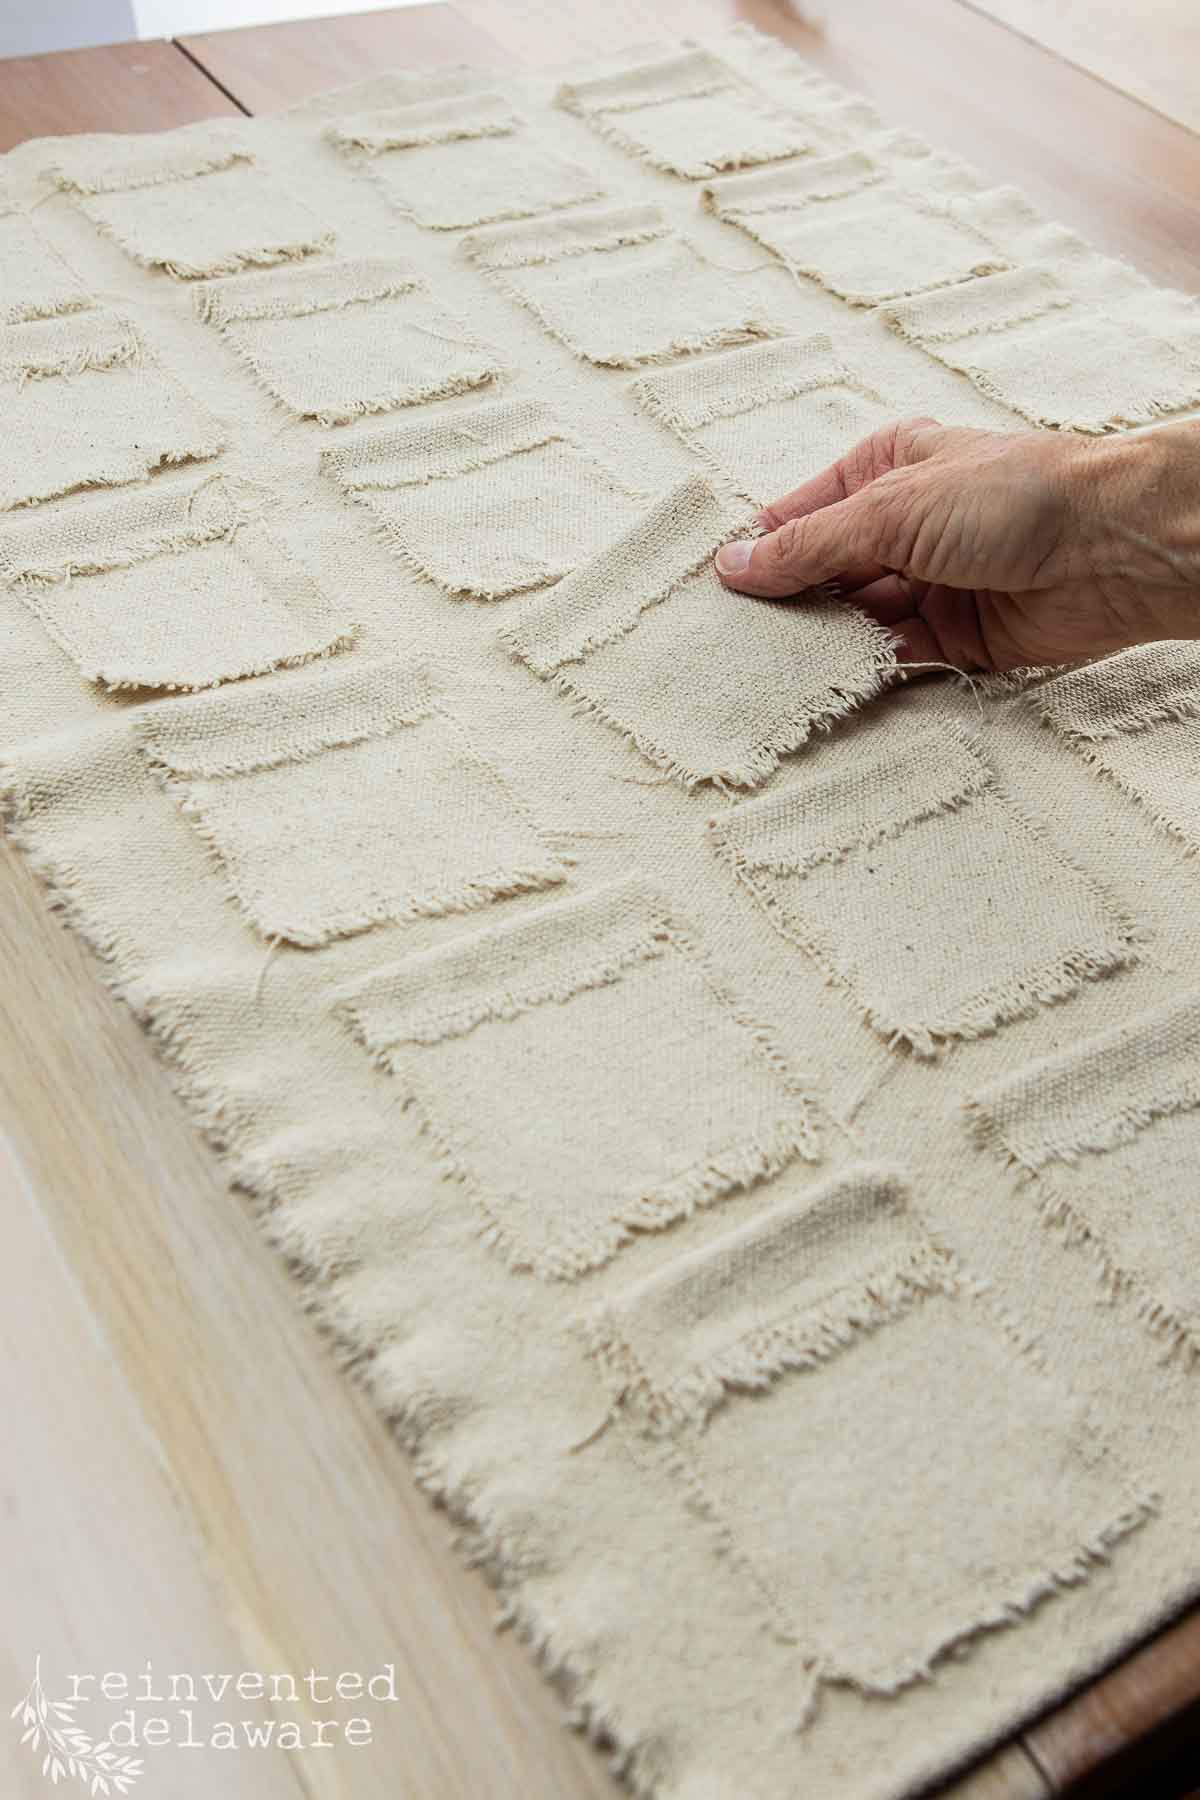
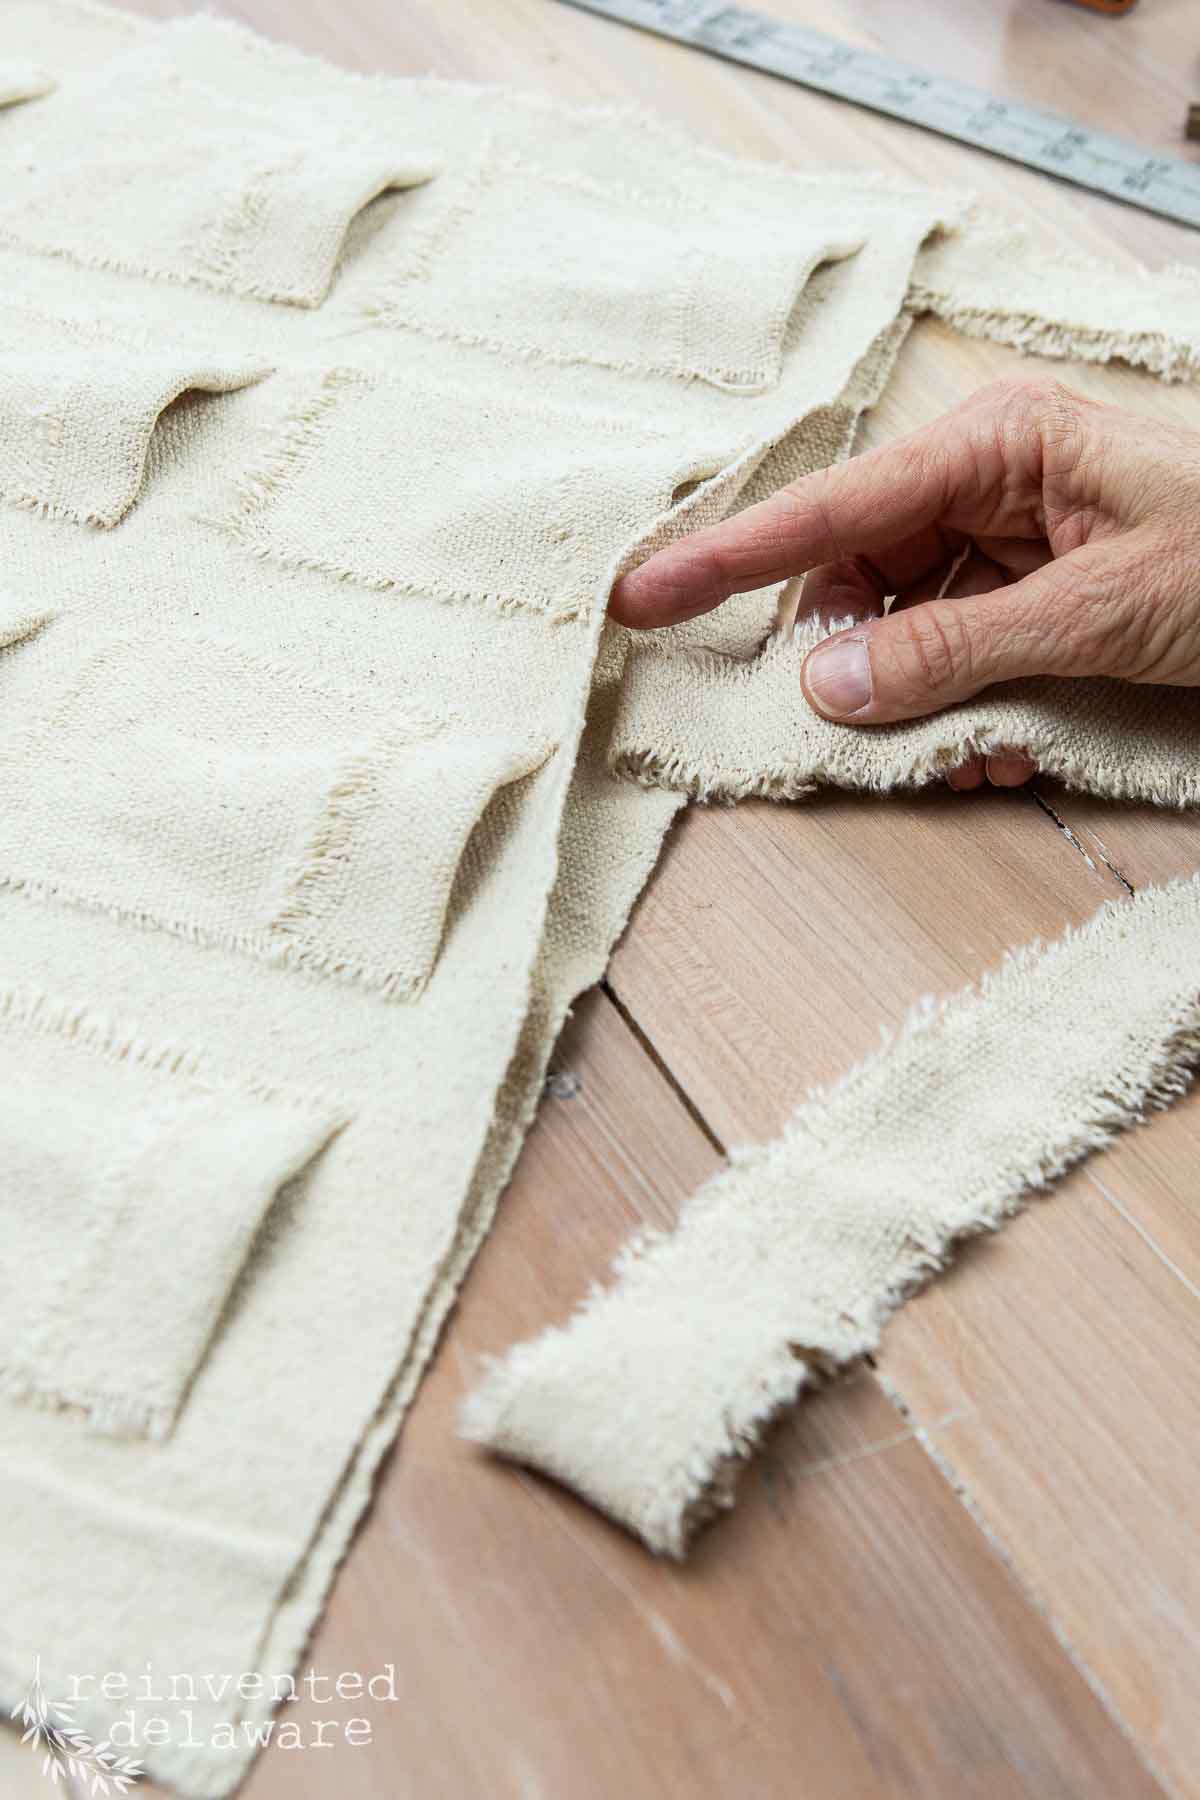
Fold the back piece in half from top to bottom with right sides together and mark the center of the top and bottomer with straight pins or a light pencil mark. Next lay out the pocket sections in rows (side to side) four each, and columns (up and down) six each.
If you like you can measure each pocket to make sure the placement is exact. But since I like the handmade, imperfect look, I just eyeballed it!
create the pockets
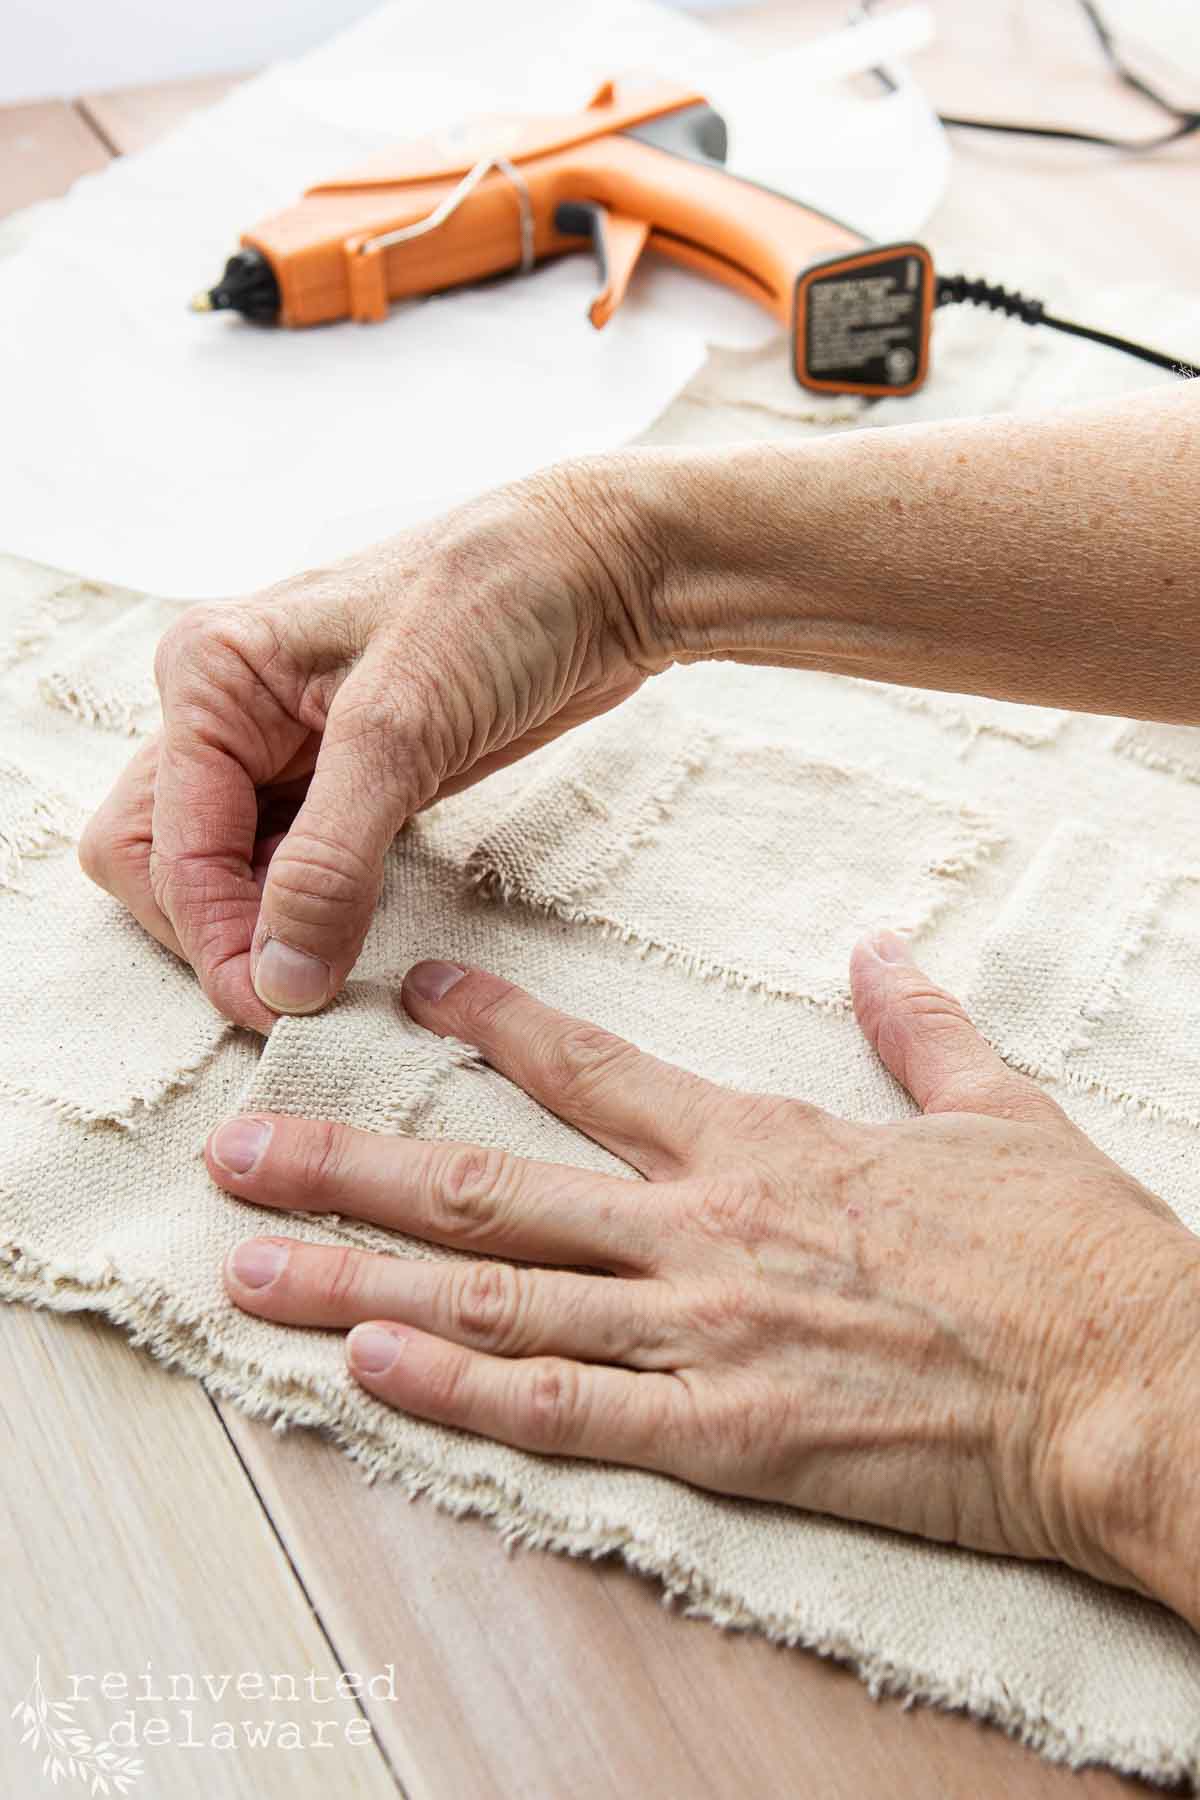
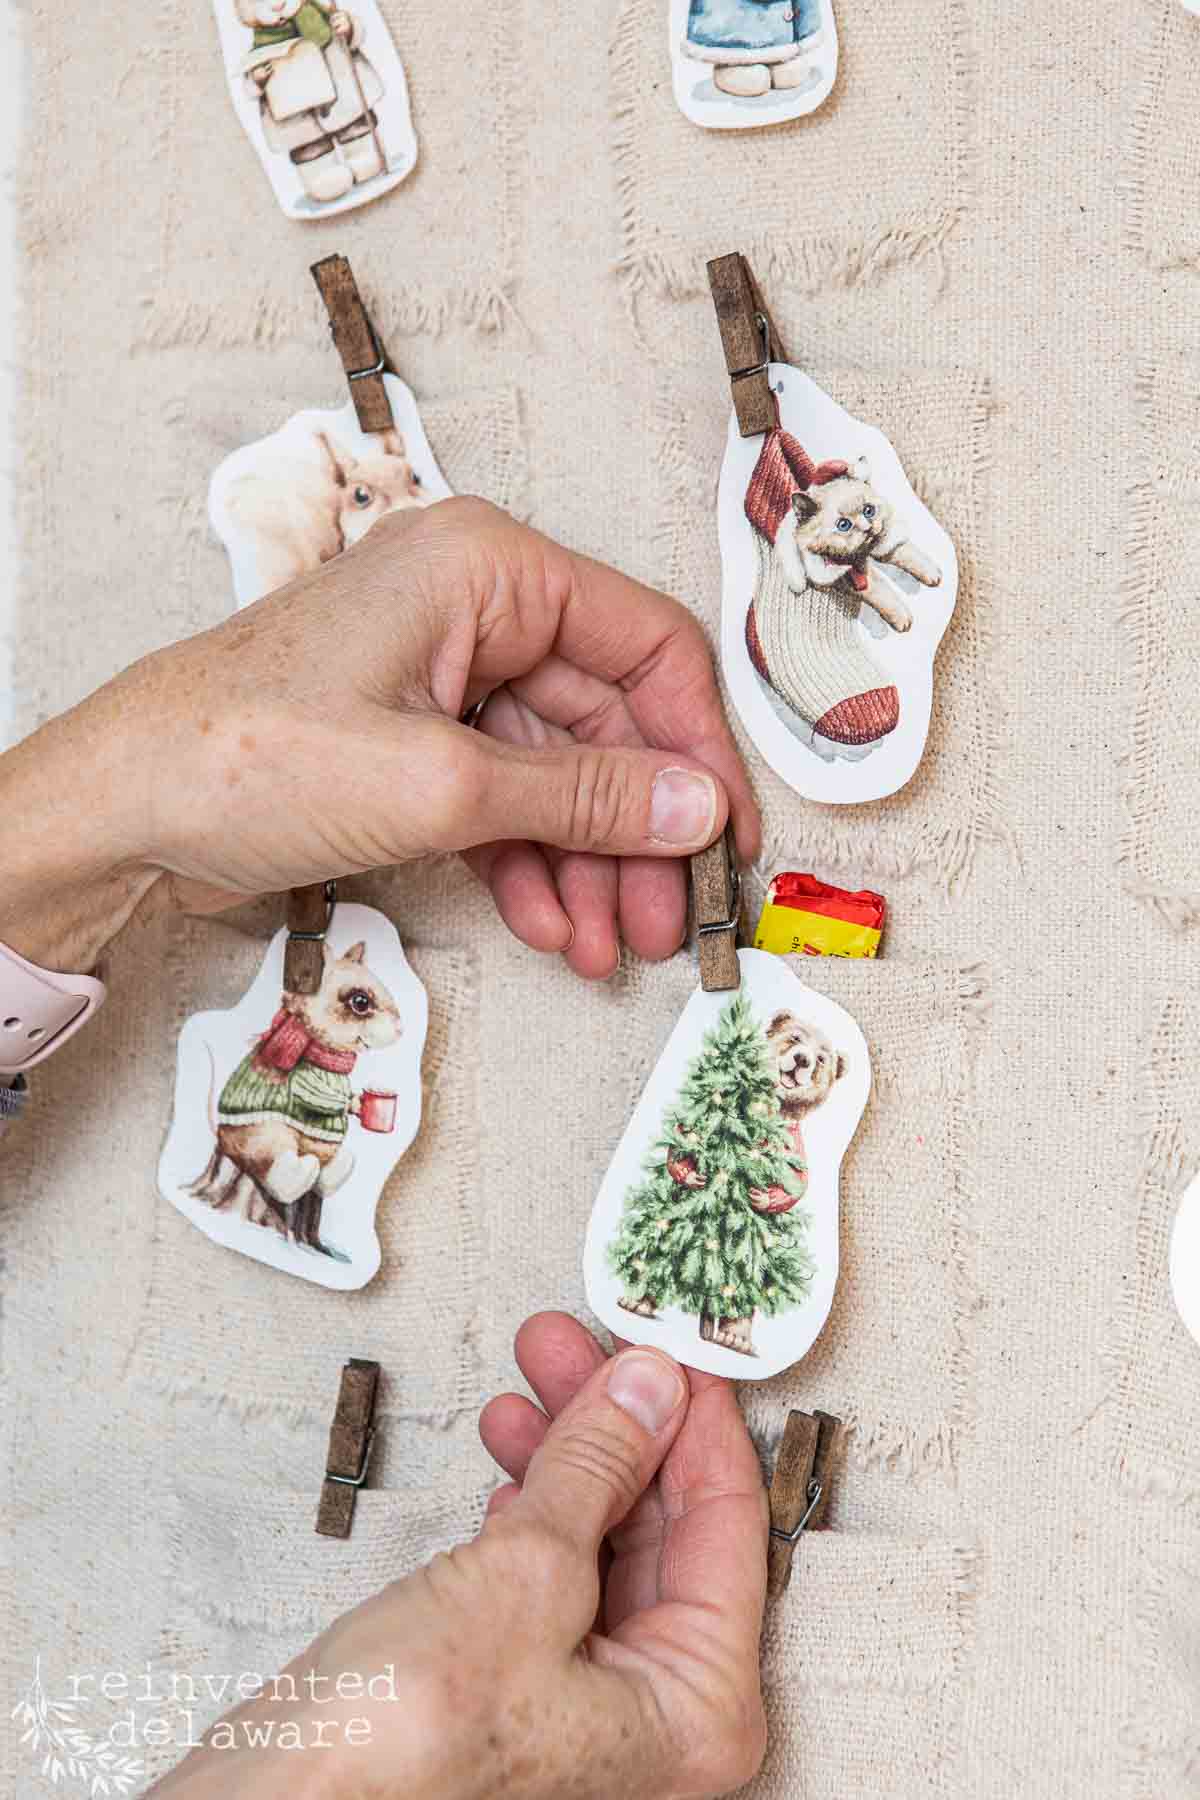
Next, fold down the shorter edge of each pocket and glue it down creating a fold at the top edge of each pocket. Place the pocket back in its spot and move on to the next one until each pocket has this design element.
Now glue each pocket on the main section. It’s easiest to glue the bottom edge first and allow it to cool. Then bring the two sides of the pocket inwards to create a gap at the top.
Then glue the sides of the pocket down leaving the top of the pocket open. The gapped edge helps to get the treats inside the pocket.
secure the sides
The raw edges along the side of the advent calendar are easy. Simply run a bead of glue on the wrong sides of the fabric and glue the side pieces together along that raw edge.
The top edge of the front piece is next. Tuck in each hanging strip and glue them in place. Then glue the edge down just as you did with the sides of the calendar.
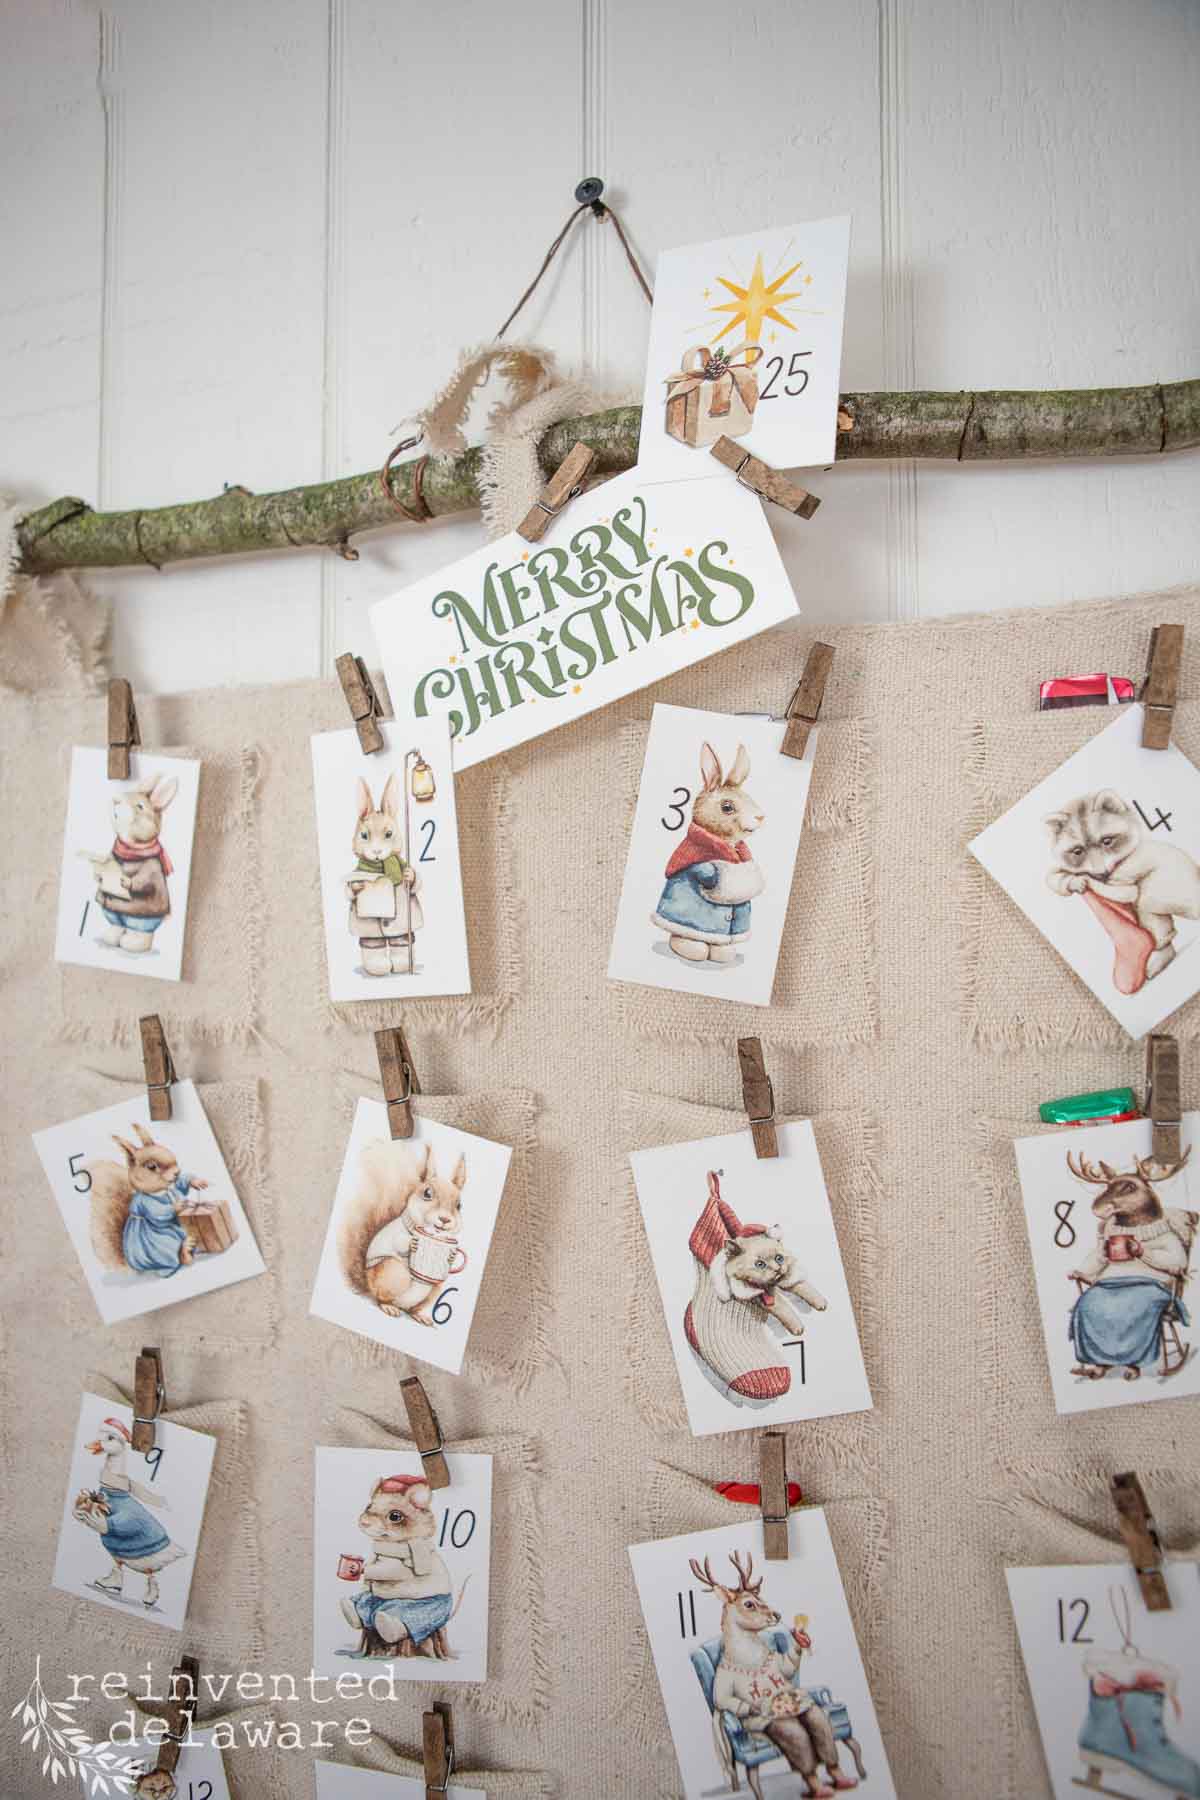
The fabric strips are the base for the hanging structure. I glued the folded edge inside the panel so that I could tie strips to a branch from our yard.
If you use a curtain rod or dowel rod to hang it. You could cut the strips to the appropriate length and attach the cut ends inside of the panel creating a loop.
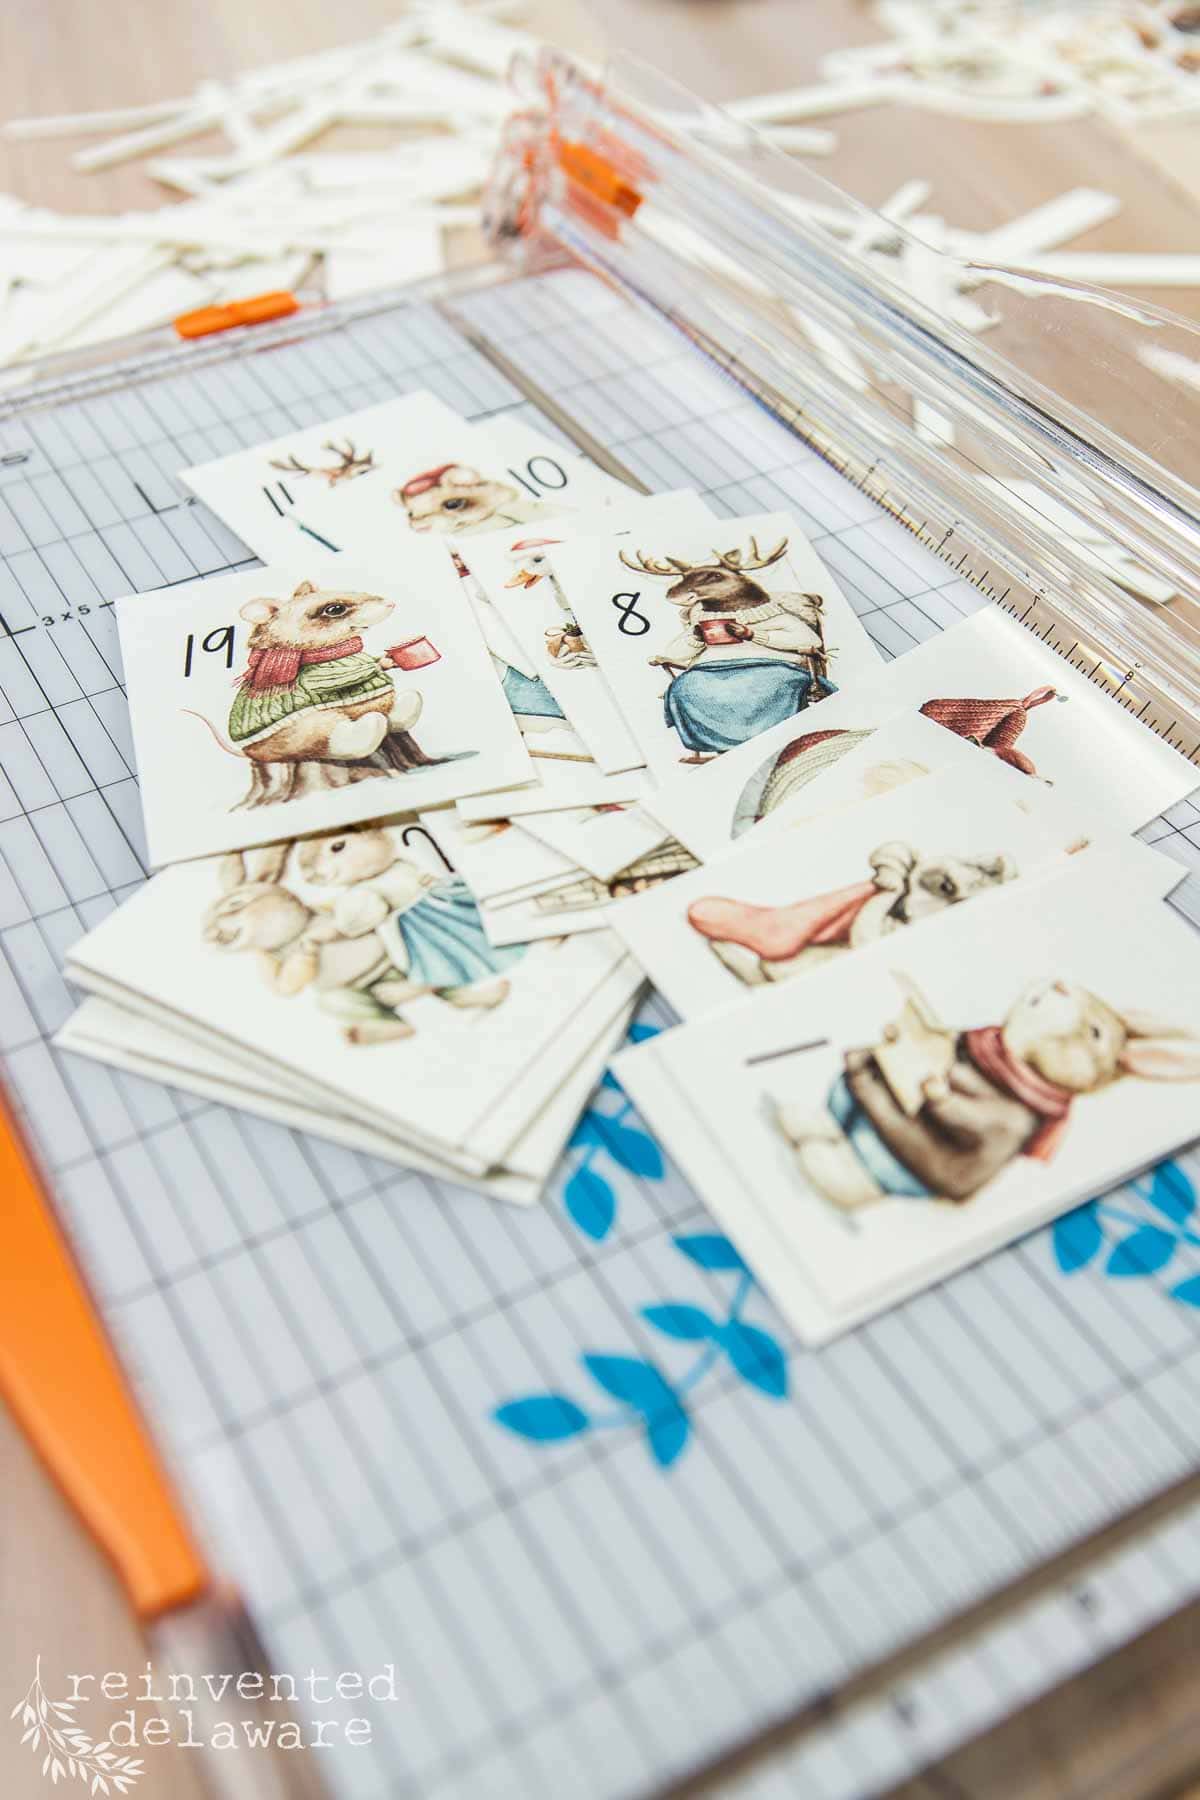
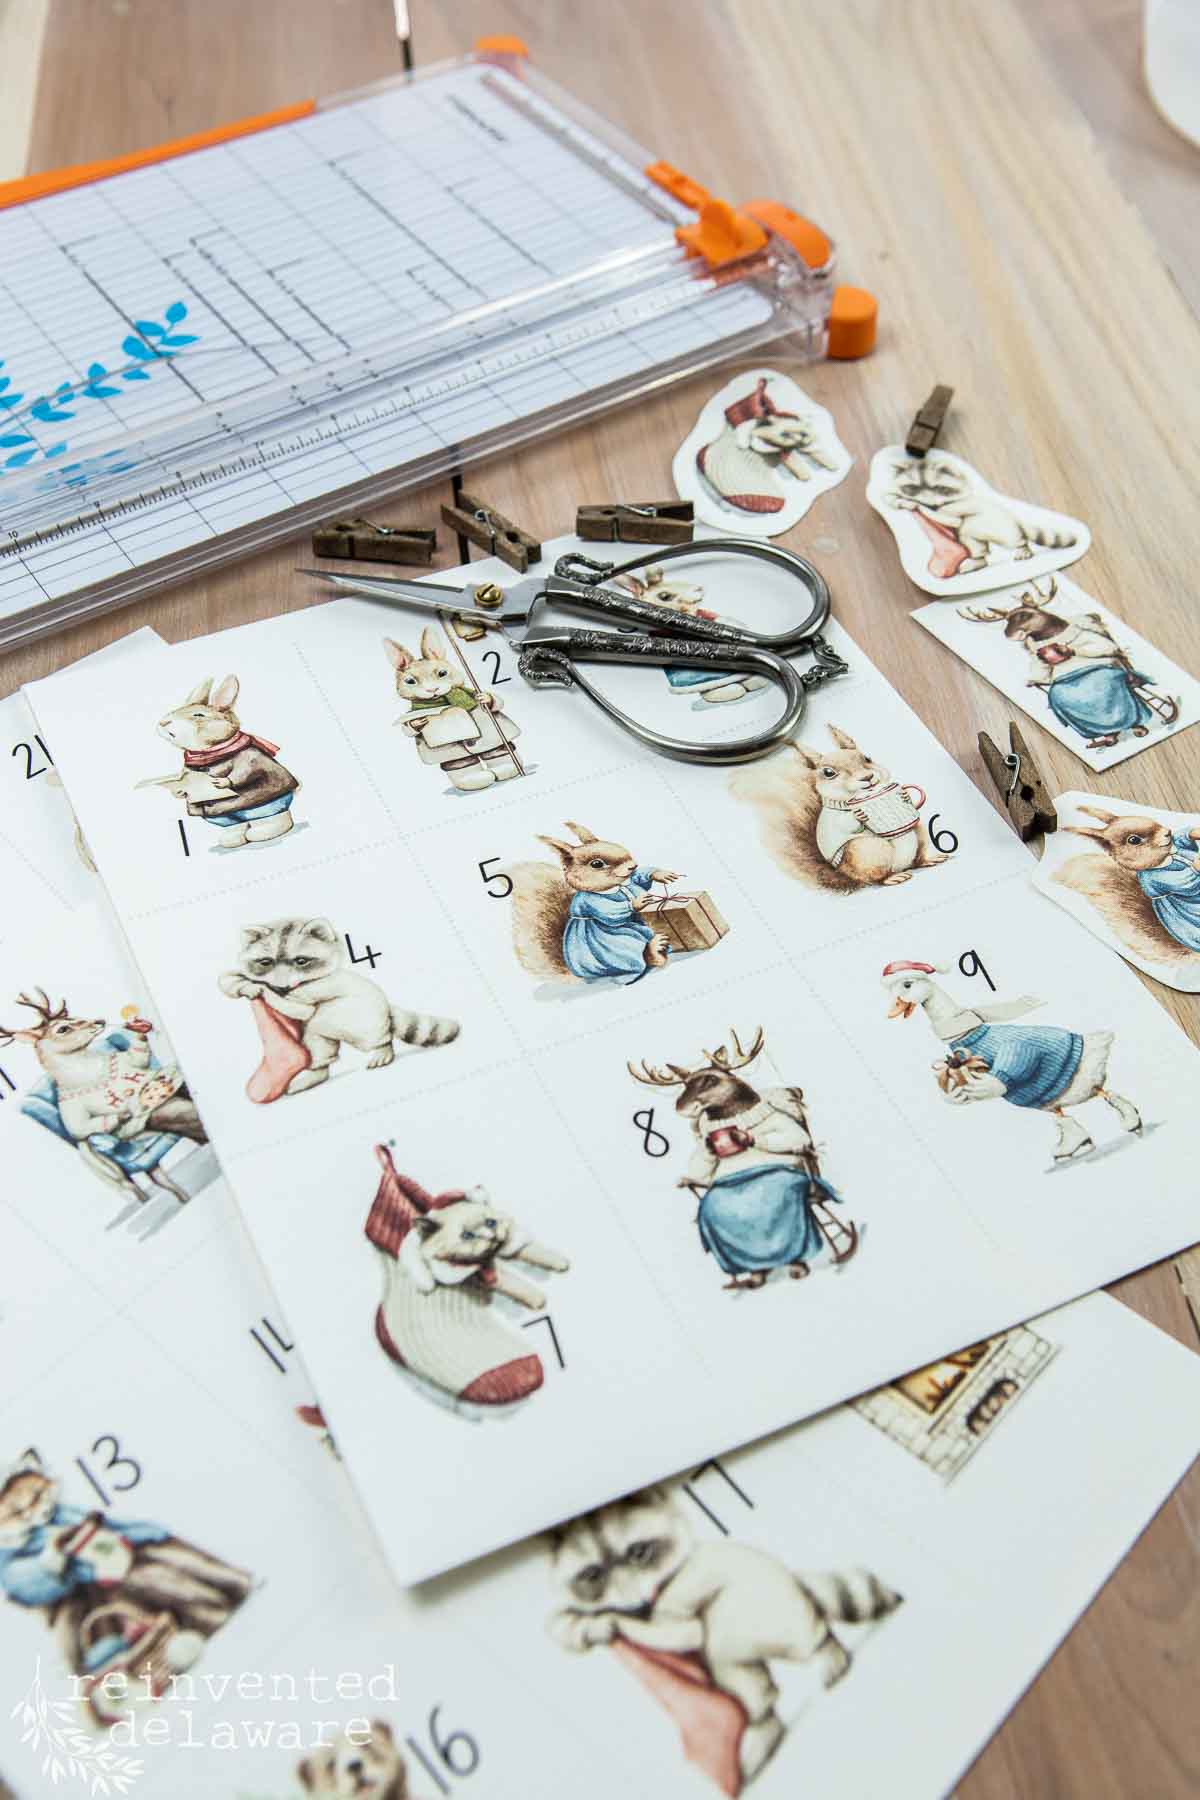
step 4: print and cut the free printables
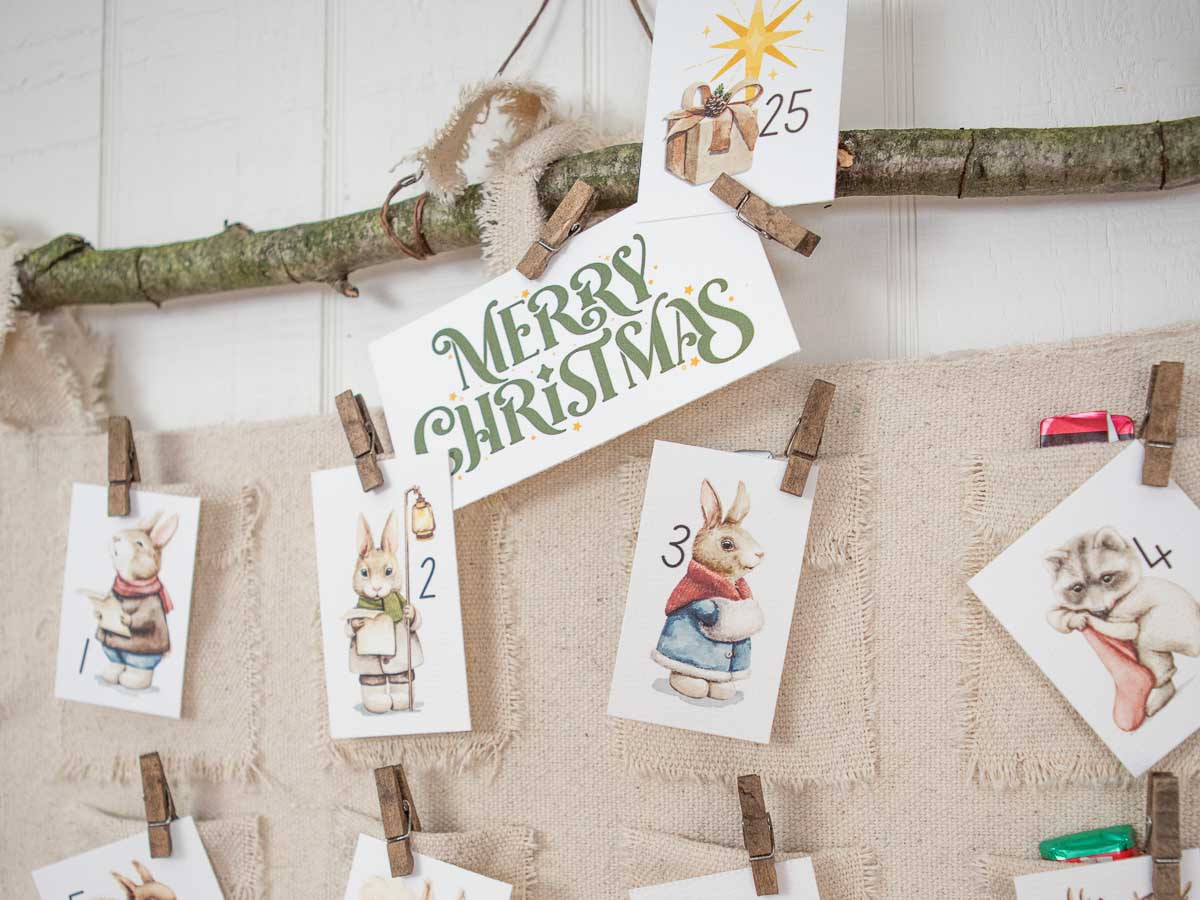
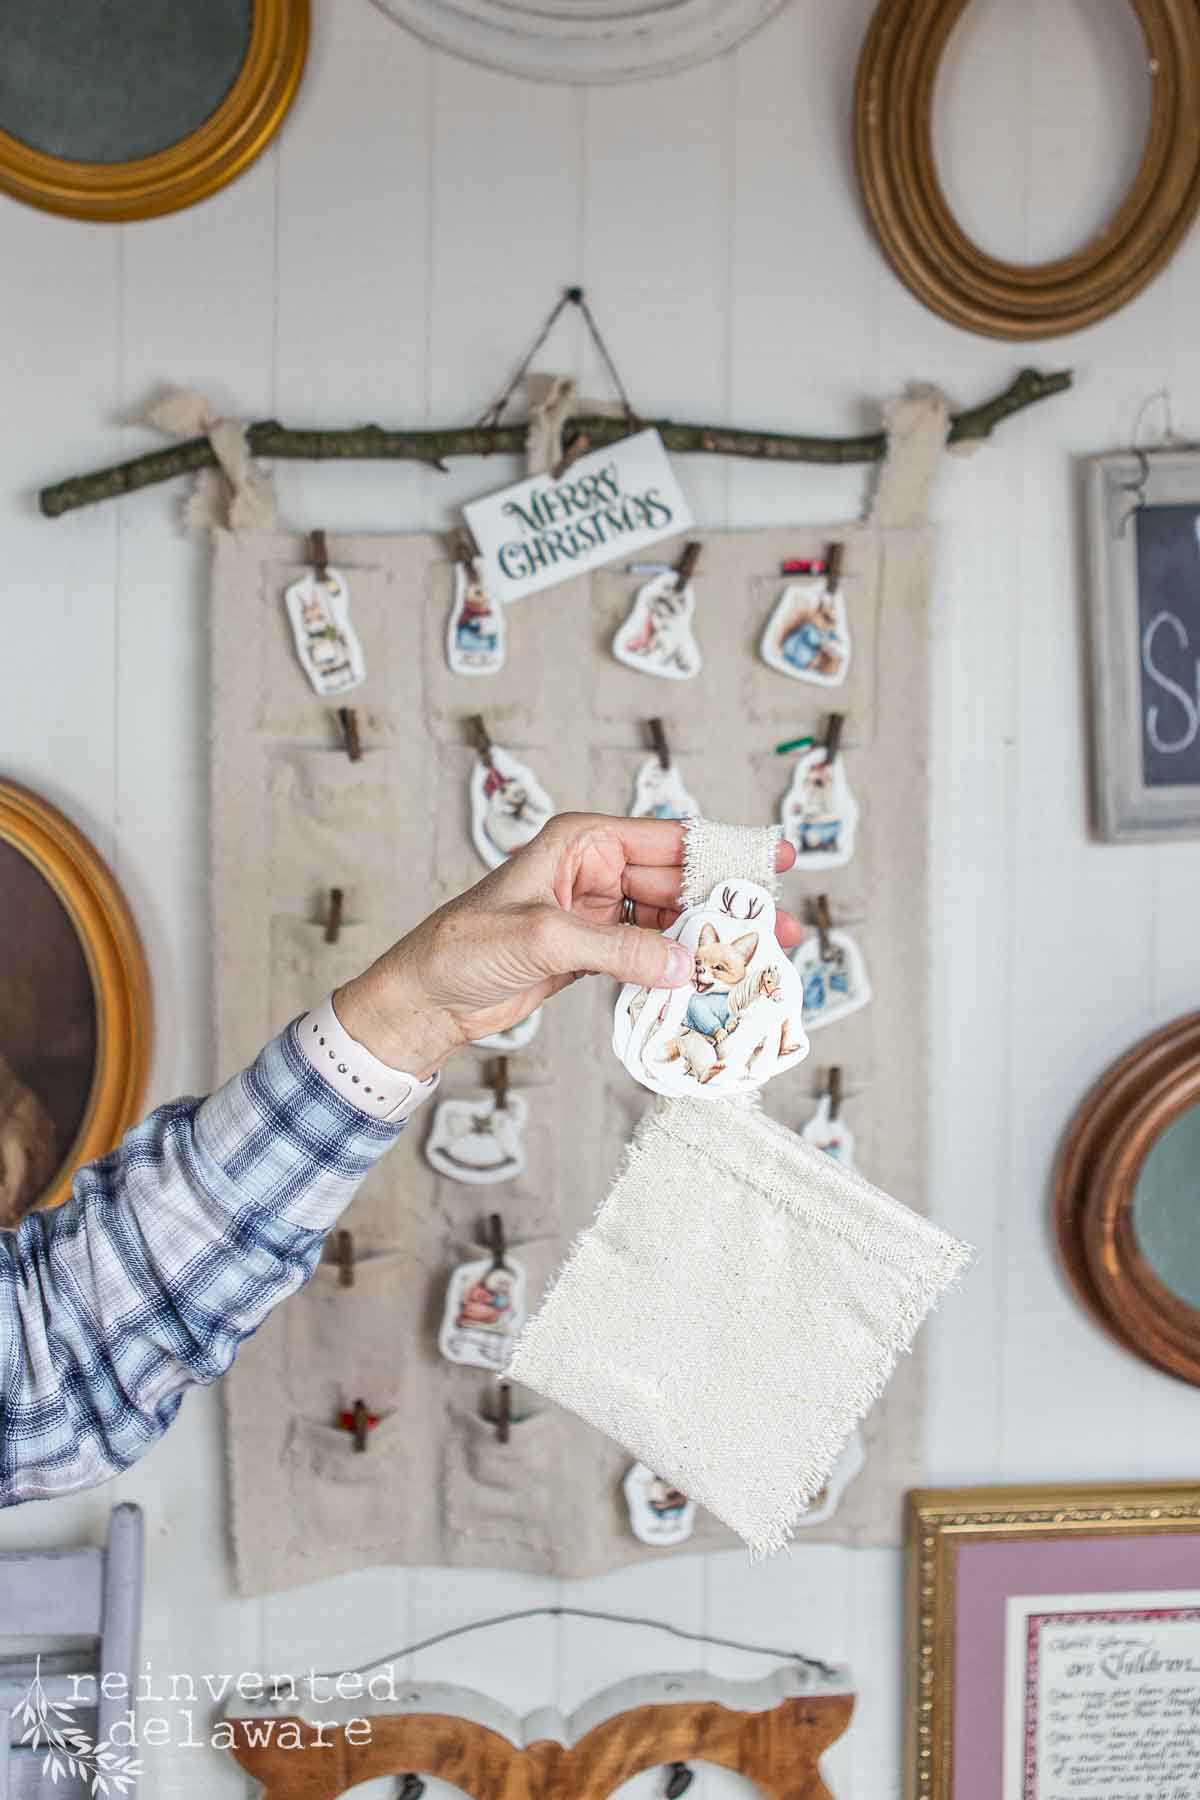
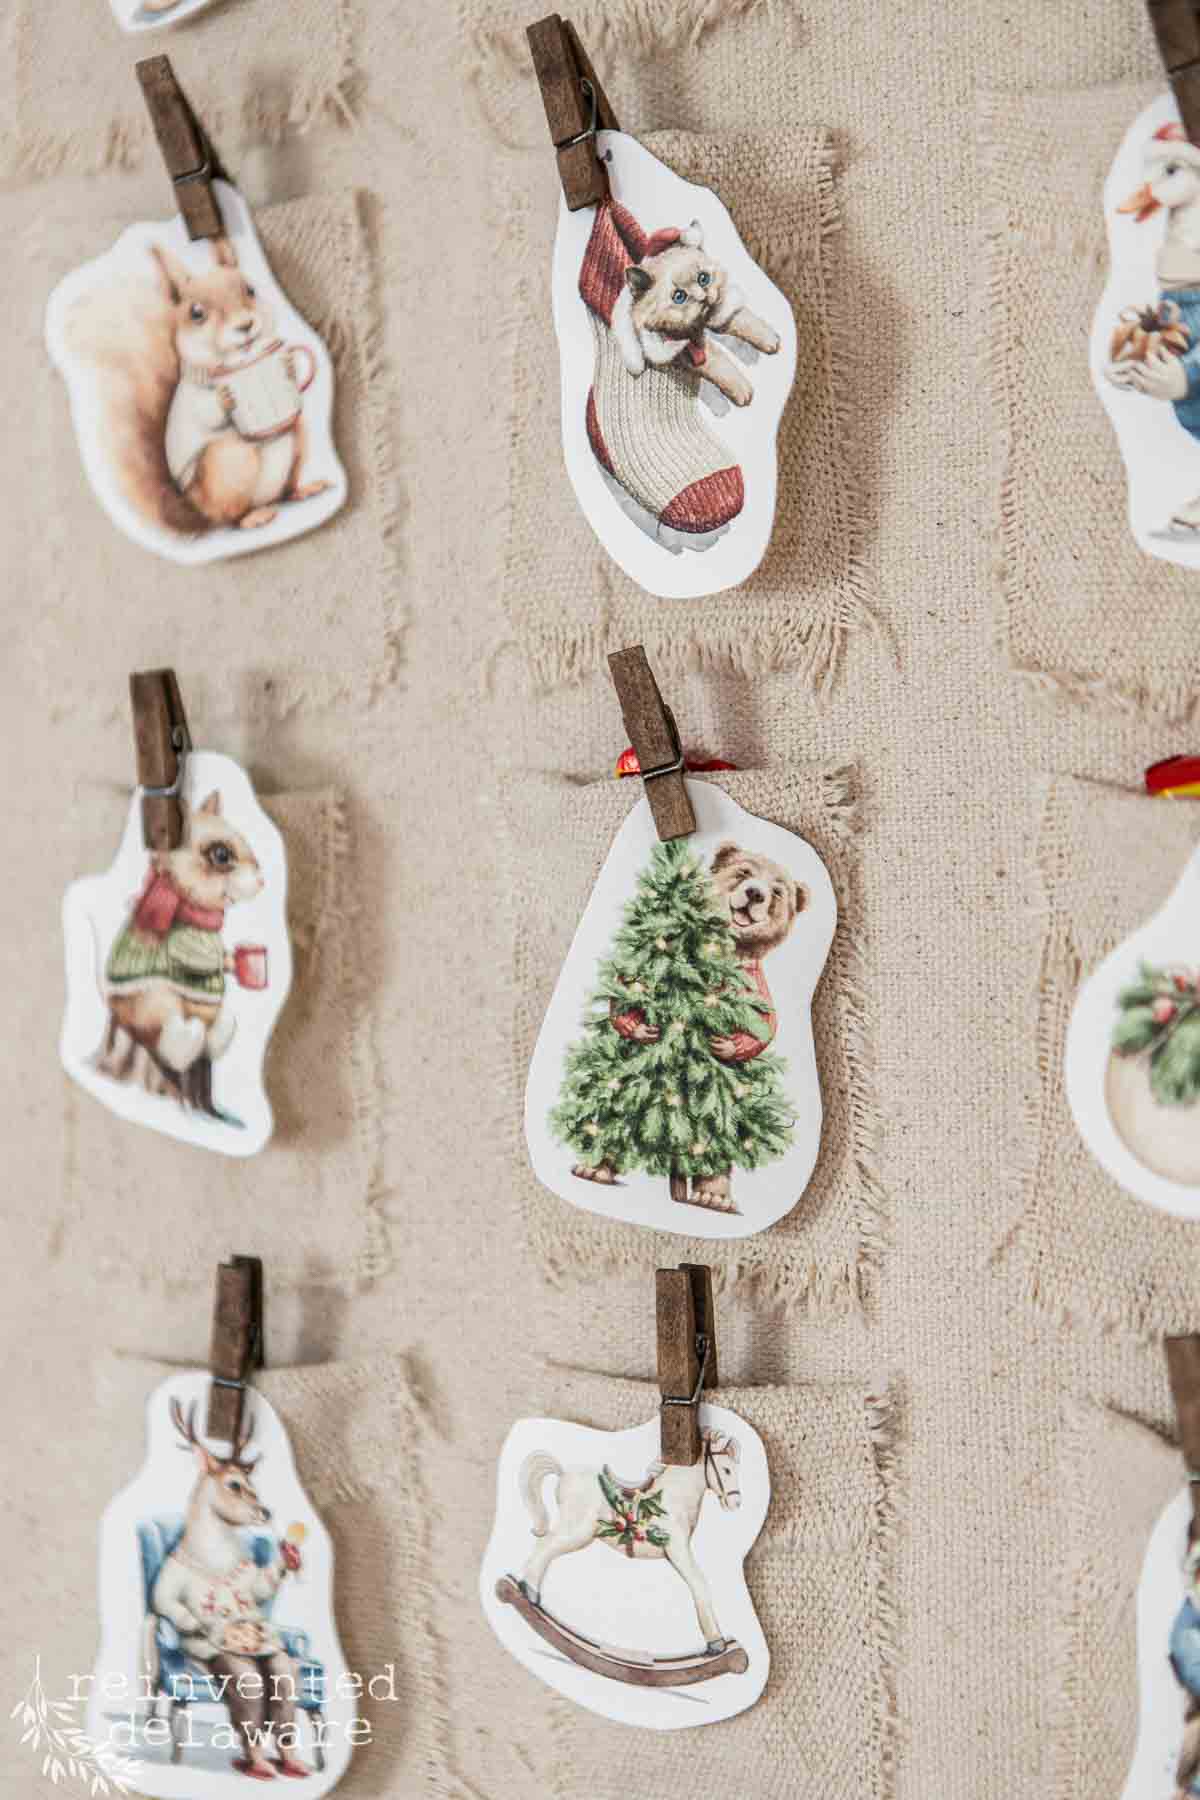
I had so much fun creating these woodland characters for this advent calendar! They remind me of Beatrix Potter designs, don’t you think?
To make your images, subscribe to my email list and you will gain access to the free printable library I have created! The library is full of so many pretty designs to create greeting cards, gift tags, and wall art!
The advent calendar woodland characters printable is in the Cheatsheets & Patterns folder.
The woodland creatures are in the library for you too! Full instructions for printing are included on the download page.
Once in the library, you will see that one set of woodland animals has numbers printed on them and one set does not. Choose whichever set you like best!
seasonal printables
If you are looking for more ideas for the free printables I offer my email subscribers, tap the posts below! You will enjoy the inspiration!
more free printable ideas!


thanks for being here!
I hope you are enjoying this project! Let me know if you have any questions. Or leave me a comment to tell me about your project and ideas!
thanks, Cindy 😀

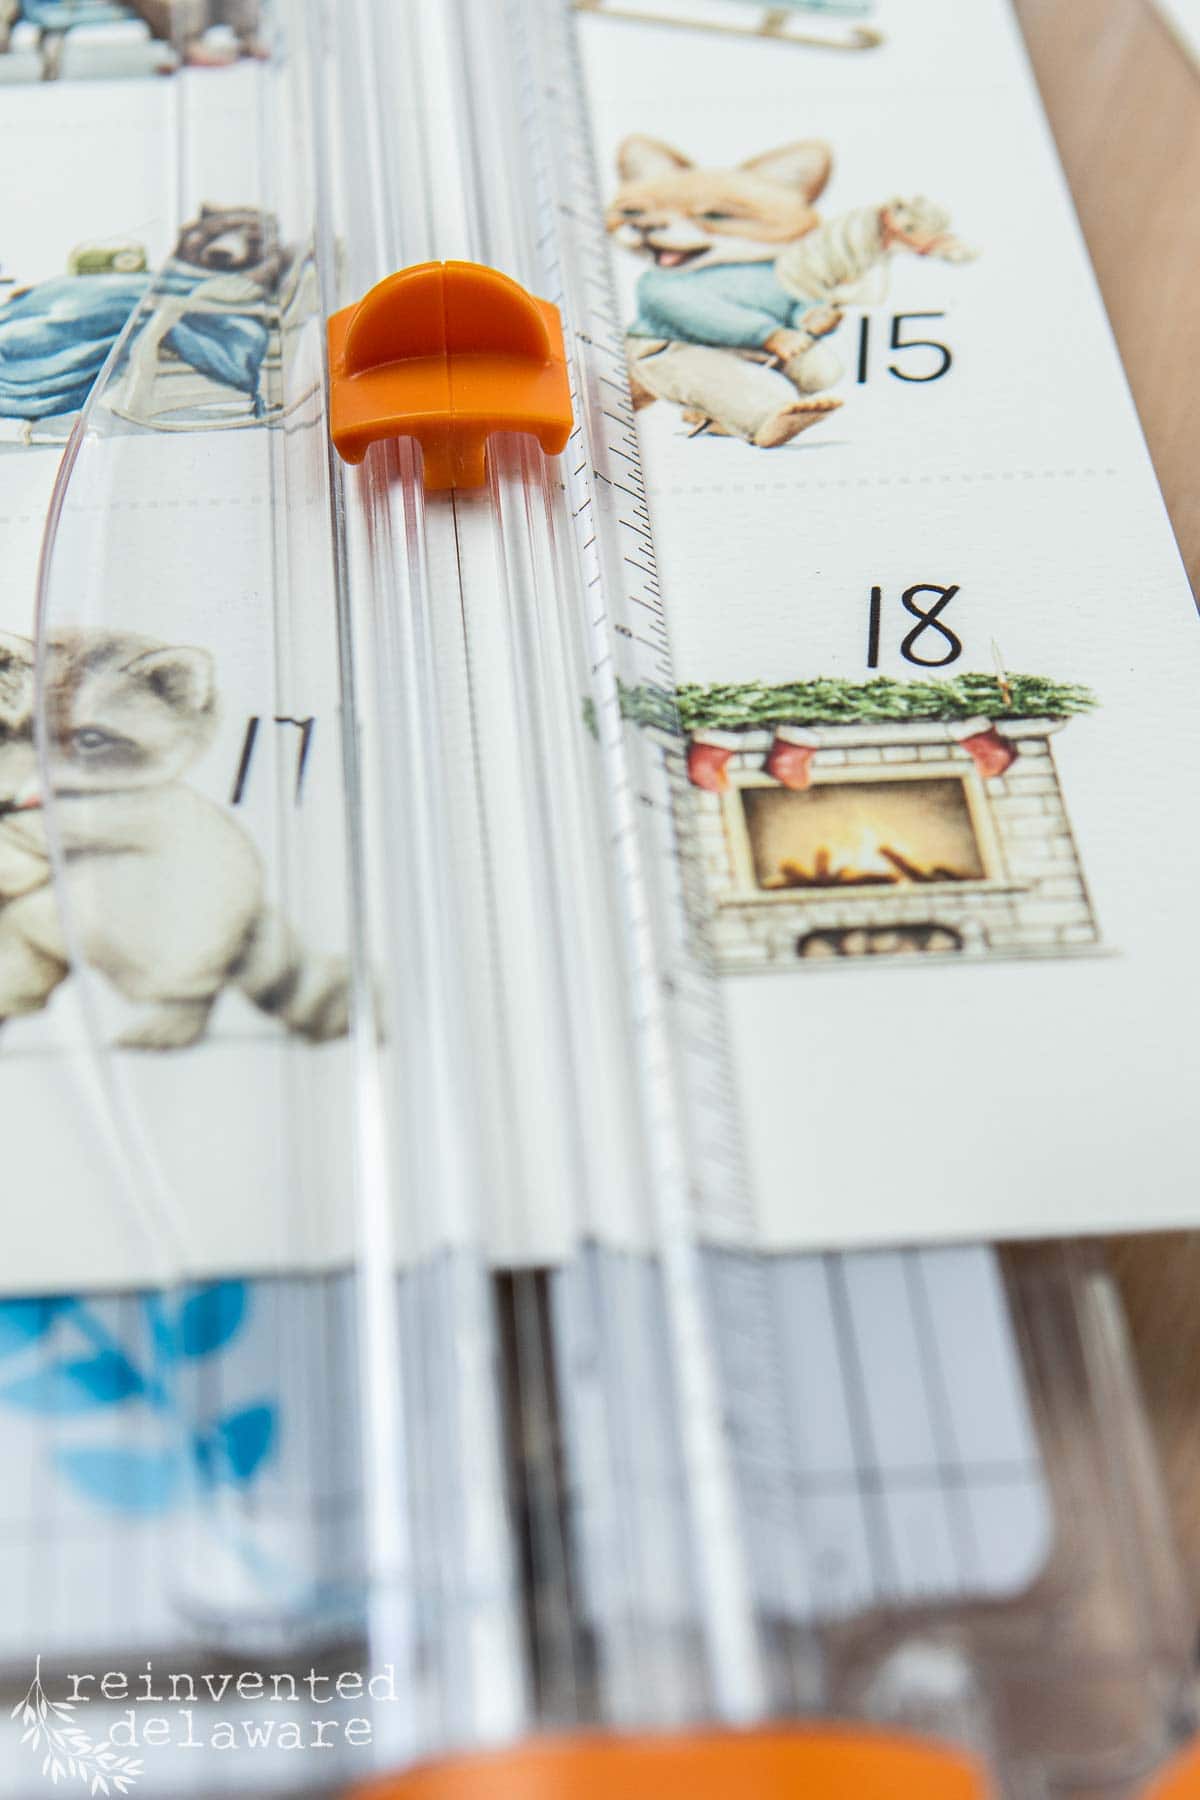
To print the woodland friends, cut three pieces of watercolor paper down to 8.5″ x 11″ size to fit in your printer. Use a paper trimmer for perfect cuts.
Then run one piece of watercolor paper at a time through the printer and print off each sheet of critters!
You have two choices for cutting out the designs. One look creates a card shape the other a whimisical look.
Use the paper trimmer (mine has a thin wire to line up perfectly with the cut lines) and cut out the woodland creatures in equal pieces. Or you can cut curvy shapes around each critter leaving a little less than a 1/4″ white border around the animals. Both look amazing! Which is your favorite look?
Hang each woodland creature on the pockets using small craft clothespins. You can also hang the Merry Christmas design at the top of the calendar!
step 5: fill with treats
Depending on what the children in your life enjoy, you can add different types of treats to each pocket. The treats will need to be small to fit inside.
I purchased a bag of individually wrapped assorted chocolate candy for each pocket. You could choose any candy the children in your life would enjoy including gum, hard candy, licorice, chocolate kisses, smarties, and Skittles. The sky is the limit!
Another option is to include a prize in each pocket. This could be small toys, a small wrapped cookie, or any small toys you find at the Dollar Store.
By the way, at the time of this writing, my chocolate candy has been eaten by yours truly! 😂 🍫
step 6: hang your advent calendar
Since this advent calendar has a woodland creature design, I thought hanging it from a branch was a good idea. This branch is from our yard and has the perfect amount of curvy whimsey to it!
Keeping the hanging strips open helped to make this calendar hang evenly. I also added a small piece of brown craft wire for hanging the whole calendar.

YouTube video
Many of you enjoy watching diy projects so I’m creating a video for you! Tap the red button below so you don’t miss it!
YouTube Video
coming soon! subscibe so you don’t miss it!
creative options for an advent calendar
- Add battery-powered fairy lights to this advent calendar for a cute look.
- Hang faux greenery near the branch hanger. Evergreen sprigs would be so pretty!
- You can use wooden rods and brackets that hold a dowel rod to hang the calendar.
- Small inexpensive curtain rods are another option for hanging this advent calendar
- If you like to sew, stitch seam allowances instead of gluing them! Or stitch so that the raw edges are exposed.
supply links
Shopping for this project is easy! Tap the images below to shop! You can also follow me on LTK shopping app!

enjoy the countdown!
I hope you enjoyed this project and that you get a chance to make one of these advent calendars for your home or for someone in your family! I’ve got two more to make so I better get busy!
more ideas for grandchildren
My friends are so creative! You will enjoy the inspiration they have for you! Tap the images below to head over to their posts!


Recreate and Decorate
Join the Facebook Group and Share Your Projects With Us!

Thanks for joining our journey!
Thanks so much for joining us for this post! Join our journey so you don’t miss any of the fun projects, tutorials, and inspiration that we share with you each week! You can follow us on Instagram, Facebook, and YouTube. We share even more inspiration on Pinterest!


Cindy Rust
Cindy has been decorating her home with thrift store finds for 40 years. She is an avid thrift store shopper who loves to makeover the items she finds into vintage-inspired home decor and furniture. When she isn’t thrift shopping or painting a piece of furniture, you can find her making homemade butter, working in her garden, or painting with watercolors.
So cute Cindy and those little woodland creatures are the best! I love the washed drop cloth you used. Isn’t that texture the best?!?!
The fabric is one of my faves! It’s so sturdy and useful!
Cindy: The printables are so adorable. I think they could also be laminated with a hole punched on top and used as ornaments for a childs christmas tree. I think I’m going to print them out and use them for tags on my presents.
As always so creative!
Brilliant ideas Lynn! I need to add that info to the post! Thanks!