
DIY Scrap Wood Welcome Sign: Easy & Budget Outdoor Decor
Looking for a charming, budget-friendly way to add a personal touch to your home’s exterior? This DIY scrap wood welcome sign tutorial is exactly what you need! You don’t have to spend a fortune to create beautiful outdoor decor that truly reflects your style. We’ll guide you step-by-step on how to upcycle common materials into a unique, custom sign perfect for your front porch or garden, making your home feel warm and inviting to all.

DIY Scrap Wood Welcome Sign for Your Front Porch
Materials
- fence pickets or scrap wood
- chop saw or circular saw
- power drill driver
- screws and wood glue
- heavy wire for hanging
- sand paper
- tracing paper
- transfer carbon paper
- small paintbrushes
- chalk paint
- clear top coat
Instructions
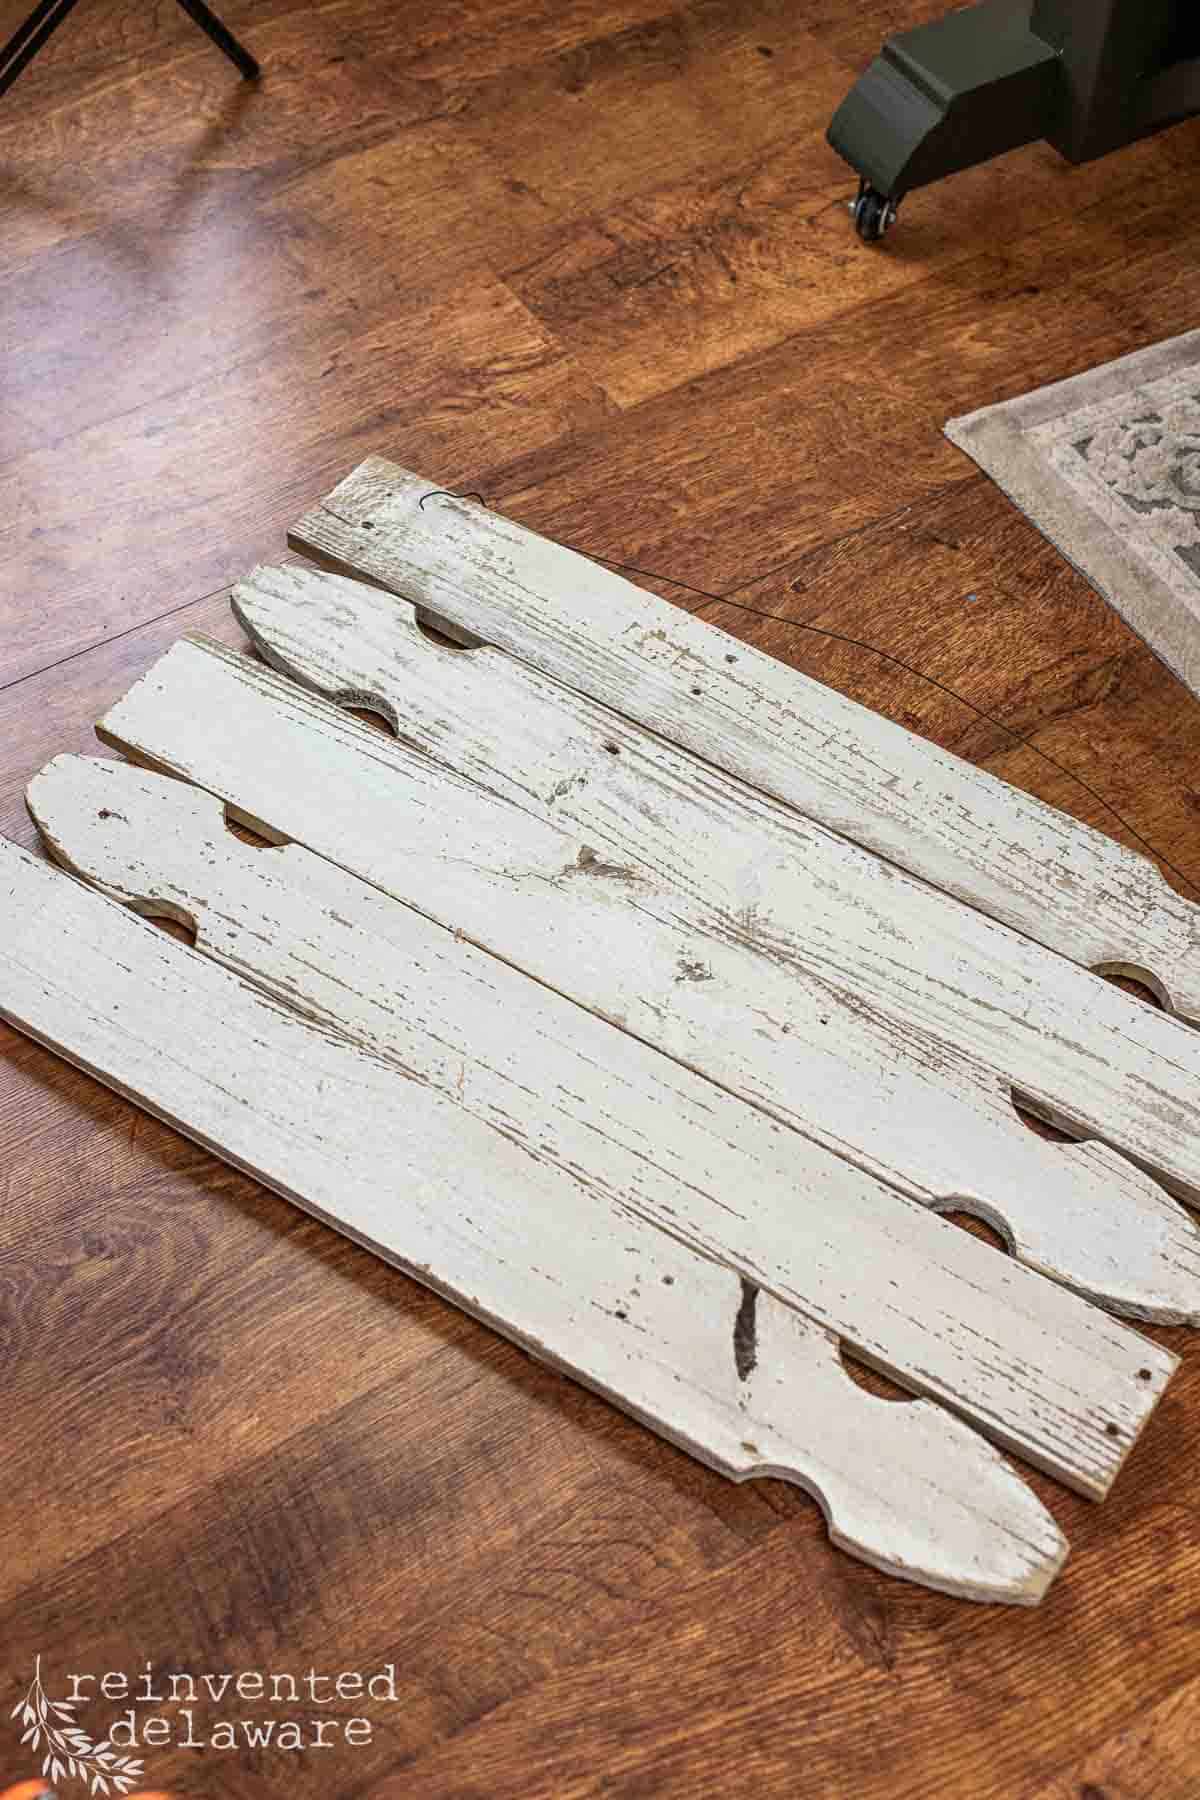
- Cut each fence board to the desired length. My boards were cut at 31" Sand off the rough edges. Also cut two short pieces to use as bracket to hold the fence boards together. My scrap wood brackets were cut at 20".
- Assemble the pickets by alterneing the boards. Use glue and screws to attach the pickets to the brackets. Be sure the screws do not go throught to the front. Secure each picket to the bracket on the backside.
- Lay our the sunflower pattern on the board and trace the design on the fence board sign using a pencil and the transfer carbon paper. Do the same with the "welcome" design.
- Paint the sunflower and "welcome" on the sign in the desired colors.
- Apply a clear coat of exterior sealer if the sign will be in the elements. This is optional if the sign will be on a covered porch.
- Attach a wire to the sign using a screw with a large head.
Notes
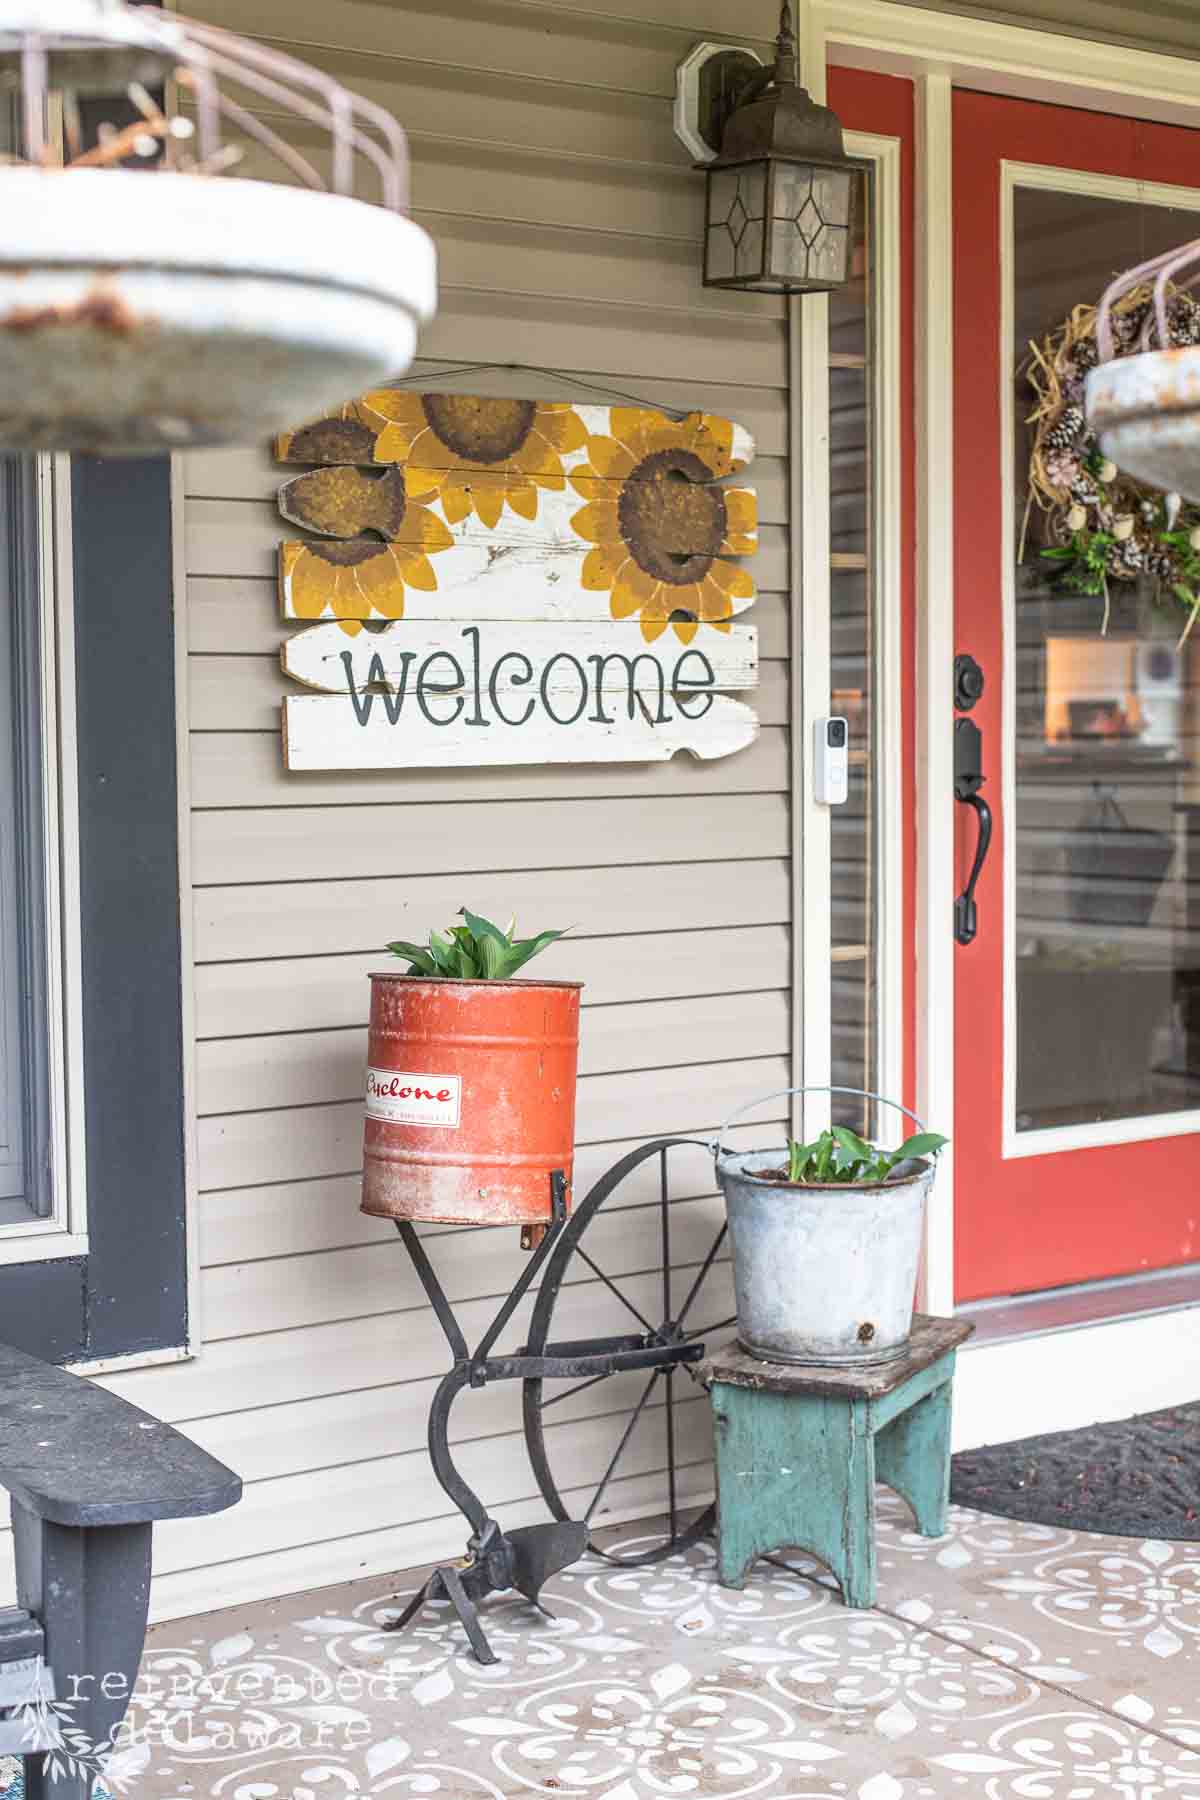
Your front porch is the first impression your home makes, and a warm welcome sign sets the tone for all who visit. Why not ditch the store-bought signs and create a DIY welcome sign that reflects your unique style?
In this post, I will show you how to create a DIY welcome sign. This step-by-step tutorial will inspire you with creative ideas and show you the tools and supplies you need to make this adorable sign.
This is the perfect DIY sign project waiting for you to make, no matter your skill level or budget. I’ve include the printable design for you as well. More on that later in the post!
Gathering your DIY Tools and Supplies
Here are the tools and supplies I used for the welcome sign project. You might already have some of these basic tools and supplies on hand but I have links for you if you need to grab supplies! Many of us have paint leftover from previous projects like furniture makeovers, repurposed projects or thrift store upcycles.
The following post may contain affiliate links. That means if you click and then buy something, I will make a small commission at no additional cost to you! Thank you for supporting my blog. full disclosure here.
This post is sponsored by Dixie Belle. All opinions are my own!
Supplies
- Yellowstone Chalk Paint
- Mojave Chalk Paint
- Anchor Chalk Paint
- Sequoia Chalk Paint
- Saltwater Chalk Paint (if needed)
- Gator Hide Top Coat
- Small Paintbrushes
- Artist Brushes
- pickets or scrap wood of your choice
- scrap wood for brackets
- chop saw or circular saw
- power drill driver
- screws and wood glue
- sanding sponge
- carbon transfer paper
Planning Your easy DIY Welcome Sign
Who doesn’t love a good scrap wood project? I love this kind of fun project that is easy to make and useful. You can use any type of wood, but I chose to use leftover fence pickets from our many projects. Using scrap wood is the perfect way to avoid extra cost in a project.
Choosing the Type of Wood
There are several options to choose from when making your wooden porch sign. I used scrap wood for our porch sign. My fence boards are reclaimed from my niece’s home. She no longer wanted a white picket fenced-in yard.
We gladly said yes when she asked if we wanted the old fence boards. All we had to do was come and get it! We used other fence boards to create a variety of farmhouse-style home decor pieces, so we were familiar with the versatility of fence boards.
For this welcome sign I used pickets cut in the Gothic style. You can purchase individual pickets at your local home improvement center for about $2-$3 each. You can find them in the Gothic style or the dog ear style. Both would work great!
Here are some ideas of the type of wood you can use:
- fence boards leftover from your fencing project including dog ear cedar wood pickets
- scrap 1’x 3″ or 4″ boards from any DIY project
- scrap pressed board
- scrap wood from furniture makeover projects
- reclaimed pallet wood
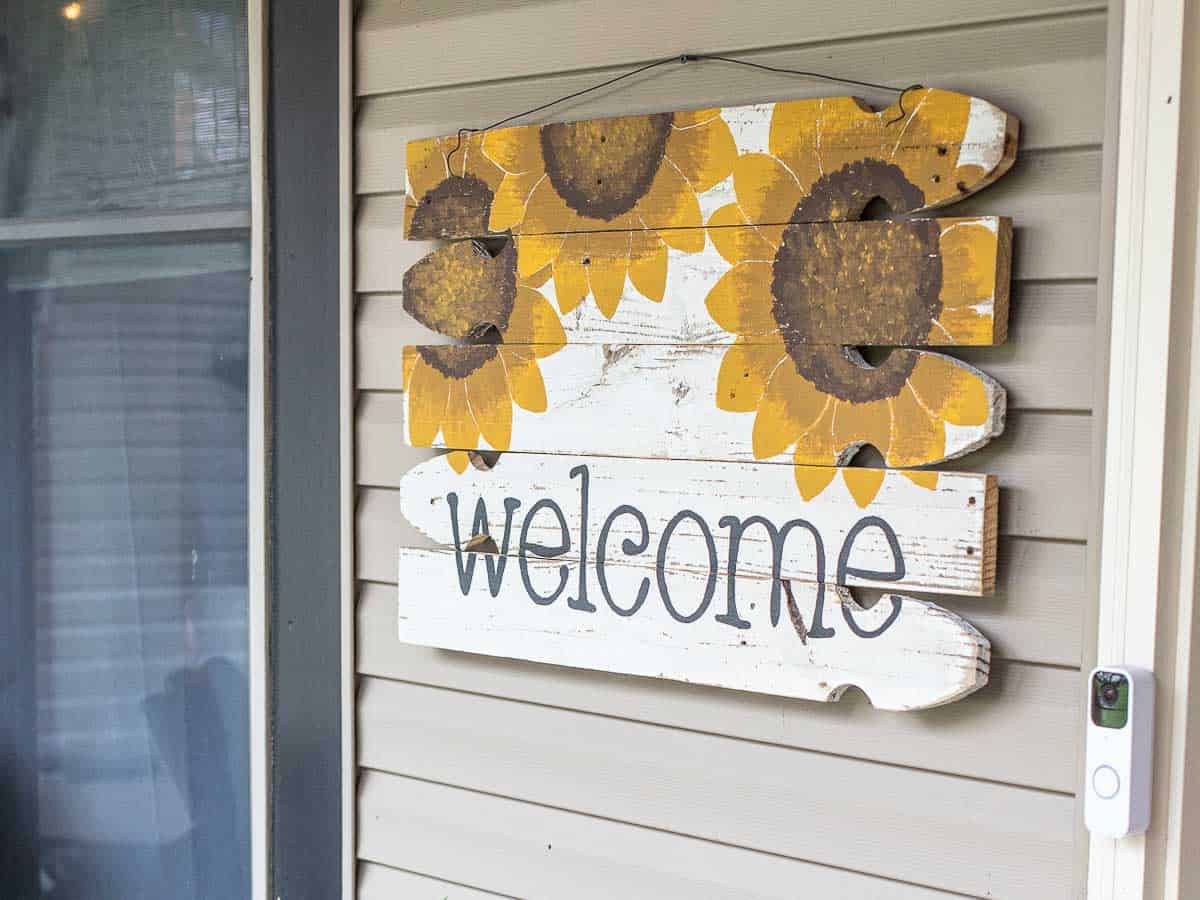
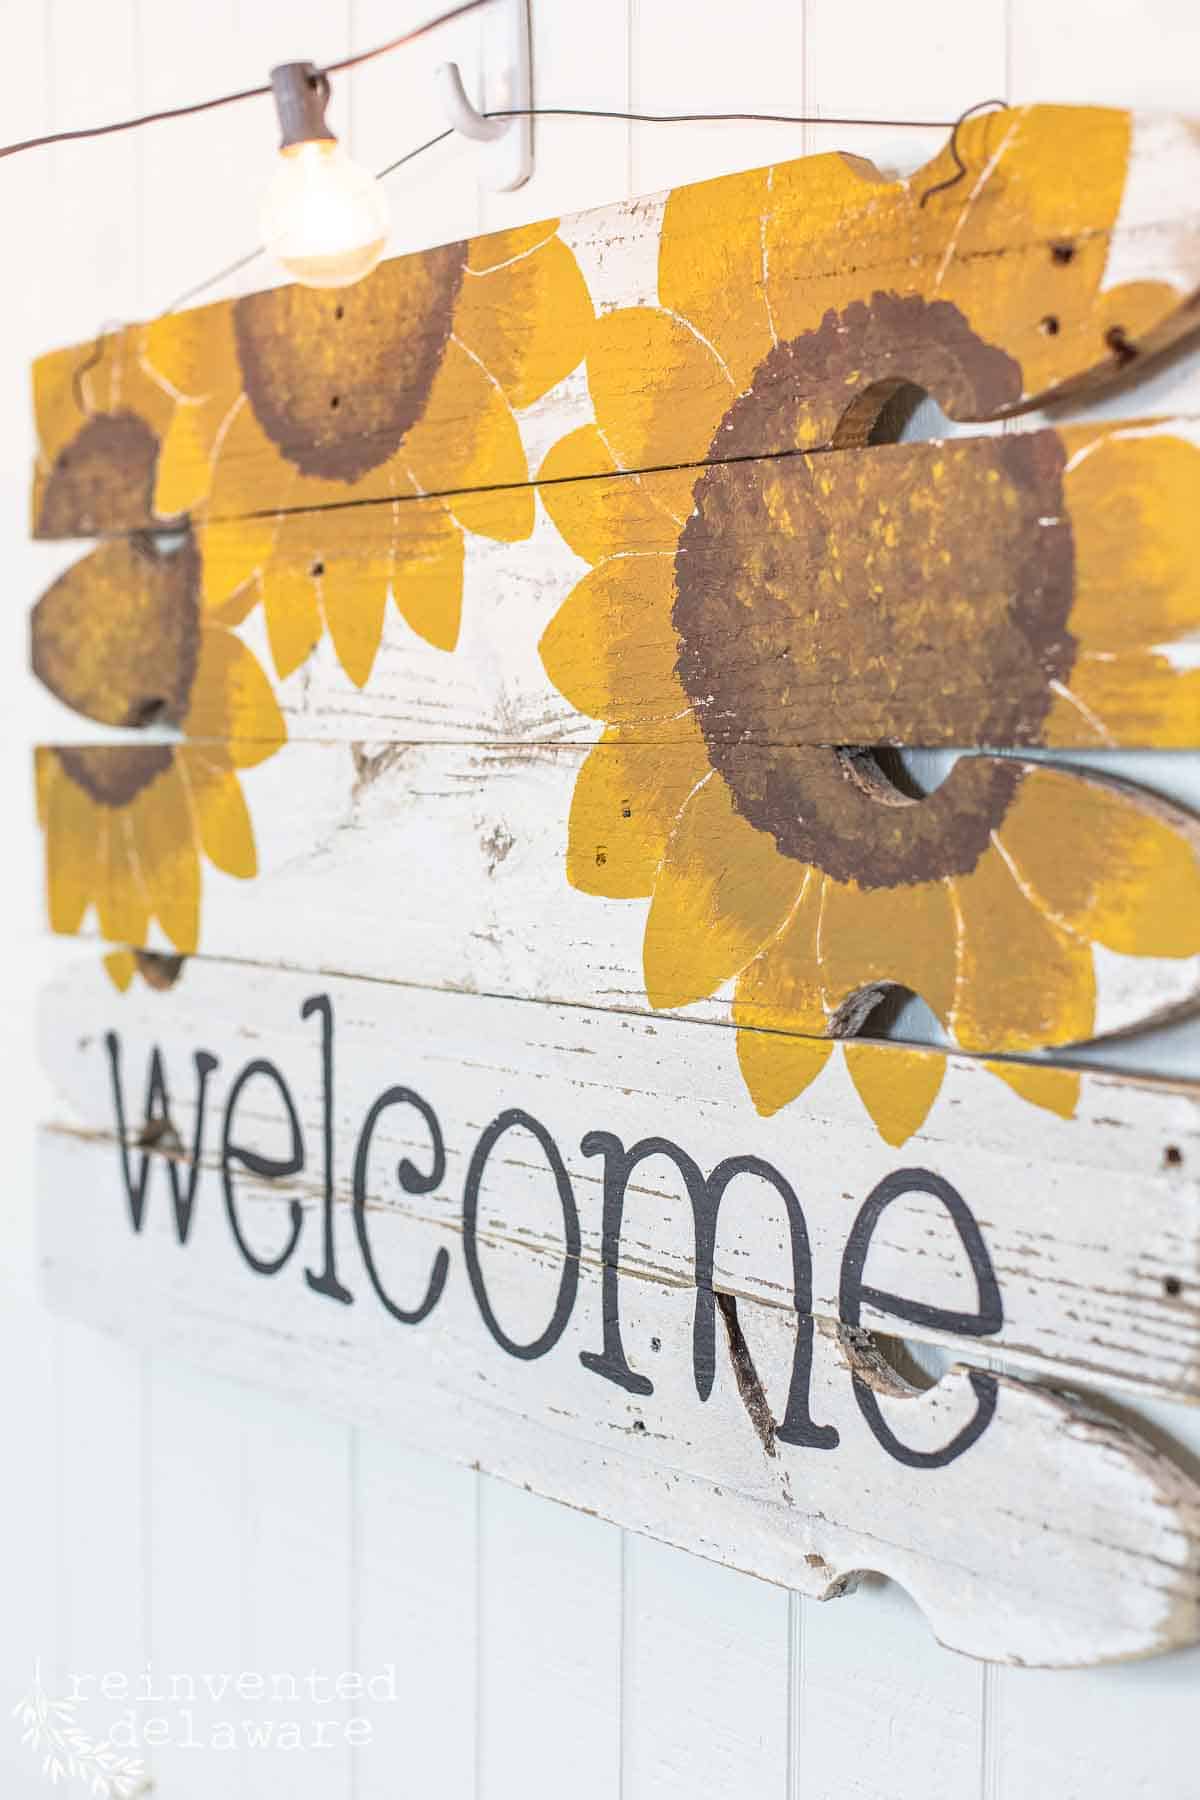
You can make the wooden sign any size you like. My own DIY welcome sign measures 20″ tall and 31″ wide. Each picket is 4″ wide. This sign is made of five pickets. We will talk about assembling the sign later in this post.
Selecting the Right Paint
Choosing paint is an important consideration. If your sign will be directly in the weather, consider using exterior paint or sealing it with an exterior clear top coat. If your welcome porch sign will be on a covered front porch like mine, then you won’t have to get specific exterior paint.
I chose to use Dixie Belle Silk Chalk Mineral Paint. It has a built-in primer and sealer so this is an easy choice to make. If I was concerned that the sign would get direct weather, then I would have also sealed it with Dixie Belle’s Gator Hide. It is the toughest sealer they offer and it is amazing!
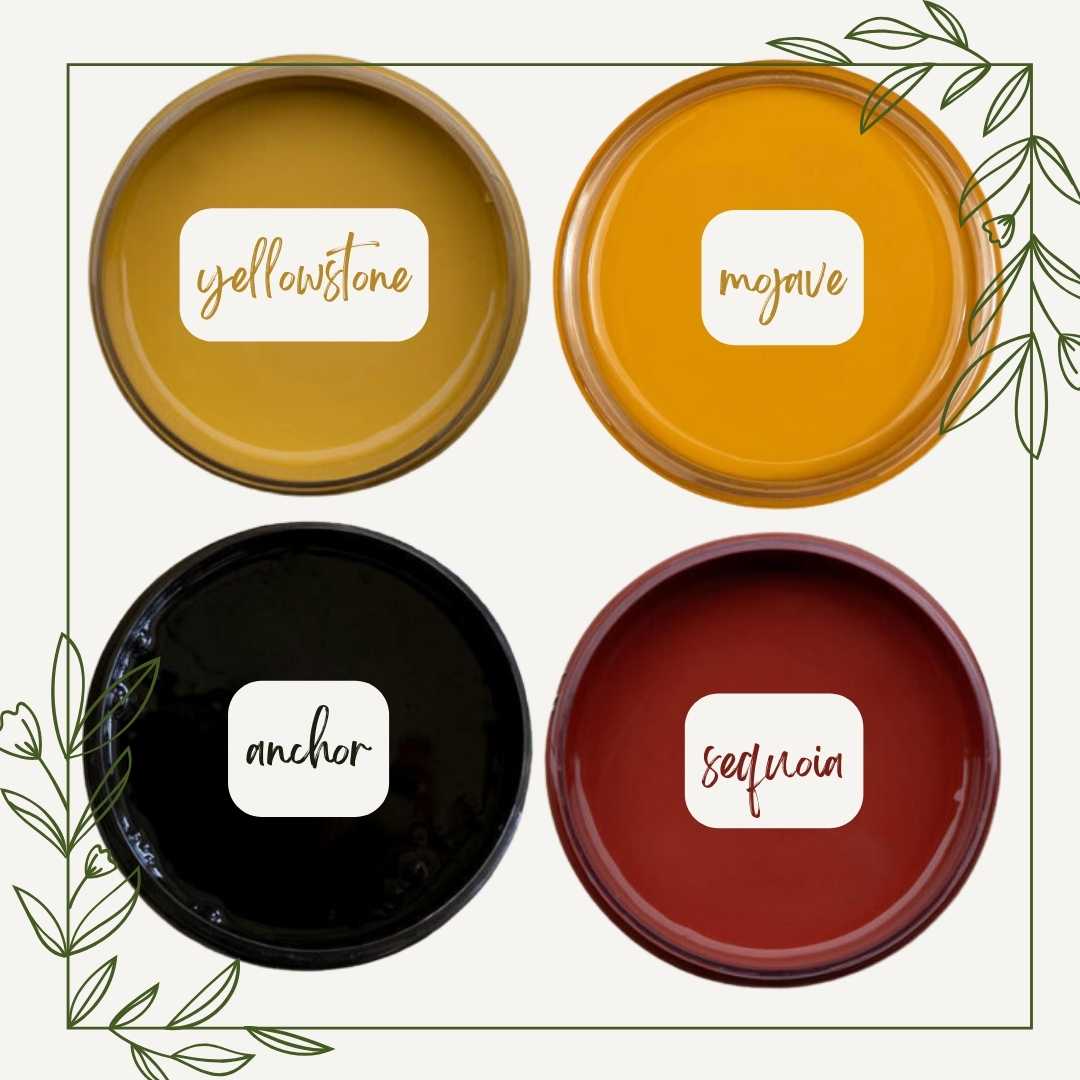
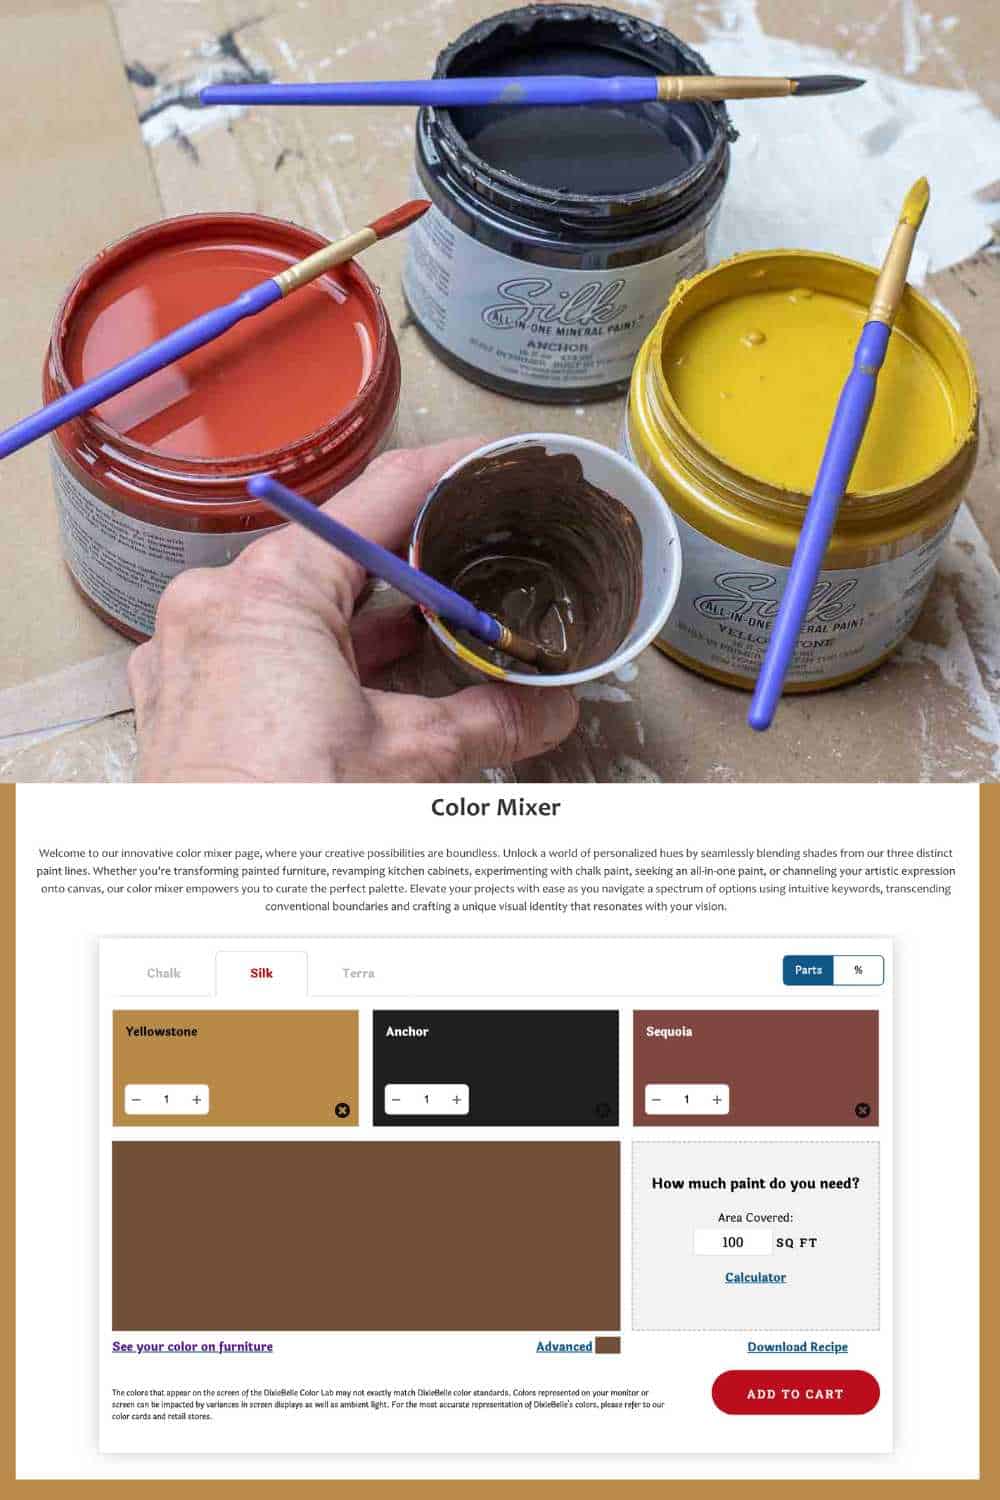
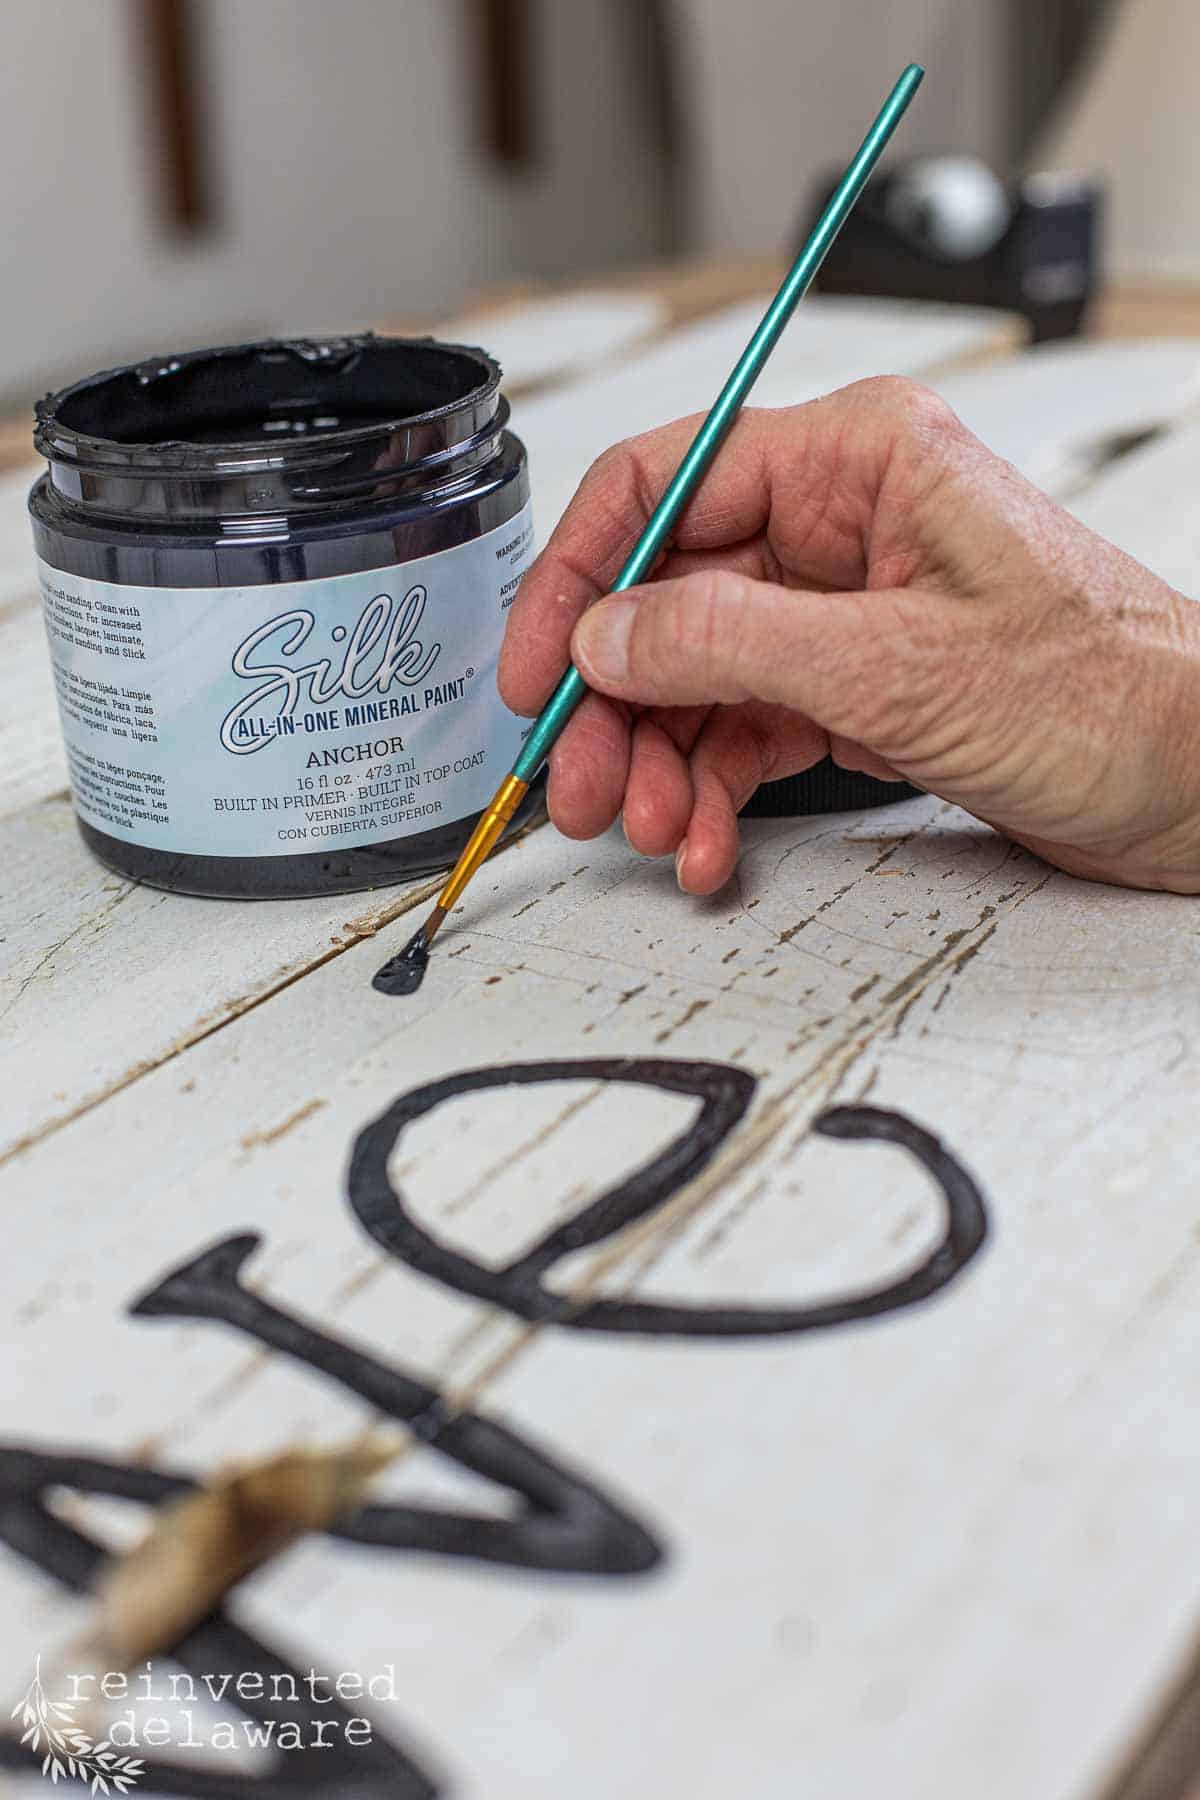
Since the design I’ve created is a large sunflower, I grabbed two colors for the blooms (Mojave and Yellowstone) and Black (Anchor) for the letters. I also needed a warm brown color for the center of the flowers but I didn’t have any on hand. That was not a problem because I used the Dixie Belle Color Mixer.
You can use other colors they offer and mix them online before actually mixing them for real! This tool was a lifesaver!
First I used Anchor and Yellowstone and digitally mixed them. The brown I got was lovely but not the color I imagined for the centers of the sunflowers. I looked at the other Silk colors I had on hand and saw that I had Sequoia (Red).
It only took a click on the color mixer to digitally add the red tone and wa-la, I had the exact color of brown I wanted! I mixed an equal part of each paint to create the perfect brown for the sunflower centers!
Creating Your Welcome Sign
Now that you have the paint chosen and you have your tools and supplies gathered, let’s create and assemble this adorable sign for your home!
Preparing the Wood Boards
As I mentioned earlier, we have a stack of pickets that we can pull from for projects like this. My hubby built this sign but I have also made plenty of them over the years. When we sold our repurposed items at a local shop, we made about 200 farmhouse-style signs over five years we were vendors. They were very popular signs!

Assemble the Sign
Building the sign is easier than you think. Once the fence boards are cut to length (mine were cut at 31″ long) you will need to give them a scuff sand on the cut ends. You might need to also sand off any loose paint.
Using two scraps pieces of wood cut to the height of the sign (mine were 20″ tall) and attached them to the back of the fence boards with glue and screws. I go into full detail about assembling this sign in the video (linked later in the post) but I am sure you can figure this out! It’s so easy. You will notice that I alternate the gothic design of the fence boards to create a cut look.

Designing Your Sign
You can design your sign in different ways. I ultimately designed my sign the old-fashioned way. More on that in a bit.
Use a Cricut Machine
If you have a Cricut machine or Silhouette Machine, then you are all set. Create your welcome sign design in Cricut Design Space according to the dimensions of your sign. Create the word ‘welcome’ using the font of your choice.
You can either make a vinyl stencil for the letters or you can have the Cricut cut the vinyl letters out for you. The Cricut cutting machine does all the work for you! BTW, you can find an abundance of svg files over on Etsy!
I used the Cricut to create a scrap wood sign for our back entrance. Later in this post, I will include a link to the video. My friend Crissy from First Day of Home has many tutorials for using this amazing machine for so many projects!

Use the Old-Fashioned Method
I opted to create my design the old-fashioned way. The first thing I did was to find something that was round and the size I wanted for my sunflowers. Lo and behold it was a thrift store lampshade! It measured about 14″ in diameter. It helped to give me a visual for the blooms.
The next step was to create a sunflower design. I grabber a large piece of wrapping paper and quickly sketched out the design in my mind. Then I used a free online design studio called Canva to finalize the design.
The sunflower was too large to print on an 8.5″ x 11″ paper so I divided the main sunflower design into quarters. I saved the file as a PDF so you could use it too! The design is in my free printable resource library. You can sign up to get access to this design as well as some other fun printables!
While I was still using Canva, I also created the letters for the ‘welcome’ part of the design. I chose a font I liked and made the words fit over three sheets of copy paper. I have that saved for you in the free resource library too!
If either of those ideas doesn’t work for you and your sign, you can also go to your local craft store like Hobby Lobby and purchase pre-made wooden letters. These often come with phrases like ‘welcome’ in a pack. Using a ‘welcome’ stencil is another option!

thanks for being here!
I hope you are enjoying this project! Let me know if you have any questions. Or leave me a comment to tell me about your project and ideas!
thanks, Cindy 😀

Painting and Decoration
Here are the instructions for transfering the designs onto the scrap wood sign. I will share how to get access to the designs later in the post. For now, these are the steps you will take to create this adorable sign on your old wood board!
Paint the ‘welcome’ Letters
The first step is to transfer the ‘welcome’ letters and the sunflower design to the wood sign. I used transfer carbon paper to transfer the design. Layer the printed PDF design on the assembled fence boards the way you like it.
I centered the word ‘welcome’ on my sign. I taped the three pages together to spell out welcome, then folded it in half to find the center of the letters. Next, I measured the sign and found the center. I matched up the two centers and used painter’s tape to hold the three pages to the sign.
Then I used transfer carbon paper and a pencil and traced the letters. This leaves the perfect line on the fence board sign. The next step is to use a small paintbrush and black paint (Anchor) and paint in the letters! It’s not as daunting as you think. Put on a good podcast or audiobook and paint away!

Paint the Sunflowers
Ok, now for the really fun part! Don’t be nervous to paint the sunflowers! I will break down this simple design step by step! Trace the sunflowers in the same way as you did the welcome letters.
Remember the design is on one-quarter of the sunflower. You can trace it directly on the wood sign or you can trace it onto a large piece of paper to create the whole sunflower then you can trace it onto the wooden sign.
That’s what I did. I traced the full sunflower onto craft paper I had on hand. Be careful to line up each fourth of the flower so that it forms a circle.
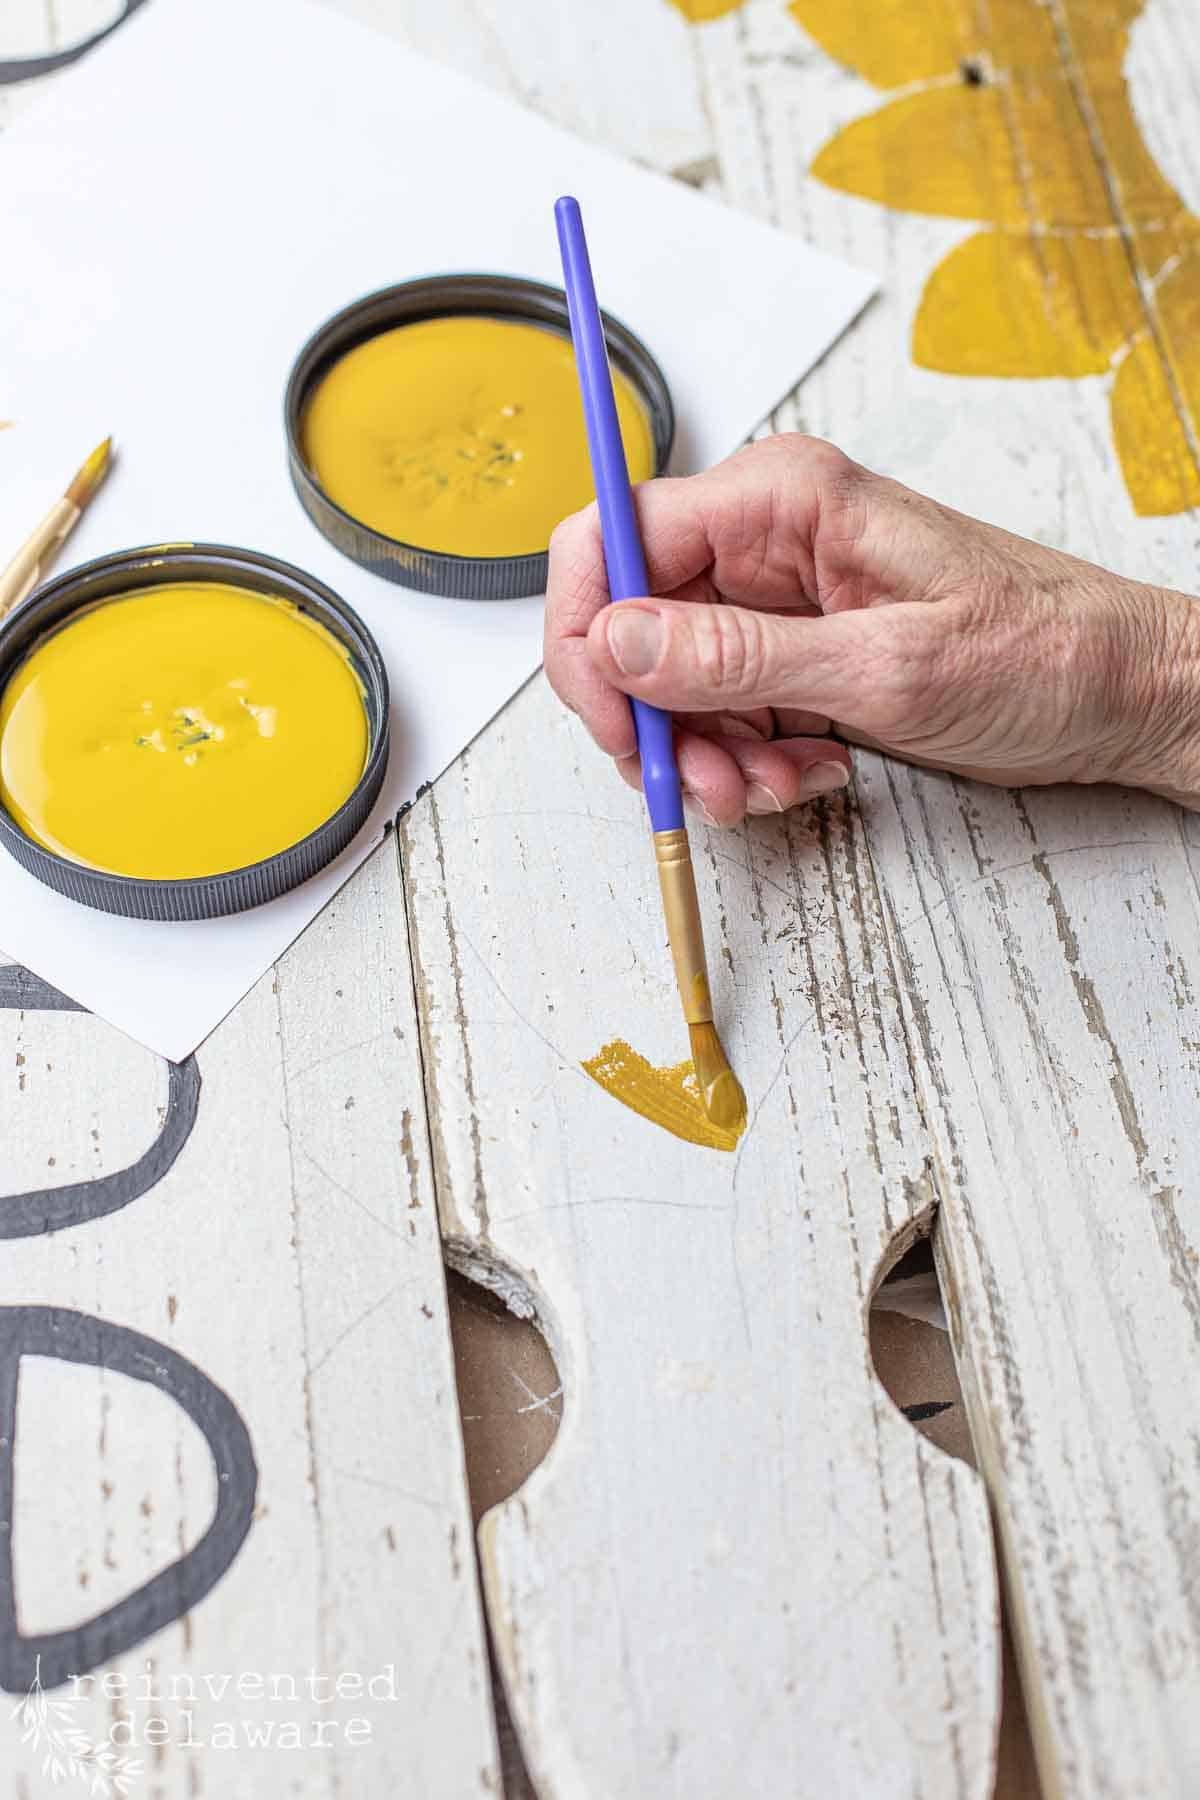
Start by painting each petal using the lightest yellow color (Yellowstone) towards the tip of the petal. Then, with another small paintbrush paint the centermost part of the petal with darker yellow (Mojave). BTW, I do not recommend using a foam brush for this style of painting. A small artisits brush is the way to go!
Paint towards the first color and meet somewhere in the middle. You can blend the colors in the middle of each petal. Chalk paint is blendable on the spot. This is fun to do! Paint one petal at a time and you will become an expert sunflower artist!
You will also notice that I left a thin outline around each petal to create definition.


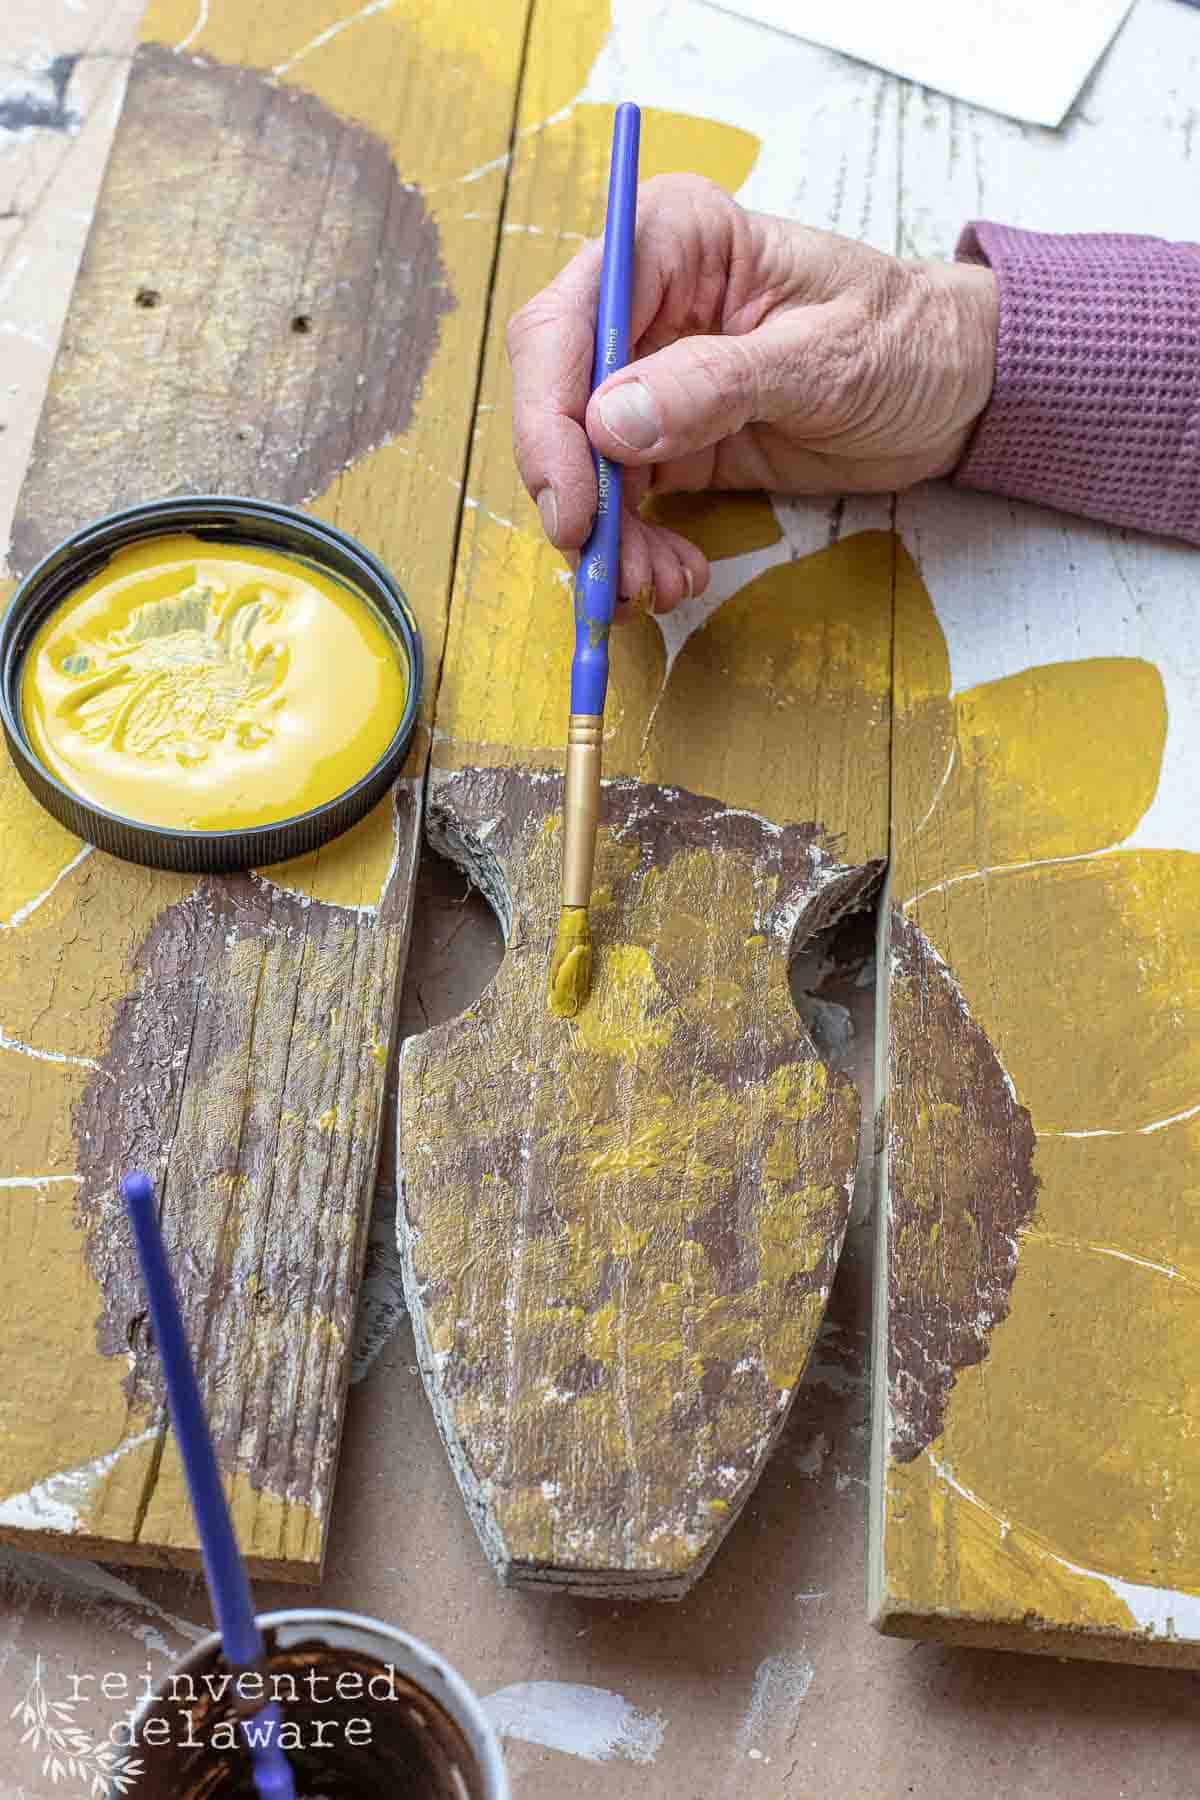
The next step is the paint the center circle of the sunflower. Use the warm brown color we mixed earlier and with a dabbing motion, dab the paint on in the circle and some around the perimeter. This creates texture and an uneven look around the outside edge.
Then use the two shades of yellow and dab color over the warm brown. Don’t be intimated by this! The great thing about this style of painting is that it is fixable. If you don’t like it you can either wipe it off with a damp paper towel or allow it to dry and paint over it!

Adding Final Touches
Now it’s time to seal the porch sign if it is going to be in direct contact with the elements. My front porch is covered so I didn’t need to seal the sign. If you seal your sign, seal the surfaces with a polyurethane clear top coat in the desired sheen.
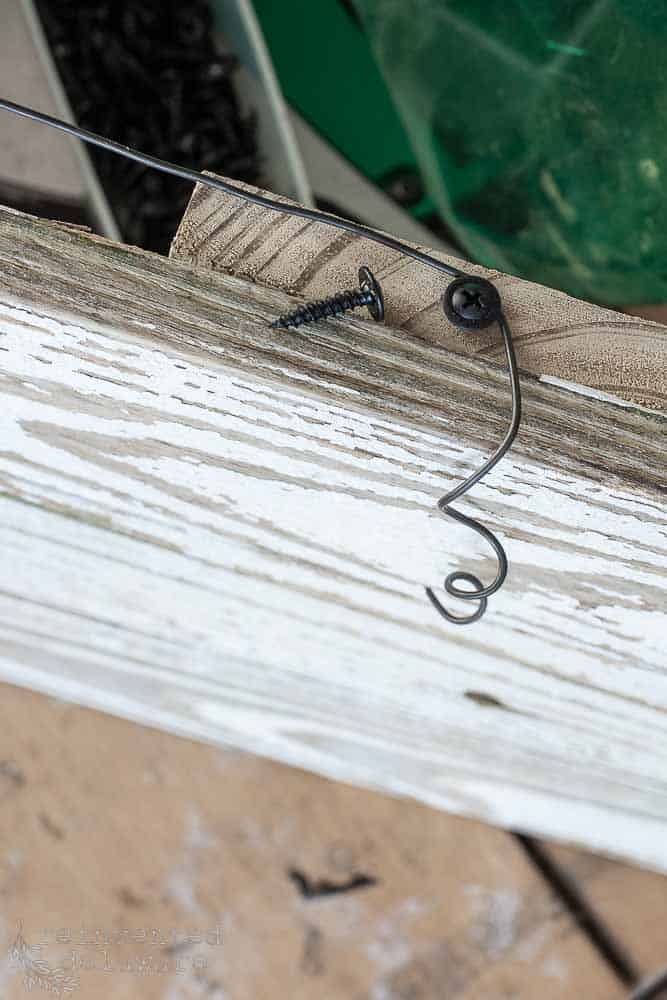
It’s also time to add a hanger. This is easy to do with heavy wire and a screw to hold it securely to the top of the sign.

Seasonal Welcome Sign Ideas
Here are some additional ideas for a front porch welcome sign DIY project you could make for your home!
- Cut the fence boards longer and create a vertical welcome sign to lean near your front door
- Create a matching welcome mat on a sisel outdoor mat using a stencil and spray paint
- use the same flower pattern and bright colors to add a pop of color for the spring season
- Look for simple designs you could draw yourself. Pinterest is full of ideas.
- Use red and green colors at Christmas time and paint a poinsettia instead of the sunflower.
YouTube Video
Here is a video that will demonstrate the process to build and assemble a sign that is very simialr to this one. The only difference is the size!
DIY Wood Sign
using Reclaimed Lumber
My Facebook Group
I would love for you to share the welcome sign you make! I’ve created a Facebook Group so you can do just that! We are a thrift loving, project making group who loves to share what we are working on. Click below to join!
Recreate and Decorate
Join the Facebook Group
Get the Free Designs!
You can gain access to the printable desgins for this sign by joining my email. I like to send out an email to let you know when I have a new project on the blog or a new video over on YouTube!
If you are already a member of my list, then you can access the library by clicking the button below. The password is in my recent email to you!
If you are new here, tap the button below to sign up and get the adorable sunflower and ‘welcome’ designs! They are located in the freebie library in the file called “Guides, Cheatsheets and Patterns” You will see a ton of other fre printables in the library too!


Thanks for joining our journey!
Thanks so much for joining us for this post! Join our journey so you don’t miss any of the fun projects, tutorials, and inspiration that we share with you each week! You can follow us on Instagram, Facebook, and YouTube. We share even more inspiration on Pinterest!


Cindy Rust
Cindy has been decorating her home with thrift store finds for 40 years. She is an avid thrift store shopper who loves to makeover the items she finds into vintage-inspired home decor and furniture. When she isn’t thrift shopping or painting a piece of furniture, you can find her making homemade butter, working in her garden, or painting with watercolors.


So Cute Cindy! And in your usual style, you explained it all ssoooo well!
Thanks for sharing such a cute project!
Thanks Diane! Coming from you that’s a great commpliment!
That is really cute. Love using the old pickets. Everyone needs greeting like that for arrivin guest! I will go scouting for old pickets, or buy some at Lowe’s! Thanks for such a clever, easy project.
Yay!! So glad you enjoyed this project Barbara! If you can’t find reclaimed fence pickets, get them at a big box home improvement store. This is the time of year they stock replacement pickets 🙂
You know I love a good scrap wood project and this one is adorable, Cindy. The yellow sunflowers are the perfect addition! You’re so talented, my friend. Pinned! 📌
xo 😘
You are so good with scrap wood projects Do! You have inspired me so much through the years my friend🥰
Cindy, love your sign. It’s really cute. I would love to make one but I’m going to have to do my Sunflowers free hand. Don’t have a Criket. Thanks for sharing.
♥️😊👍 Shelly Dehart
Im so glad you like the project Shelly! I have a free printable in my freebie library for the sunflower design. So you don’t need a Cricut! Let me know if you have any questions about the freebie library!
Love this post about the sunflower welcome sign! Your instructions are so thorough that you make it possible for me to do!
That’s great Patti! I hope you get to make one!🥰
Adorable! I just may have some fence pieces left over. Thanks for the inspiration.
You are welcome Cheryl! Have fun making the sign!