The Best Vintage School Desk Makeover using Milk Paint
Learn how to give a fresh look to an old piece of furniture with this vintage school desk makeover. This easy DIY project is perfect for beginners and experienced painters alike. With a little time and effort, you can transform your desk into a beautiful and functional piece of furniture that you’ll love for years to come.
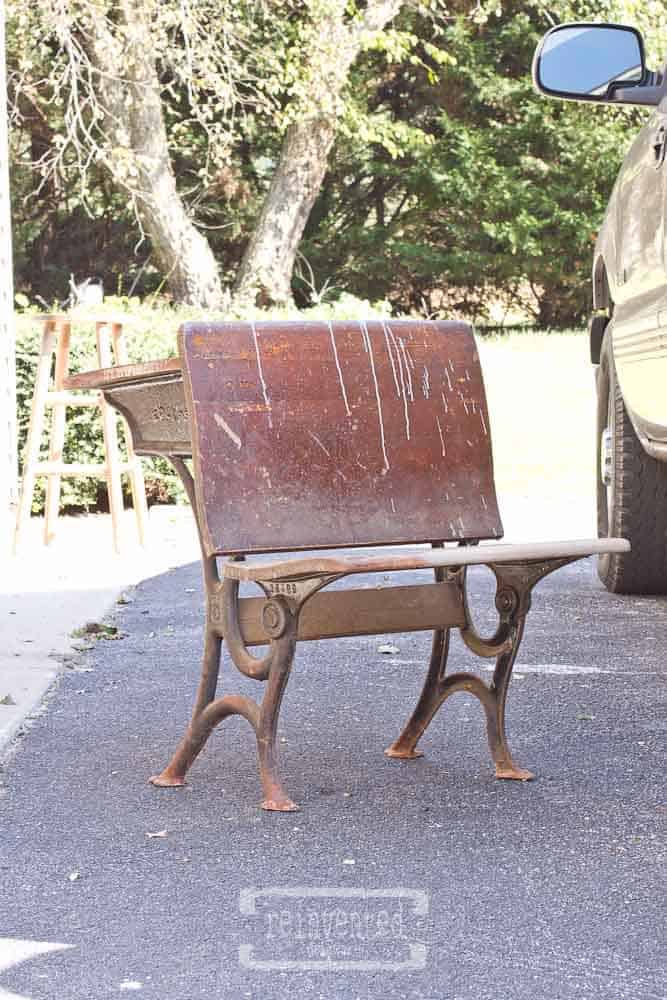
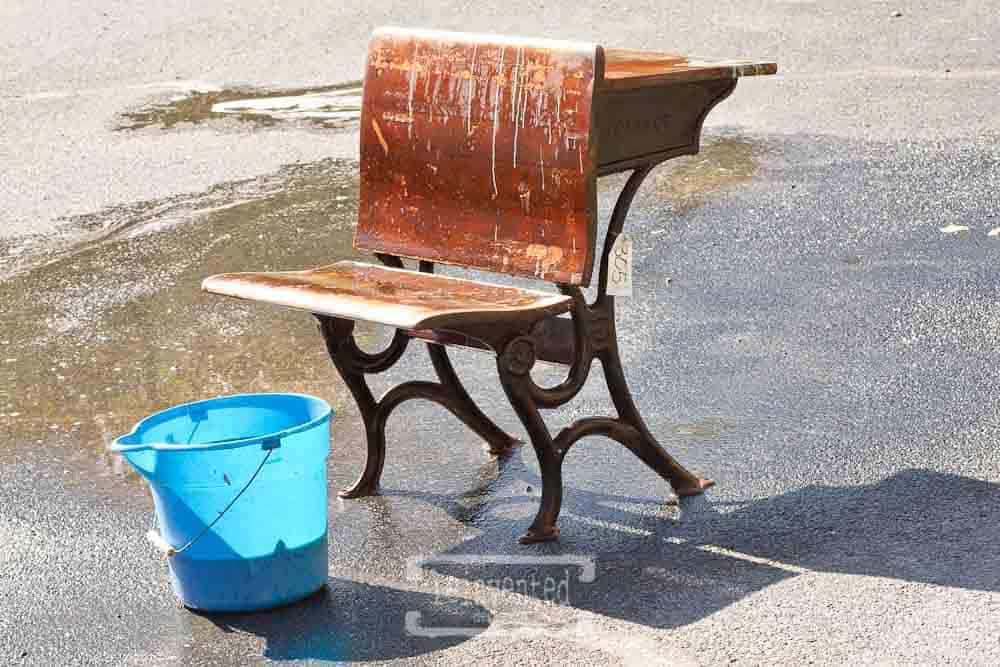
As a lover of vintage furniture, I am always on the lookout for unique pieces to add to my collection. Recently, I stumbled upon an old school desk at the annual Amish Auction.
This flea market piece was in desperate need of some TLC. The desk had seen better days, with scratches, dents, and a rough original finish. However, I saw the potential in it and decided to take on the challenge of giving it a makeover.
The process of transforming the old school desk into a beautiful piece of furniture was both challenging and rewarding. The end result was a stunning vintage desk makeover that was both functional and beautiful.
Let’s get into this fun project!
The following post may contain affiliate links. That means if you click and then buy something, I will make a small commission at no additional cost to you! Thank you for supporting my blog. Full disclosure here.
finding the perfect vintage school desk
As someone who loves old furniture pieces, I have always been drawn to the charm and character of old school desks. Whether you are looking for a desk for your home office or your child’s study area, antique school desks can add a touch of nostalgia and uniqueness to your space.
Even though this little desk wouldn’t be optimal for an adult’s home office, you can use this furniture makeover for inspiration!
Before we start on the furniture makeover, here are some tips on where to find the perfect vintage piece.
yard sales
One of the best places to find furniture pieces like this old school desk is at a yard sale. Many people sell their old furniture at a garage sale, and you can often find great deals on vintage desks. Make sure to arrive early to get the best selection. Be prepared to negotiate on the price respectfully.
thrift stores
Your local thrift store is another great place to find antique school desks. These stores often have a wide variety of furniture, including desks from different eras. Keep in mind that the selection may vary depending on the store, so you may need to check multiple locations to find the perfect desk. I would also suggest you frequent your local thrift stores since their inventory changes rapidly.
estate sales
Estate sales can be a treasure trove of vintage furniture, including school desks. These sales often occur when someone passes away or moves, and their belongings are sold. Estate sales can be a bit overwhelming, so it’s a good idea to arrive early and have a plan for what you are looking for. Check your local classifieds for estate sales in your area.
antique finds
If you are looking for a truly cute desk like the one I found, consider checking out antique stores. These stores specialize in vintage and antique furniture, and you can often find one-of-a-kind pieces.
Keep in mind that antique stores can be more expensive than other options, so be prepared to pay a premium for the quality and rarity of the desk. Sometimes you can ask the shop owners if the specific booth vendor offers discounts on items above a certain price. Many vendors offer discounts but do not publicly advertise this.
old desks in old houses
Finally, if you are lucky enough to live in an old house, you may be able to find a rusty old school desk right under your nose. Check the attic thoroughly. It’s quite possible that the previous owners did not completely empty the attic space! If only I could find a historical item like a school desk in the attic of our house! Haha! Let me know if you are so lucky!
Overall, finding the perfect vintage school desk may take some time and effort, but it is well worth it for the character and charm that these desks bring to a space.
assessing the condition
When it comes to old desk makeovers, assessing the condition of the desk is the first step. Before starting any work on this desk, I gave it a good once over to see how dirty it was, whether or not it had broken pieces, and the condition of the original finish. The old desk I found wasn’t broken but it was very rusty and the original finish was sad. Very sad!
If the desk is in good condition, with no major damage or structural issues, then the makeover process will be relatively straightforward. However, if the desk has seen a lot of use over the years, it may require some repairs before it can be refinished. Before you purchase a piece like this, be sure you are willing to make the needed repairs.
Most of the damage can be found on the top of the desk. The desk top is the area that shows the most wear and tear for obvious reasons.
One common issue with vintage desks is old paint. If the desk has been painted multiple times over the years, it may be difficult to remove all of the layers of paint without damaging the original finish. In this case, it may be necessary to strip the desk down to its natural wood and start from scratch. You can strip paint from old furniture but be prepared for a mess!
Another area to inspect is the back of the chair and the underside of the desk. These areas are often neglected and may have accumulated dirt, grime, or even mold over the years. You might be lucky enough to find some old chewed-up gum! Agh!!
Cleaning these areas thoroughly is important for the desk’s appearance. We will talk about cleaning an old school desk in just a bit!
The wooden seat and metal parts should also be checked for any signs of damage or wear. If the metal parts are rusty, they may need to be sanded and repainted or clear coated. The wooden seat may need to be sanded and refinished to restore its natural beauty. You can also decide to paint the wood sections of this old school desk.
Overall, assessing the condition of a vintage school desk is an important step in the makeover process. By identifying any areas that need attention, you can ensure that the desk is restored to its former glory and ready for many more years of use.
furniture makeover step-by-step
Before starting the vintage desk makeover, it is important to prepare the piece of furniture properly. Without proper prep, the paint will not adhere and the final results won’t be a beautiful as you hope. If this is the first time you have done a furniture makeover, I can’t stress enough the importance of prepping the piece!
step one clean the furniture piece
The first step is to give the desk a good cleaning. I use a solution of Simple Green with water and wash down the whole piece. A heavy-duty Scotch Brite pad is a great way to scrub and rough up the surface at the same time. Sorta like wet sanding. Let the piece dry completely. I had a sunny day that helped with this step! Don’t you just love sunshine?
Cleaning the piece is always the first thing you should do when starting a makeover! Don’t even think about paint until the piece gets cleaned!
step two prep the surfaces
Next, it is important to do some prep work on the wood surfaces. Here are two options:
- use an orbital sander to remove any old paint or varnish and smooth the surface.
- use a sanding sponge to scuff sand the piece and leave the rough texture of the old finish intact.
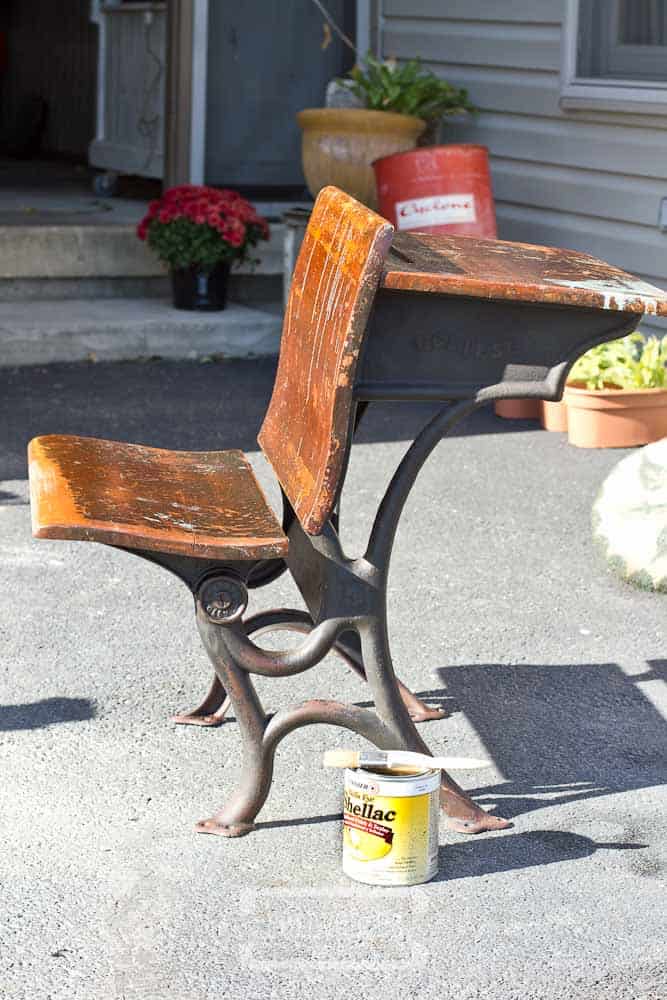
I chose the latter since I love a lot of texture on my old furniture pieces. So I sealed the wood before I painted it using two coats of Zinsser Shellac. It is easy to apply, dries quickly, and seals the wood. Apply the first coat and allow it to dry for at least 1-2 hours. Then apply the second coat and allow it to dry overnight. This ensures you will not have bleedthrough. Shellac also seals in the musty odor that old furniture can have.
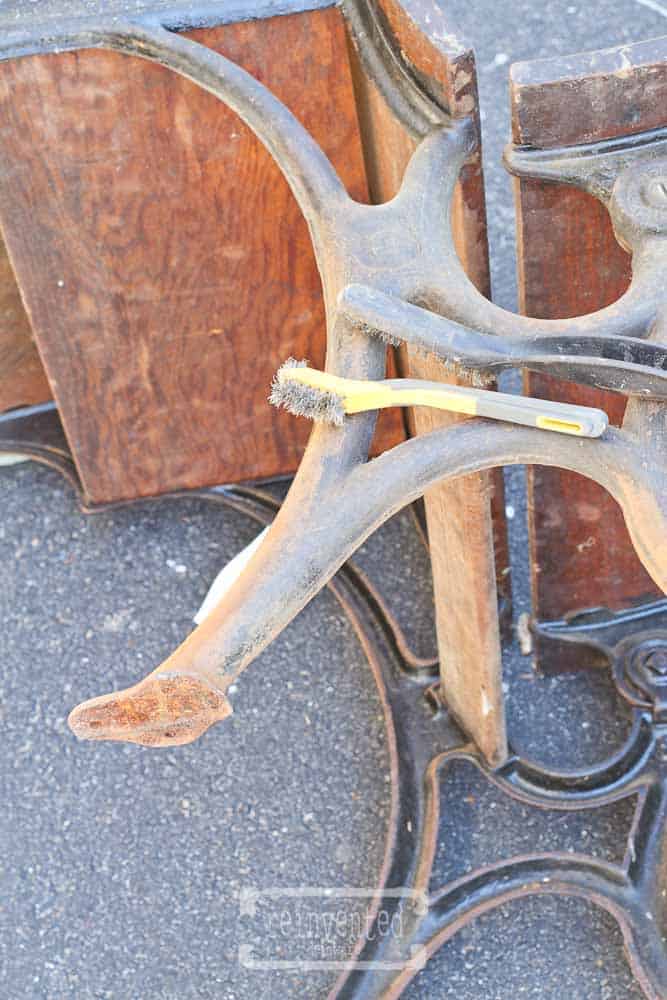
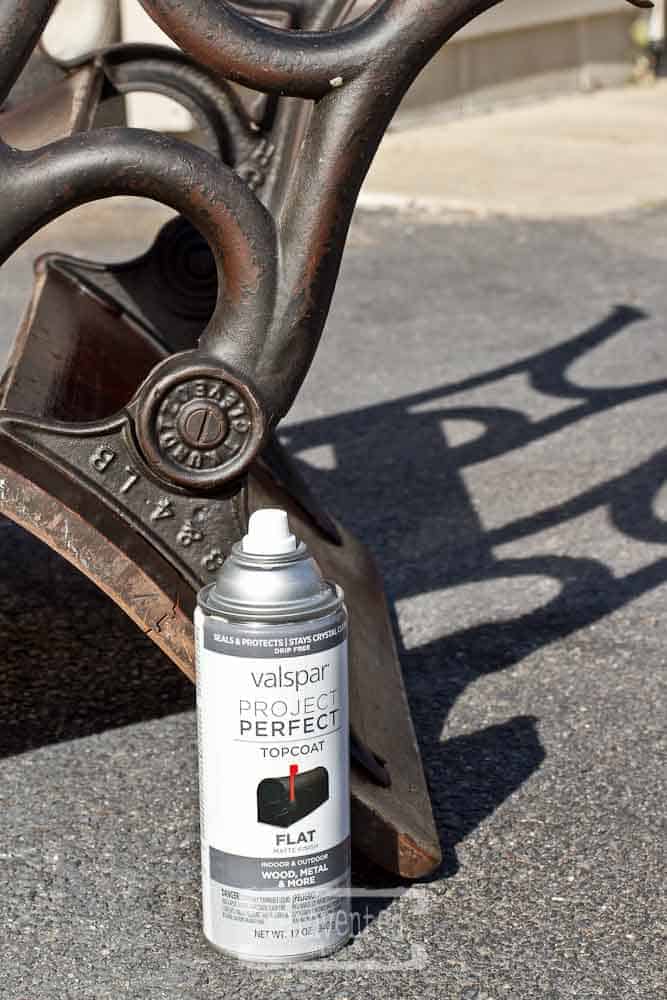
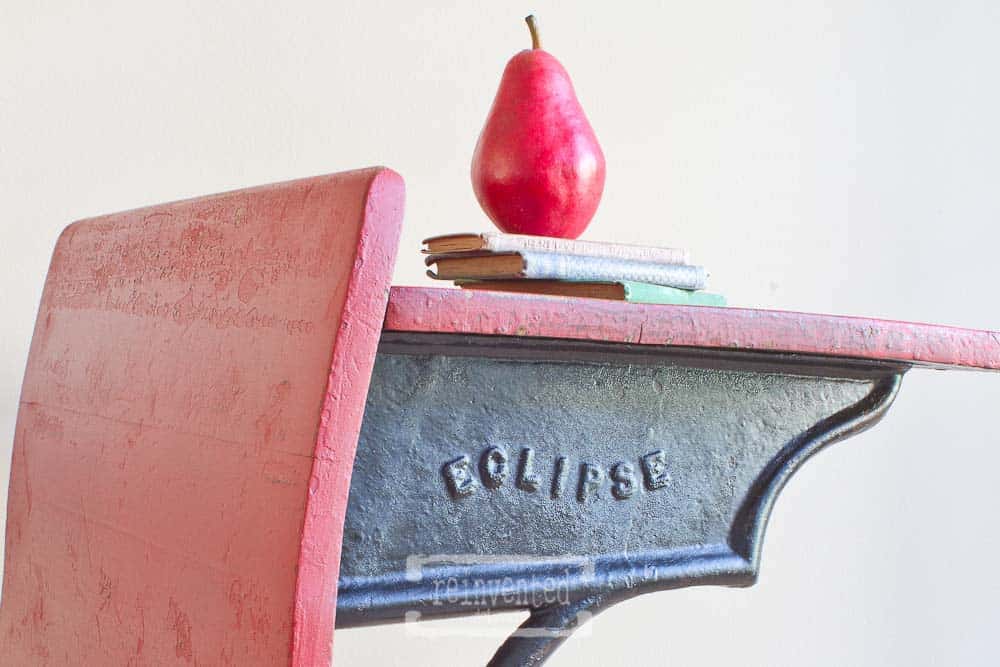
The frame of this old desk is made from cast iron and can easily rust if left outdoors or in barns. The first step is to take a wire brush to the cast iron and remove the loose rust. Next, I sealed the cast iron with two coats of Valspar Project Perfect Topcoat in Flat creating a beautiful finish and preserving the original patina.
I noticed that there were several areas with scratches, dents, and other imperfections. Like I said earlier in this blog post, I decided to keep those imperfections to create texture. If you prefer a smooth finish, you can use wood filler that matches the color of the desk. Apply the filler to the damaged areas and smooth it out with a putty knife. Once the filler dried, sand it down until it was flush with the rest of the desk.
Maybe you want the wood on your desk to be lighter in color. You will have to sand the wood pieces down to bare wood to remove any blotchy stain areas or areas with excess stain. You can lighten dark stained wood by using white wax.
If you choose to refinish the wood surfaces instead of painting them, be sure to use fine grit sandpaper to create a natural-looking wood finish.
Throughout the preparation process, it is important to be thorough and take your time. Rushing through this step can result in a poor final product. By taking the time to properly prepare the desk, you will ensure that the makeover is successful and the desk looks great.
Overall, good scrubbing, as well as proper prep work, are essential for a successful furniture makeover.
step three paint the furniture piece
When it comes to giving an old a makeover, choosing the right paint is crucial. After all, the paint you select will determine the overall appearance and durability of your project. Here are some things to think about when choosing the paint you want to use.
choosing the right paint for a furniture makeover
Before we jump into all of the types of paint you can choose from, let me say that this is a personal choice. I prefer two types of paint: milk paint and chalk mineral paint. These are the two I am most familiar with. I would recommend that you not use general latex paint meant for drywall in your home. Instead use paint that is specific for a furniture makeover.
spray paint
Spray paint can be a great option if you’re looking for a quick and easy way to give your vintage furniture piece a new look. However, keep in mind that spray paint can be more difficult to control than other types of paint. To avoid drips and uneven coverage, be sure to apply light coats and allow each coat to dry completely before applying the next.
chalkboard paint
Chalkboard paint (not the same as chalk paint) is a popular choice for furniture makeovers because it allows you to write and draw on the desk just like a chalkboard. This is a fun option for a child’s desk. Keep in mind that chalkboard paint can be more difficult to apply than other types of paint. To ensure an even coat, be sure to apply multiple thin coats and allow each coat to dry completely before applying the next.
milk paint
Milk paint is a traditional paint that has been used for centuries. It is made from all-natural ingredients and is known for its durability and matte finish. However, milk paint can require multiple coats to achieve the desired coverage. Brush strokes are not a problem with milk paint because of its thin consistency. Apply even coats and allow each coat to dry completely before applying the next. Milk paint needs to be sealed. This is one of my favorite paints to use on my projects.
chalk paint
Chalk paint is a popular choice for furniture makeovers because it requires minimal preparation and can be applied directly to most surfaces. You will need to apply a minimum of two coats of chalk paint for good coverage. Avoiding brush strokes with this thick paint is easy when you use a fine water misting bottle while you apply the paint. This paint needs to be sealed.
mineral paint
This amazing paint is similar to chalk paint. The mineral paint I like to use includes a primer and a top coat so it’s a one and done type of paint. A minimum of two coats is necessary on most furniture pieces.
apply the paint
Now for the fun part! Painting furniture is one of my favorite things to do. The only question I had was what color to paint the wood.
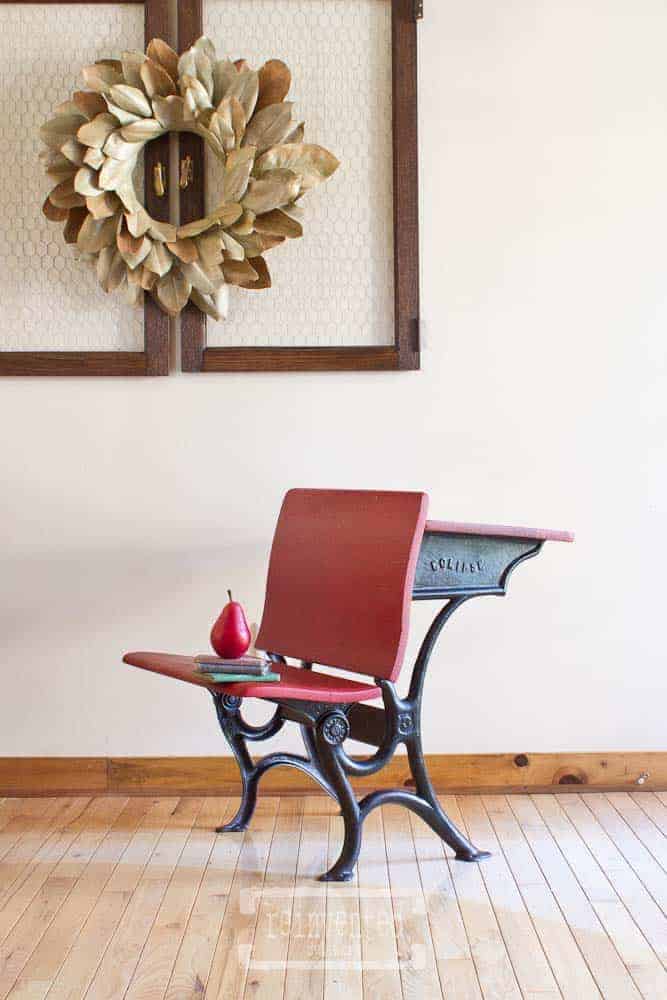
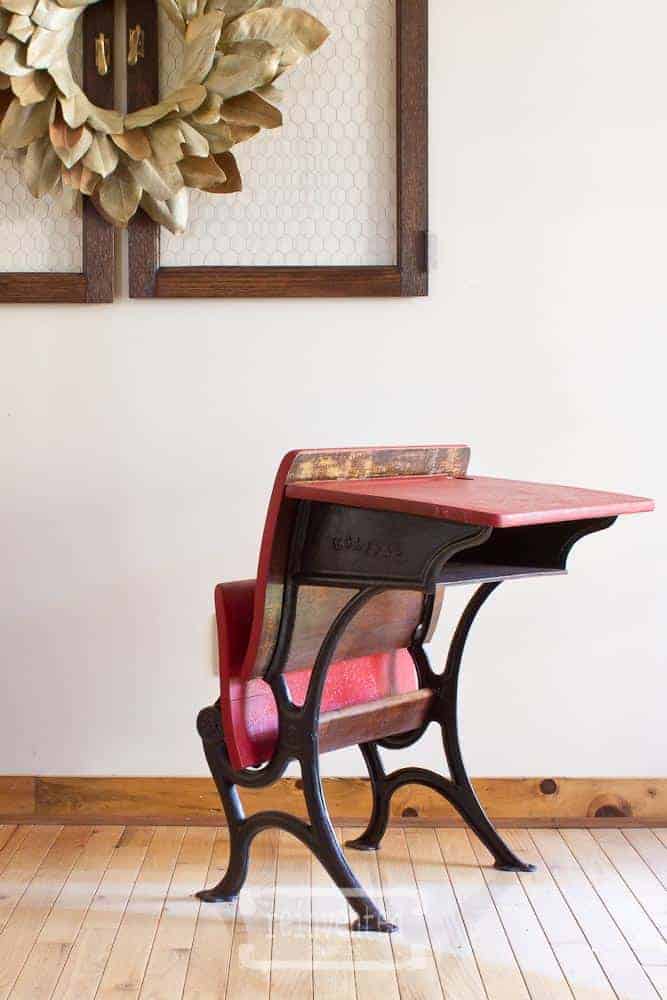
I thought about the color as I was cleaning and prepping the piece. My mind kept going back to a little red schoolhouse. So I thought what could be better than to paint this desk red! It really seemed like a no-brainer after it clicked in my mind 🙂
Miss Mustard Seed’s Milk Paint in Tricycle would be the perfect choice because I also wanted to use an old-school type of paint. wink, wink!
Mixing Miss Mustard Seed Milk paint is easy! All you need is a container, a fork that has been bent like the one in the image, Miss Mustard Seed’s Milk Paint, and water. The directions on the bag say to use equal parts paint and water.
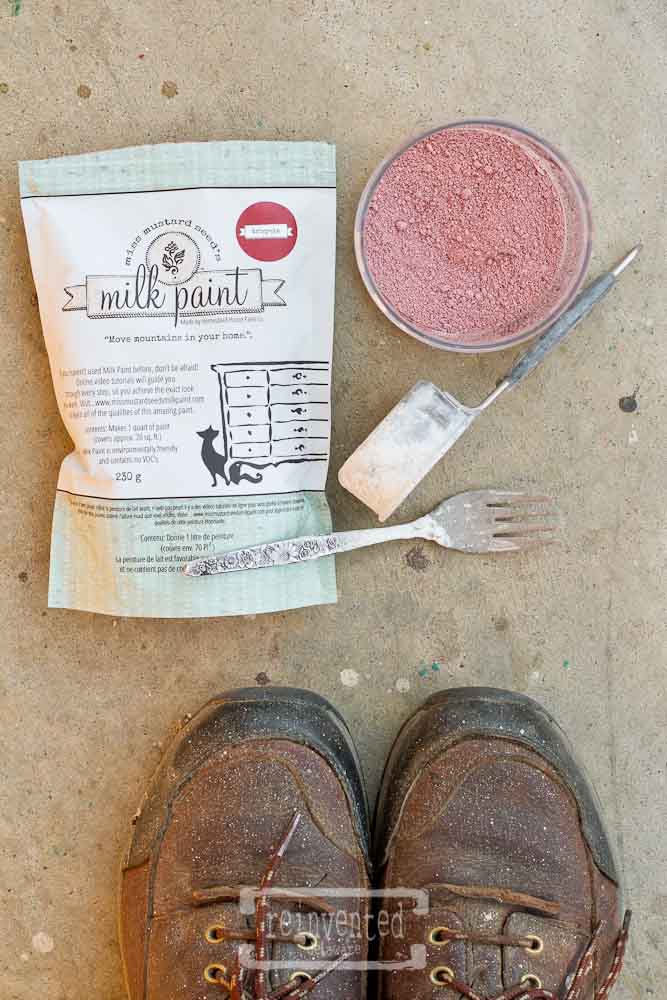
I start off by mixing two parts of paint with one part of water which creates a paste. Once I feel all of the milk paint has been absorbed by the water, I add the remaining amount of water. I find it easier to completely mix any lumps that might form by mashing down with my bent fork. Sometimes I pour it through a stainer but that is not necessary. Excuse my compulsive behaviors!
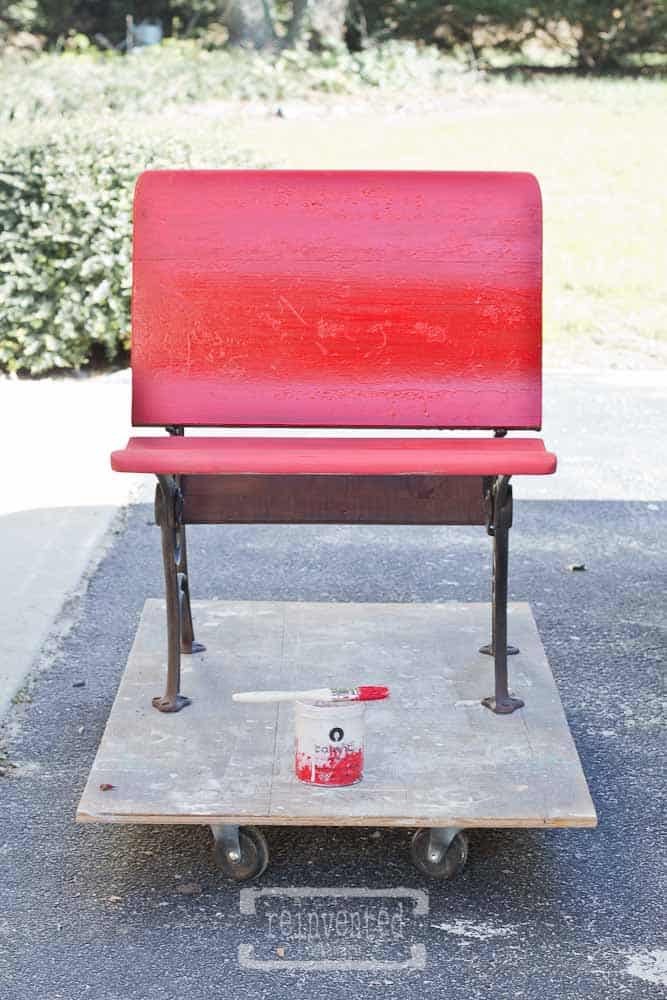
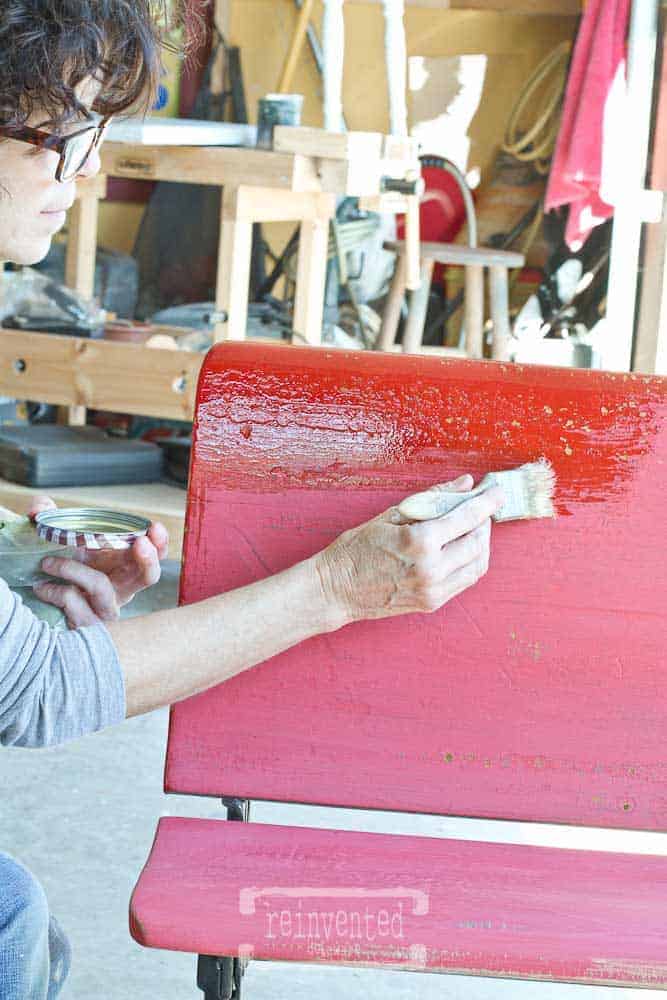
First, I used a chip brush to apply the first coat of paint. I made sure to use long, even brush strokes to ensure an even application. The paint can settle to the bottom of the container so stir the paint periodically. I let the first coat dry completely before moving on to the next step.
Next, I applied a second coat of paint using the same technique as before. This time, I made sure to pay extra attention to any areas that needed more coverage. I let the second coat dry completely before moving on to the final step.
The final coat of paint was a light touch-up in the areas that needed it. Milk paint dries quickly so this whole painting process was finished within 1 1/2 hours.
Overall, the painting process was straightforward and easy to follow. By using high-quality paint and applying multiple coats, I was able to achieve a beautiful, durable finish that will last for years to come.
distressing the paint for a chippy appearance
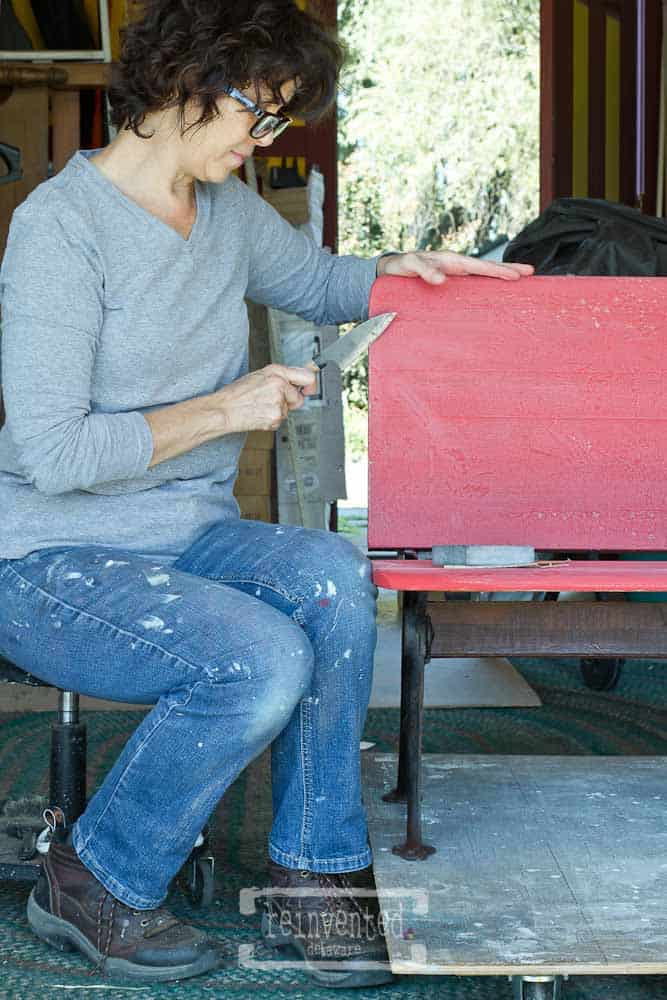
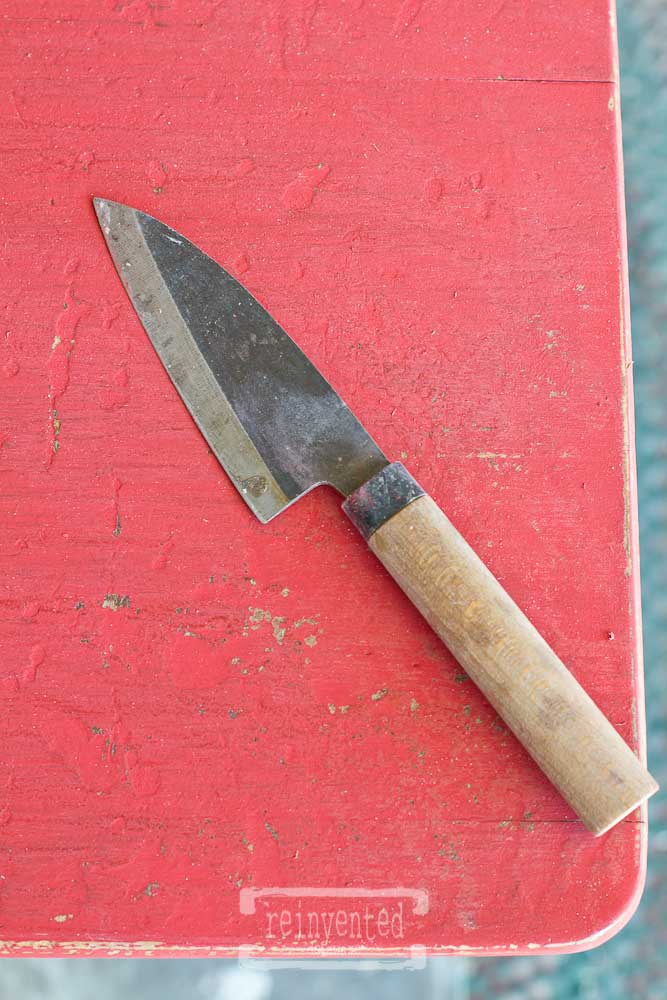
Now that I have finished the basic makeover of my vintage school desk, it’s time to add some unique touches to make it truly my own. This is an old desk and I want to enhance the aged appearance of the textured paint.
So I pulled out a knife! Sounds crazy I know! I used the flat edge of this old kitchen knife to scrape over the high points of the furniture pieces. I am careful not to gouge the wood with the knife. I use the knife over the high points and the edges that would naturally be worn off. I also use an old, partly-used sanding block over the entire piece to smooth the surface and distress even more.
This method of distressing creates an authentic chippy paint look that I love and matches the age of the piece of furniture while still giving this piece new life.

step four seal the paint
The last step is sealing the paint. One of the products I love to use is Miss Mustard Seed Hemp Oil. It is a natural based product that when applied to milk paint enhances the color and seals the paint.
I apply it with a chip brush like this one and wipe it back with a microfiber cloth, buffing it as I go. It produces such an authentic age for any furniture piece. I really love this stuff!
You can also consider applying a clear wax to protect the finish and add a subtle sheen. Be sure to apply the wax in a thin, even coat and buff it with a clean cloth to achieve the desired shine.
final touches and preservation
Now that the vintage school desk makeover is complete, it’s important to take some final steps to ensure that it remains in good condition for years to come. Here are some tips for giving your desk the final touches it needs and preserving its beauty.
First, consider using hemp oil every few months to protect the wood. Hemp oil is a natural wood preservative that can help prevent damage from moisture and other environmental factors. Simply apply a thin layer of hemp oil to the surface of the desk and let it absorb for a few hours before wiping away any excess.
Add an additional coat of wax each year that you use this desk. This will help to paint the beautiful finish you have created with the makeover.
Apply a clear coat in a flat finish to create a waxed appearance with the durability of a clear coat. This is especially helpful if this desk will be used on a regular basis instead of only for decorative purposes.
Finally, be sure to keep your desk out of direct sunlight and away from sources of heat and moisture. This will help prevent warping, cracking, and other types of damage that can occur over time.
By following these simple steps, you can help ensure that your vintage school desk remains in great condition for years to come.
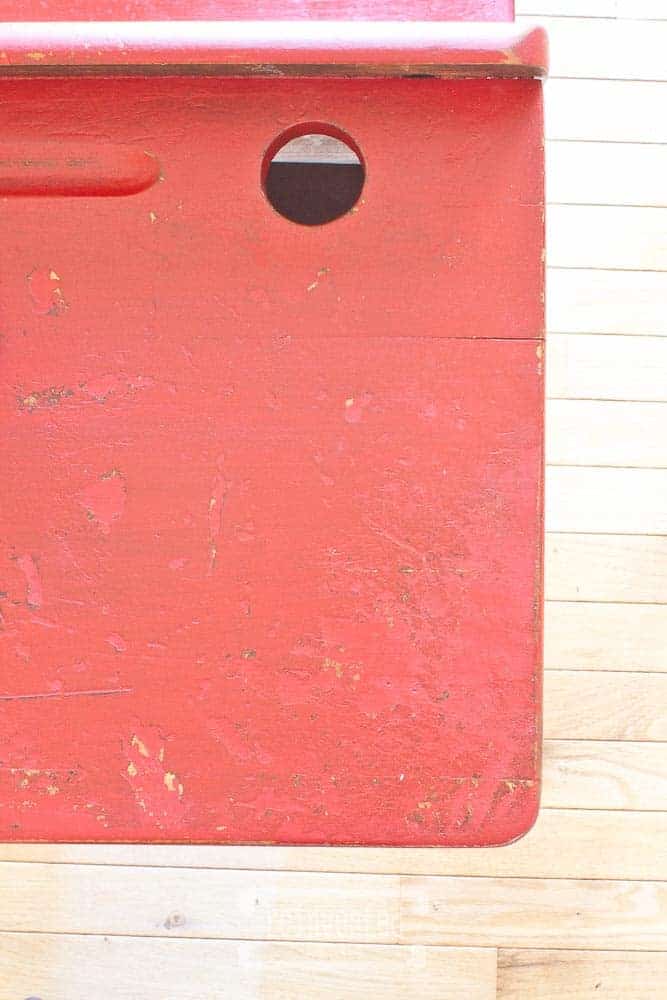
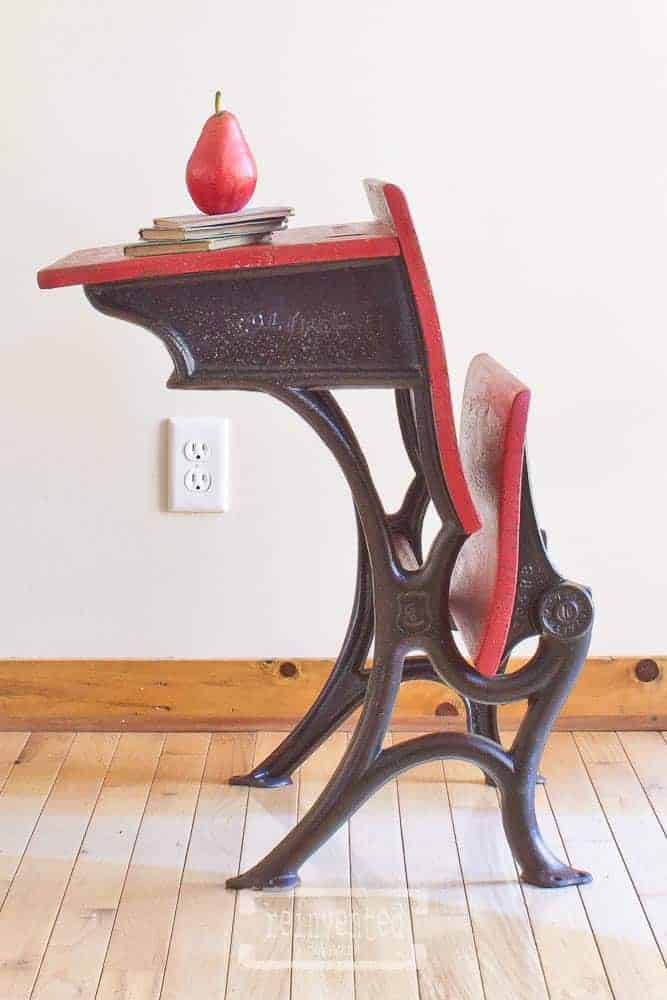
By the way, you can see here that I chose to not paint the underside of the wood. (Use a bit of sandpaper to remove any paint on the underside edges that could be messy looking.) This is such a good way to keep some of the originality to the piece!
Of course, you can choose to paint the underside of your furniture makeovers! This is just my personal preference!
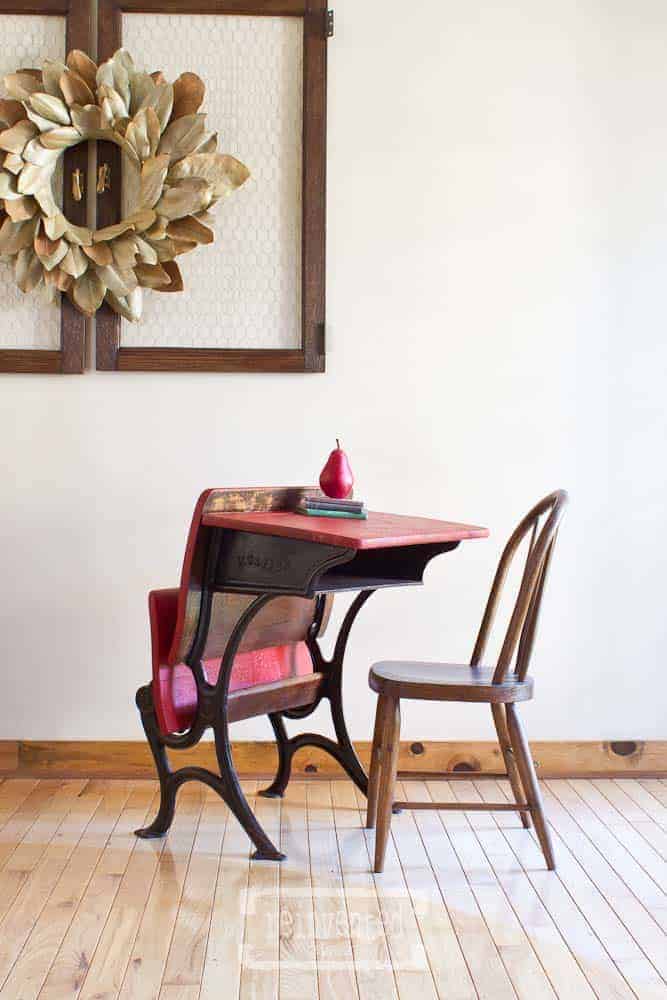
If you have a little one in your life who wants to use a school desk for homework or artwork, pull up a small child’s chair like this one and let them enjoy a bit of history!
supplies
- milk paint (I chose Tricycle Red)
- hemp oil (or furniture wax)
- chip brushes
- cleaner like Simple Green
Vintage School Desk Makeover Step by Step
Equipment
- milk paint
- water
- empty container for mixing
- chip brush
- hemp oil or wax
- cleaning cloths
- soap
Instructions
- Clean the furniture piece thoroughly using Simple Green or another decreasing cleaner. Rinse the piece completely and allow it to dry in the sunshine.
- Make any needed repairs. Remove any rust on the cast iron legs of the old school desk with a wire brush. Remove the dust created by wiping down the piece with a damp microfiber cloth.
- Seal the cast iron using spray on clear coat in a flat finish. Apply a minimum of two coats allowing proper drying time.
- Fill dings and scratches if desired. Or leave the worn surfaces as is for added old world texture. Lightly scuff the surface then wipe away dust.
- Seal the wood surfaces with Shellac to prevent bleedthrough.
- Paint the piece with 2-3 coats of milk paint in the desired color. Distress to your liking.
- Seal the paint with hemp oil or furniture wax. Apply and wipe back the excess.
Video
Notes
Thanks for Stopping By!
I am so glad you stopped by to see how this little school desk was transformed! It is such a rewarding challenge to find the old and make it new again! Pin this post for inspiration!
Here are a few more desk makeover projects:
- Antique Desk Makeover Idea
- How to Refurbish Heywood Wakefield Desks
- Easy Chair Repair on Antique Desks
Follow along on Instagram, Facebook and Pinterest for more projects! Happy Reinventing!


Cindy Rust
Cindy has been decorating her home with thrift store finds for 40 years. When she isn’t thrift shopping or painting a piece of furniture, you can find her making homemade butter, working in her garden, or painting with watercolors.