
The Best Way to Upcycle a China Cabinet – Furniture Makeover
Learn how to upcycle an old china cabinet from the thrift store into a gorgeous built-in style of cabinet for a laundry room or butler’s pantry.
This complete guide will take you step by step about how we gave an old china cabinet a facelift and a new life. I will show you how to reconfigure this piece of furniture by adding depth to the back panel, using a repurposed countertop, and even how to add a sink to the countertop surface!
These great ideas will inspire you to rethink that old china hutch that you have sitting around or that you found at your local thrift store. Grab that 1980’s china cabinet and let’s give it a new look and a new purpose!
1980’s china cabinet makeover
Hubby and I bought a solid wood dining set in the early 1980s from a local furniture retail store. It included four chairs, a pedestal table, and a two-piece china cabinet. We called it a hutch. The top half was a display cabinet and the bottom had closed storage.
We loved this set of furniture so much! Especially since it was among the first furniture pieces we bought as a married couple.

Our family outgrew the table and chairs so we decided to sell it. But I couldn’t say goodbye to the hutch. Even though by this time it was old furniture, I just loved it! Do you have furniture that you just can’t let go? Eventually, we built a new home and brought that vintage china cabinet with us to our new house knowing that it would fit in our dining perfectly.
If you would like to do a similar DIY project for your home, check your local consignment shop, thrift stores, resale shops, auction houses, and estate sales. These old china cabinets are easy to come by.
step-by-step tutorial
Let’s dive into the project. Keep in mind this is a guide to upcycling a china cabinet. The specific piece of furniture and other components that you find will be different than mine. Also, keep in mind the size of the room when choosing the china cabinet you want to upcycle.
measure first
Use a measuring tape to measure the dimensions of the area that will accommodate the china cabinet. Keep those measurements in your Notes app on your phone so that when you are shopping for the pieces you will have the measurements handy. Keep a small measuring tape with you when shopping to measure furniture pieces. You don’t want the hassle of purchasing a piece of furniture that is too small or too big.
gather the parts
We started gathering the parts we would need for this DIY project and we let our family members know about our plans. My mom replaced her Corian kitchen counters with granite and she offered any of the leftover Corian that we wanted. The countertop piece for her kitchen island was the perfect measurement for this upcycled china cabinet project! It was also in good condition!
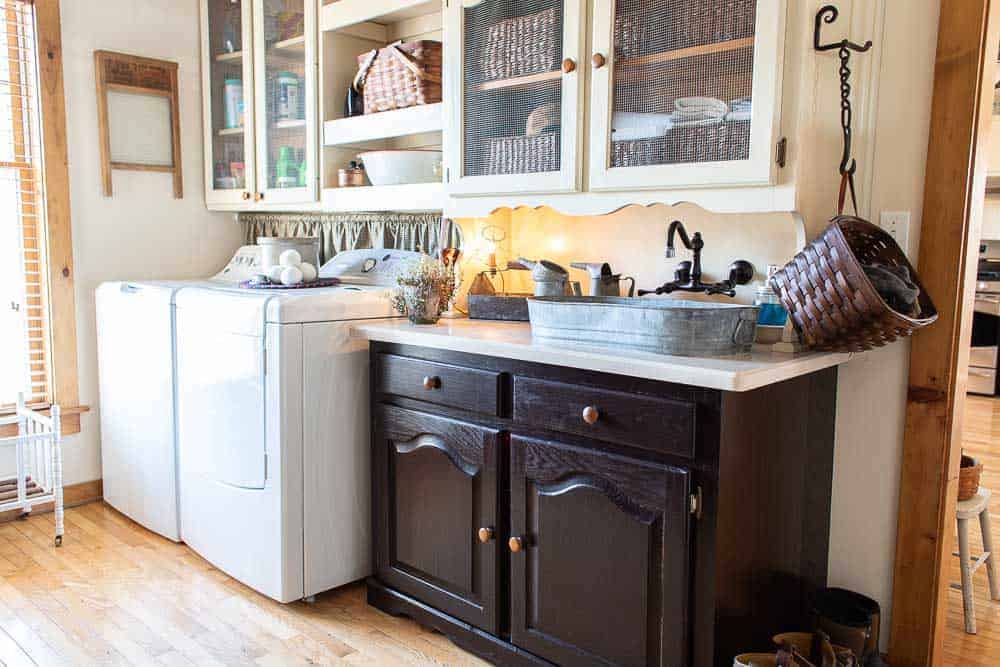
The next piece that we wanted to consider was the sink. This china cabinet would replace the utility sink in our laundry room. A sink is a must in the laundry area! I found a galvanized metal tub at our local farm store that would be the perfect farmhouse sink! I also purchased a wall-mount faucet on Amazon.
The last component we considered was the area above the washer and dryer. Shelving or cabinets were needed. Since we had mentioned to our friends and family about the project, one of my hubby’s friends offered a cabinet that he had removed from his own renovation project. The wall cabinet would be perfect.
The area between that cabinet and the upper cabinet of the china hutch needed to be filled. We decided open shelving would be the best solution.
The project would also need some lumber. Fortunately, we keep some stock lumber on hand for projects. If you need additional wood boards, let me suggest you make a simple sketch of the area so that you can determine the boards you need.
Mark the width and the height of the wall that will accommodate the finished space. Measure the china cabinet and other components you have. Place those marks on your sketch. From there, determine the size of the shelving and calculate the boards needed for the open shelving.
If you can’t find the cabinets you want, consider purchasing them at your local ReStore or even stock cabinets at the big box lumber stores.
assemble the components
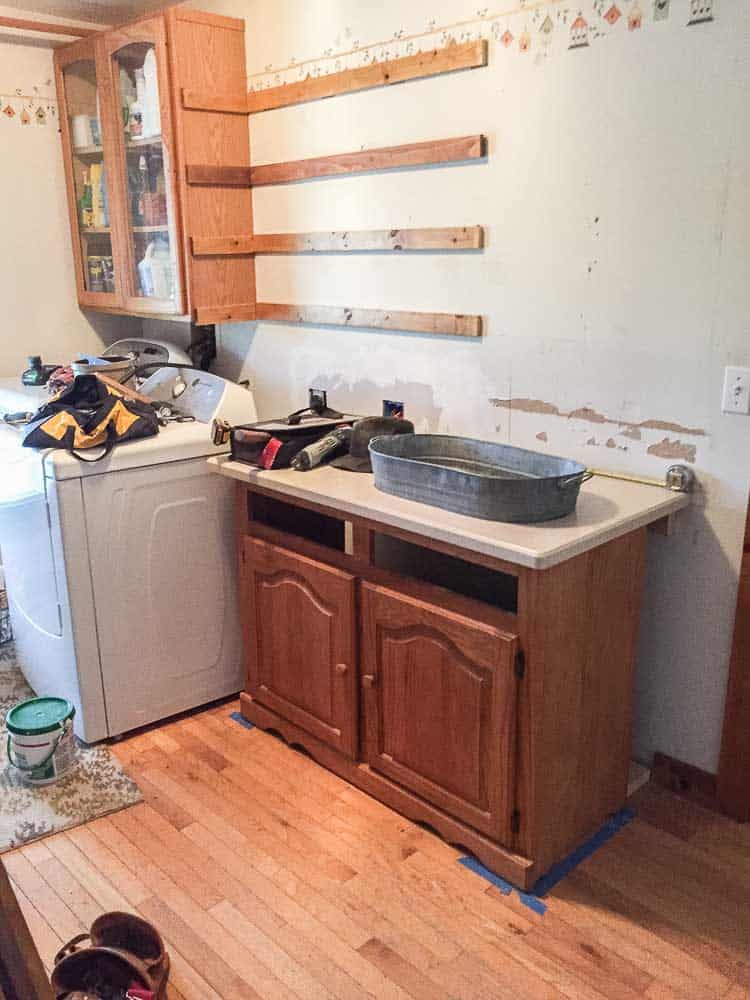
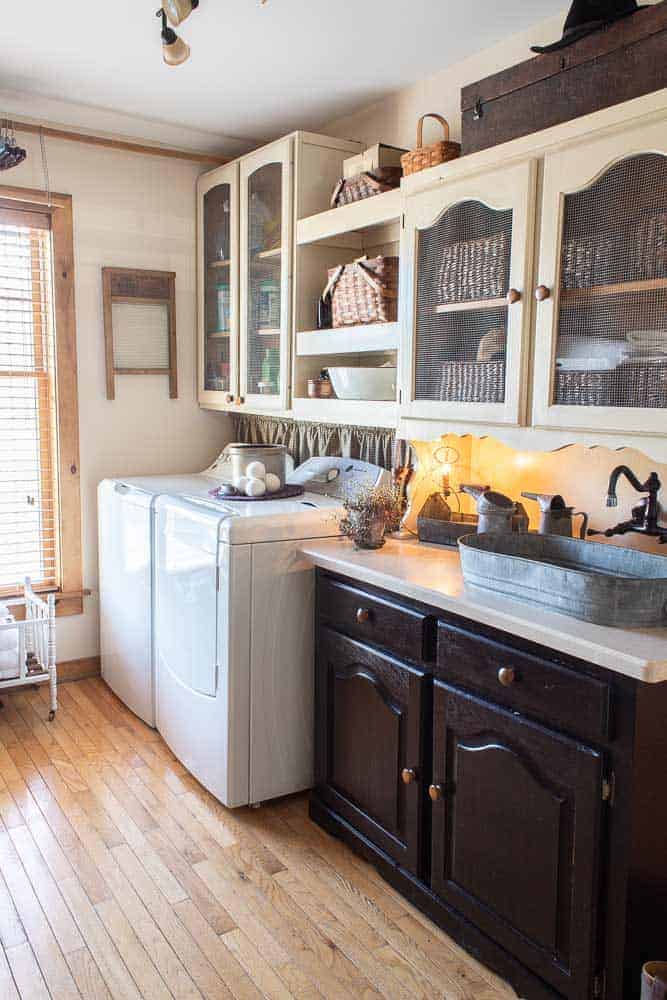
This is where your sketch will come in handy. We placed our 1980s china cabinet in the spot that we thought it would work best – to the left of the door frame opening to the kitchen.
The washer and dryer already had their designated spots and our free wall cabinet would fit perfectly above them.
Next, we calculated the shelving boards that would go between the china cabinet and the wall cabinet.
It was a good thing to see our vision come to life and it helped us to see where we could improve the design. We are not interior designers who can envision everything ahead of time. It was a good idea to see the layout with our eyes and also to ‘feel’ what it would be like to have the china cabinets in that spot.

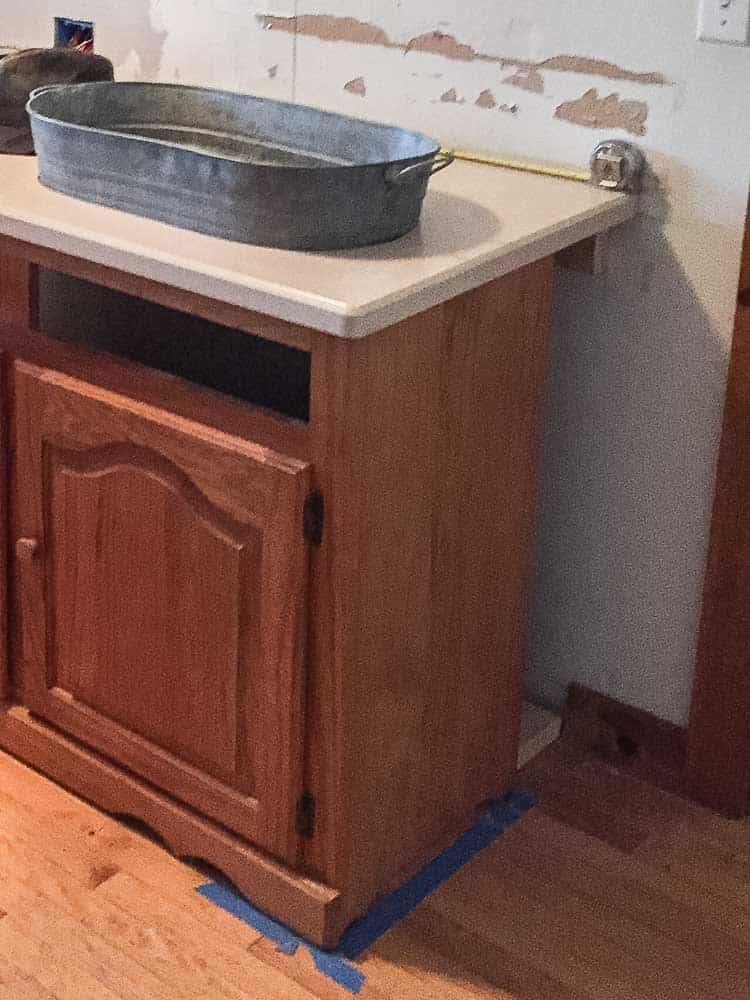
The other benefit to seeing the layout was that I was able to see that would could use the full size of the corian countertop without cutting it down to fit the china cabinet. That would have been more hard work without the guarantee of the Corian staying in one good piece! Plus keeping the original size gave us lots of counter space!
To accommodate the full piece of Corain, hubby decided to add a piece of wood to the backside edge of the china cabinet base. That would close the gap you see where the cabinet meets the wall.
Once he filled it with wood filler and it had a coat of paint on it, no one would ever know that we added to the depth of the base of this china cabinet.
prep work
The wall cabinet was the first piece we attached to the wall. Hubby located the wall studs and secured the cabinet to the wall.
The open shelving between the free cabinet and the china cabinet top section would need ledger boards. Hubby measured and cut 1″ x 3″ pine boards and attached them to the wall studs and the free cabinet that hung over the washer and dryer.
He also attached a ledger board so that the corian countertop could rest on it on the back wall. This was an extra security measure to make sure heavy coranin would be stable.
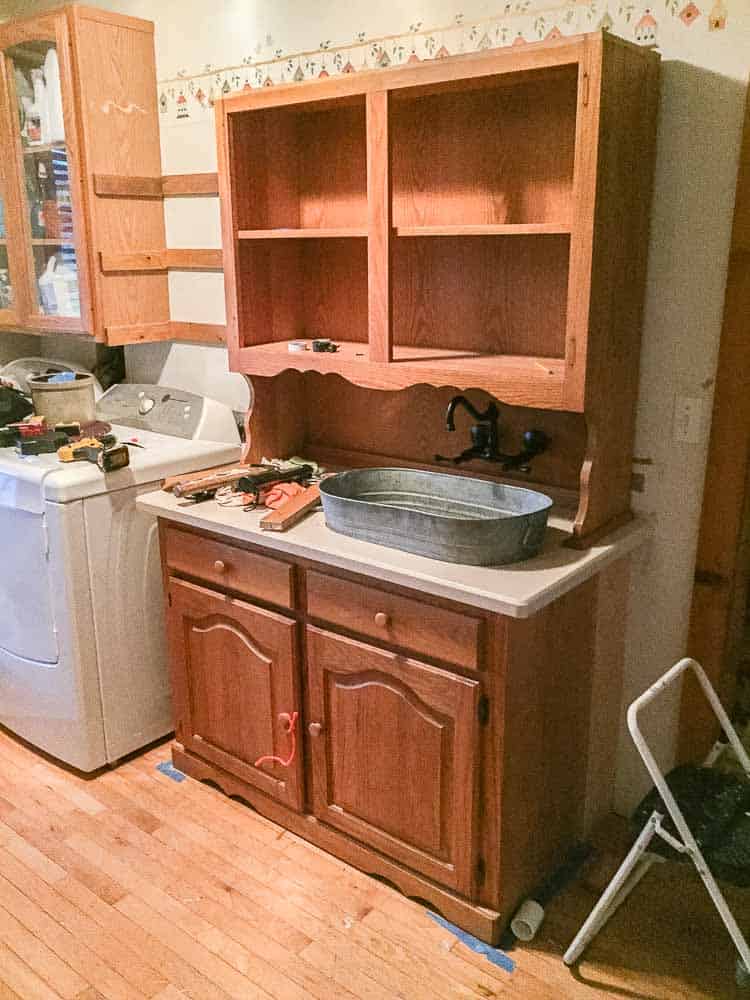
He also cut the opening for the galvanized sink in the Corian countertop. He measured the sink so that it would drop down a couple of inches inside of the cabinet base and then cut the opening for the DIY drop-in sink. BTW, we decided to forego the two drawers so that we could have space for the plumping of the sink. The drawer front was removed from the drawer boxes and permanently screwed into the base from the back of the cabinet so the screw heads would not be seen from the front.
Next, hubby prepped the area for the wall-mount faucet on the back panel of the top section of the hutch. It was a one-shot deal and he managed perfectly!

final steps
Now it was time to assemble all of the parts. The free wall cabinet was already secured to the wall as well as the placement for the china cabinet base.
We placed the hutch top section and secured it to the wall in studs. Then Hubby added the shelves to the ledger board and secured them with screws. He also cut facing boards to make the shelves look more substantial.
It was time for me to grab a paint brush and transform the look of the oak wood! I love to paint furniture and this is not different. Here are the steps I took to paint this cabinet and shelving unit.
- clean the wood to remove oils or furniture polish from the cabinet and the wall cabinet.
- scuff sand the hutch top and bottom sections as well as the upper cabinet using 220 grit sandpaper by hand or a small palm sander (beware of dust!)
- wipe down all of the surfaces to remove the dust
- prime the top sections of the new cabinetry (I painted a light color on the top so it needed to be primed, the bottom section did not need to be primed since it would have a dark finish)
- apply as many coats as needed to cover the area for the paint finish you want

I used one of my favorite furniture paints, General Finishes Milk Paint in Linen for the upper sections. Then I used General Finishes Gel stain in Java for the lower cabinets. The milk paint did not need to be sealed but the gel stained did so I used General Finishes High Performance Top Coat in Satin. General Finishes is recommended as the best paint for high-use areas like a laundry room.
recap
This project was completed several years ago and I wasn’t blogging then so we don’t have a lot of pictures of the process. Here is the list of the steps we took:
- removed all previous cabinets and plastic utility sink
- measured the countertop and placed the cabinet base accordingly
- attached ledger boards on the back wall for the countertop to rest on as well as for the open shelving
- attached the countertop to the base using construction adhesive and additional boards on the underside of the countertop
- measured, cut, and attached oak boards to fill the gap in the back on both sides
- attached shelving and face boards
- painted and stained the entire area
cohesive look
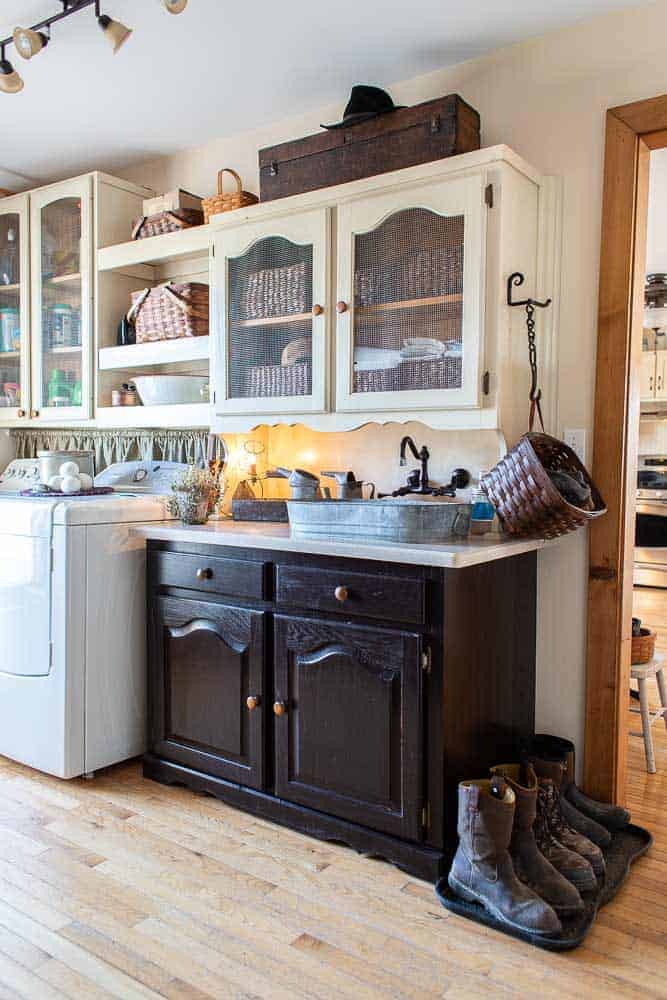
We love how this project turned out! After living with it for several years now, I know I wouldn’t change a thing!
The whole unit is a mish-mash of components but the paint finish brings it all together! It also ties in nicely with our kitchen giving both rooms a cohesive look.
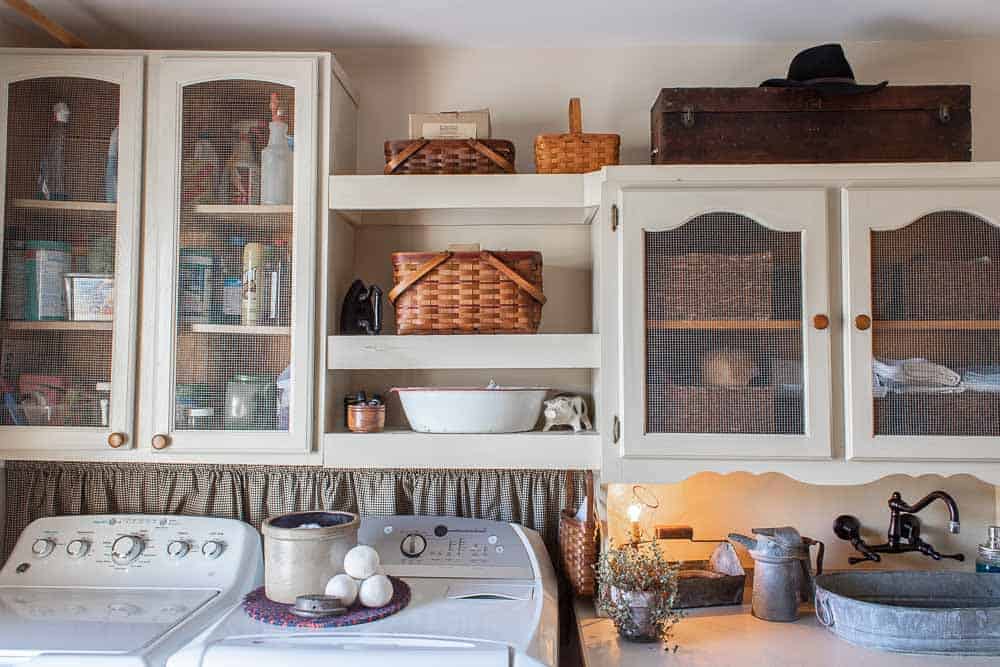
The baskets and toolbox at the top help to blend the height difference of the cabinets. The dark toolbox at the top carries the eye up and coordinates with the dark base cabinet.
repurposed china cabinet doors
You can also see that we removed the glass from the upper cabinet glass doors and replaced it with hardware cloth. This is one of my favorite looks for doors! The baskets inside help to hide the essentials needed in a laundry room.
The towel rack on the right side of the cabinet is a great place to hang a towel for drying your hands although I don’t have one hanging there now!
The large hook holds a basket of gloves and hats for the winter.
thanks for being here!
I hope you are enjoying this project! Let me know if you have any questions. Or leave me a comment to tell me about your project and ideas!
thanks, Cindy 😀

before and after
Here is a fun before and after I took when we first finished the project several years ago!

more china cabinet makeover ideas
What are some other ways this china cabinet could be used? My first thought is to use it as a bathroom vanity! You only need the bottom section and a piece for the top – maybe a farmhouse table top or a pour concrete top! And don’t forget the sink and faucet.
The top section could be attached to a wall above a buffet in a dining room! That would be so pretty! The doors could come off and be used for some other decorative purpose and then you would have open shelving! If you do this, be sure to secure it to the wall in a safe way! Attach it to studs in the wall just like the upper kitchen cabinets are attached.


I hope you found this post helpful! If you have any questions about this china cabinet makeover, please feel free to ask in the comments!

china cabinet makeover
Feel free to pin this image to inspire yourself and others to think outside of the furniture box!! We are on Pinterest – come join us!
Follow along for more fun projects on Instagram and Facebook!
UPDATE: We have made some recent changes to our laundry room. You can see the details in the following posts:


Cindy Rust
Cindy has been decorating her home with thrift store finds for 40 years. She is an avid thrift store shopper who loves to makeover the items she finds into vintage-inspired home decor and furniture. When she isn’t thrift shopping or painting a piece of furniture, you can find her making homemade butter, working in her garden, or painting with watercolors.
Lovely way to repurpose something you have and use!
Thanks Jenn!! ?
I love that you thought outside the box and found a meaningful and useful way to incorporate this hutch into your home. Oh – and they sure don’t make hutches like they used to.
Hi Cyndi, can I call you Cyndi? This was a great way to save the out dated hutch. They just dont make them like that anymore without a huge price tag. So cool.
Yes! Call me Cindy!! We just spell out names differently. We loved this cabinet and wanted to it to good use! Thanks for stopping by!!
Love this remake! You two remind me of myself and my late husband. We were always doing things like this together. Can’t tell you how many walls we’ve knocked down, repainted furniture, remade it, thrifted pieces, etc. Good times!!!
It sounds like the two of you were quite the team! My hubby and I enjoy these sorts of projects too. Thanks for stopping by! Be sure to join me on YouTube for more projects!
It turned out to be a great area. I had a cabinet from when we were first married too. Just could not part with it. I repainted it and using it in my craft room for storage. It’s better than anything that I could have bought in a store.
The old stuff is the best stuff, right??