
Upcycled China Cabinet: DIY Laundry Room Built-In
Can you really turn a dated, 1980s hutch into high-end laundry room storage? Yes, you can. In this guide, I’ll show you how we transformed an outdated china cabinet into a custom built-in — complete with a functional sink — proving that you can bring beauty back to the “old and forgotten” on a budget.
Project at a Glance
- Budget: Low (utilizing secondhand finds and leftover materials).
- The Transformation: From 1980s hutch to custom laundry built-in.
- Key Techniques: Adding cabinet depth and retrofitting a galvanized tub sink.
- Style: Vintage farmhouse using durable paint and hardware cloth.

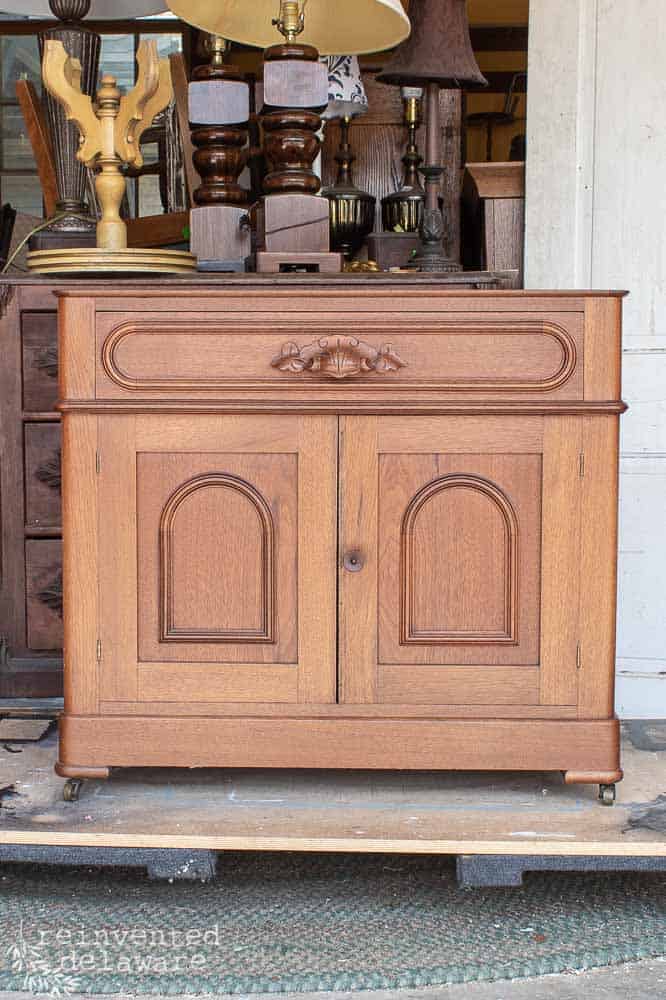
the potential of an old 1980’s china cabinet
Our family outgrew our original dining set, but I couldn’t say goodbye to the hutch. Even though it was “old furniture,” I knew it had a new life waiting for it. If you have a piece you can’t let go of, or you’ve spotted a solid wood beauty at a local estate sale, this project is for you!.
If you would like to do a similar DIY project for your home, check your local consignment shop, thrift stores, resale shops, auction houses, and estate sales. These old china cabinets are easy to come by.

Planning your budget-friendly laundy room makeover
Before picking up a paintbrush, a successful furniture makeover starts with a solid plan. For this laundry room project, we didn’t just buy a kit; we curated a collection of secondhand items to create a high-end, custom look on a shoestring budget.
how to measure your space for a china cabinet
The most important step is ensuring your piece actually fits the room. I always recommend using a measuring tape to get the exact dimensions of your designated area.
Pro Tip: Keep these measurements in a dedicated note in your phone’s Notes app. You never know when you’ll stumble across the perfect piece at a yard sale or thrift store, and having those numbers handy prevents expensive mistakes!
sourcing secondhand pieces and thrift store finds
One of my favorite parts of this project was how it came together through community and repurposing. Instead of buying new, look for:
- Leftover Materials: We used a piece of Corian kitchen counter my mom was replacing—it was the perfect size!
- Free or Discounted Cabinets: A friend provided an upper cabinet from their renovation, which we paired with the hutch.
- Alternative Sinks: A galvanized metal tub from a farm store makes a perfect farmhouse-style utility sink.
quick tips for this step:
- Think Outside the Box: If you can’t find a china cabinet, check local consignment shops, auction houses, or ReStores for individual base and top pieces you can marry together.
- Visualizing the Layout: Make a simple sketch of your wall. Mark the height and width so you can calculate exactly how much lumber you’ll need for open shelving or filler boards
how to reconfigure a china hutch into a built-in
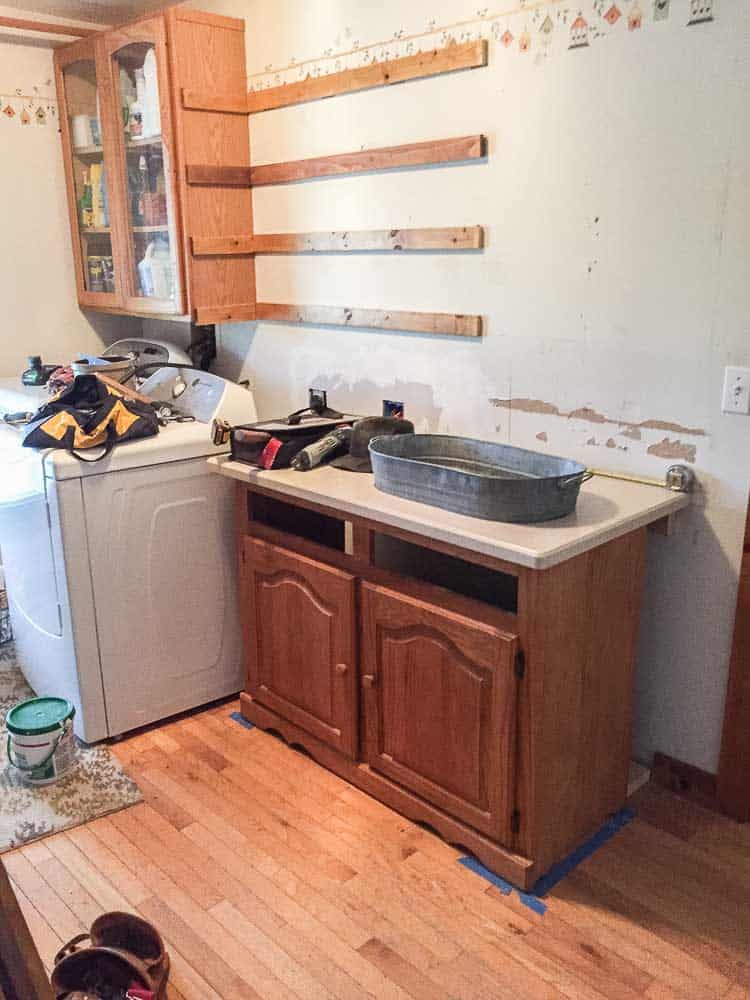
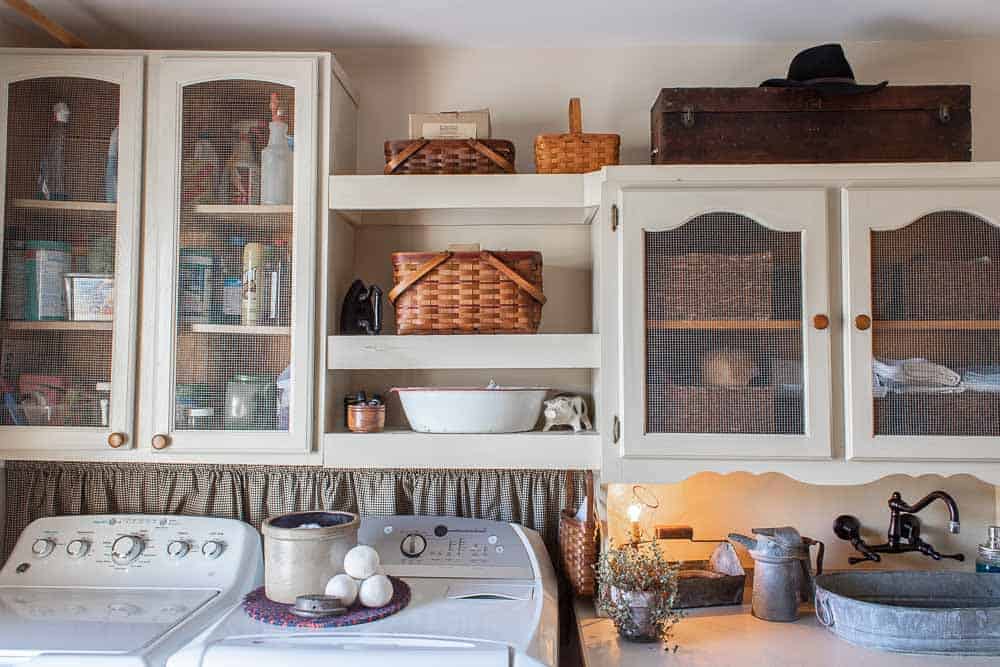
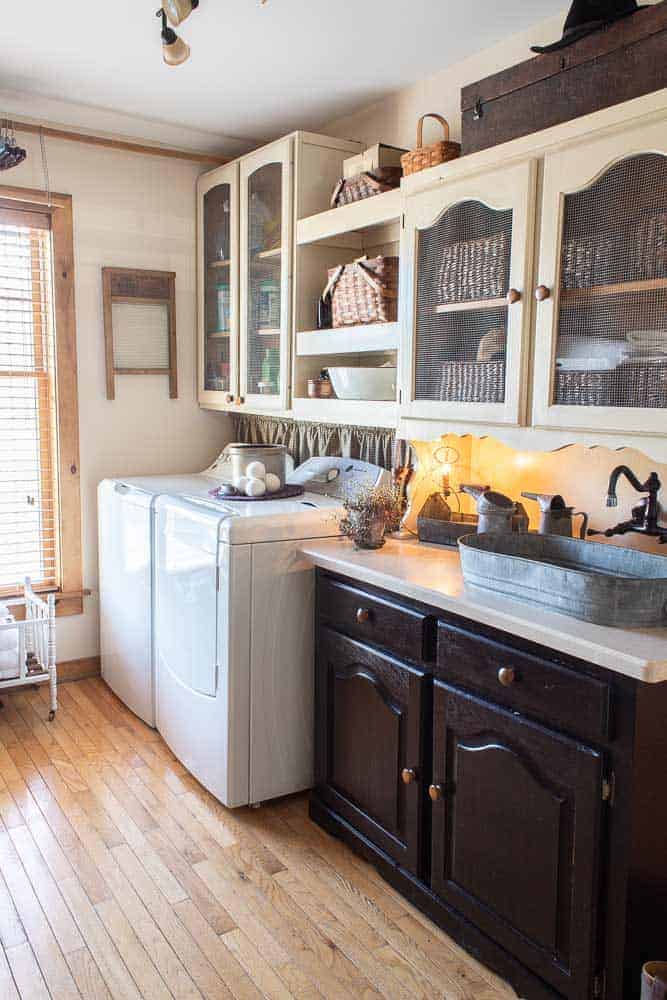
Turning a piece of furniture into a “built-in” requires a bit of creative engineering. Since the base of a standard china cabinet is often shallower than a kitchen counter, we had to get creative to make it functional for a laundry room or butler’s pantry.
adding cabinet depth and installing ledger boards
To accommodate the full size of our repurposed Corian countertop without cutting it down, Hubby added a piece of wood to the backside edge of the cabinet base. This closed the gap where the cabinet met the wall and gave us much-needed extra counter space.
We also installed 1″ x 3″ pine ledger boards along the wall studs. These serve two purposes:
- Connectivity: They act as the “skeleton” for the open shelving that bridges the gap between the hutch and the upper wall cabinets.
- Support: They provide a sturdy ledge for the heavy countertop to rest on.
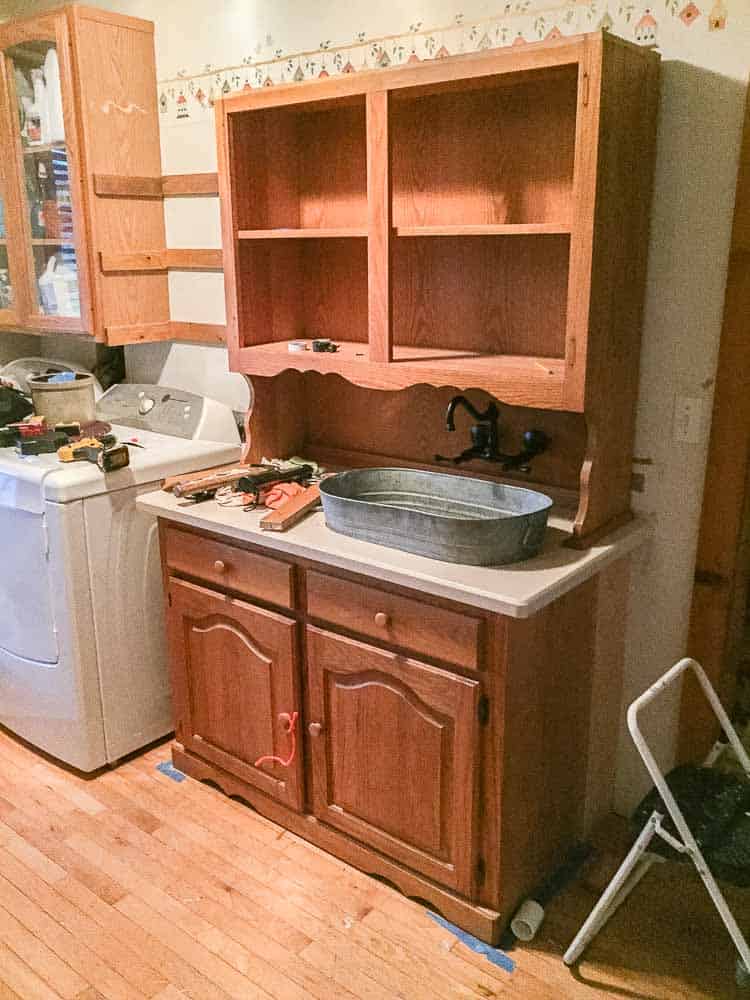
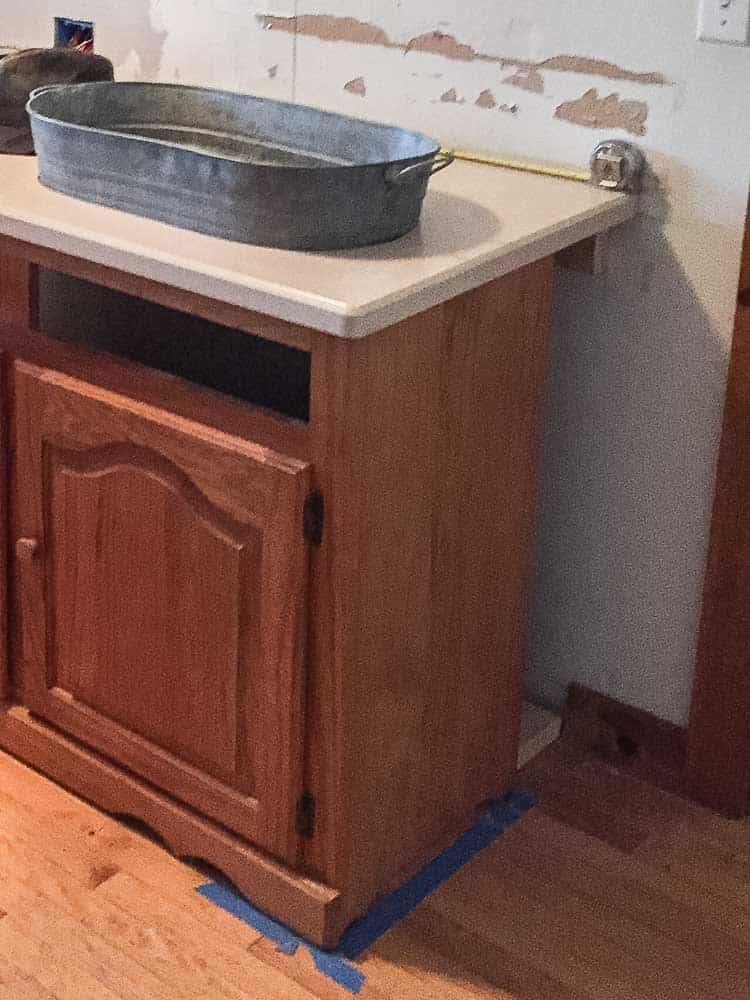
fitting a repurposed countertop and utility sink
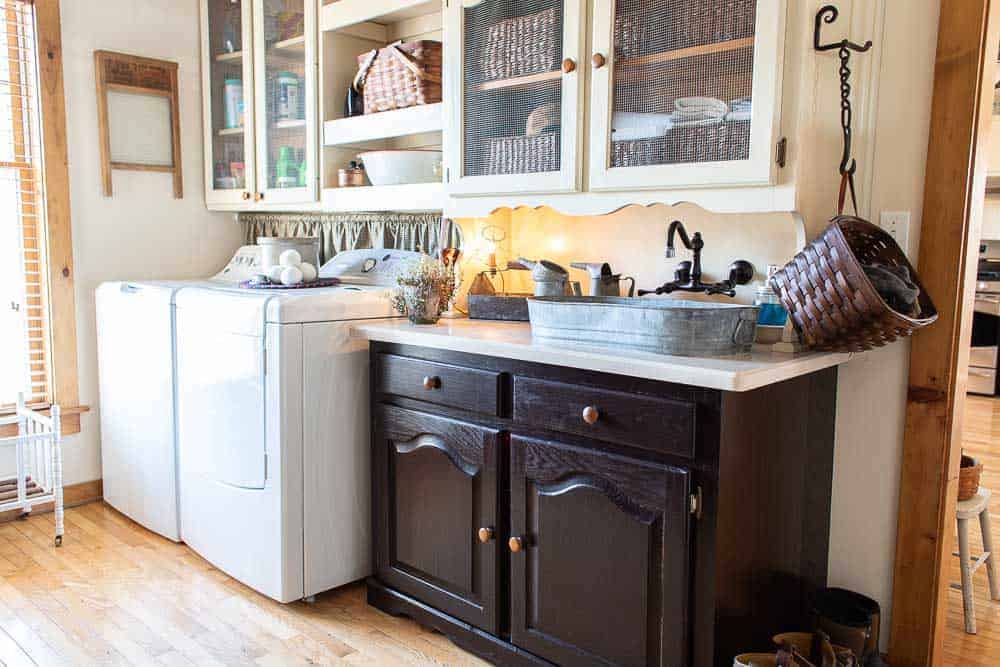
One of the best ways to save money on a budget decorating project is to rethink common items. We used a galvanized metal tub as our utility sink!
- The Sacrifice: To make room for the plumbing, we removed the two top drawer boxes. We permanently attached the drawer fronts to the cabinet face so the exterior look remained seamless.
- The Cutout: Hubby measured the tub and cut a precise opening in the Corian countertop so the sink would “drop in” a few inches.
- The Faucet: We chose a wall-mount faucet, which required prepping the back panel of the hutch.
Reinvented Delaware build tip:
“When adding depth to a cabinet, use wood filler and a good sanding on the seams. Once the piece is painted, those additions will be completely invisible, and it will look like one solid custom unit!”

Step-by-Step Prep: How to Paint Furniture for Durability
To ensure your furniture makeover stands up to the splashes and spills of a laundry room, you can’t skip the prep work. Even though I love to get right to the color, a professional, long-lasting finish is all in the foundation.
cleaning and scuff sanding the wood surface
Before the brush hits the wood, you have to remove years of furniture polish and oils.
- Deep Clean: Use a dedicated furniture cleaner to degrease the entire hutch. I like Simple Green or a TSP alternative.
- Scuff Sanding: I used 220-grit sandpaper to lightly scuff the surface. You aren’t trying to strip the finish; you’re just giving the new paint something to “grab” onto.
- Dust Removal: Always wipe down the surfaces with a tack cloth or damp rag afterward. You don’t want dust ruins your smooth finish!
BONUS POST: If you are new to painting furniture, my Complete Guide to Furniture Makeovers covers everything you need to know from start to finish.
thanks for being here!
I hope you are enjoying this project! Let me know if you have any questions. Or leave me a comment to tell me about your project and ideas!
thanks, Cindy 😀

priming and applying paint for a professional finish
For this project, I used a combination of my favorite finishes to create a high-end look.
- The Upper Section: Since I wanted a lighter look for the top, I applied a primer first. This prevents “bleed-through” from the old wood tannins. I then used General Finishes Milk Paint in Linen.
- The Lower Section: For a grounded, sturdy look, I used General Finishes Gel Stain in Java. This didn’t require a primer, but it did need a top coat for protection.
- Sealing for Use: To protect the dark base from water, I applied General Finishes High Performance Top Coat in Satin. It’s arguably the best paint for high-use areas like this!
Cindy’s refresh checklist:
- Clean: Remove all oils/waxes.
- Sand: Scuff with 220-grit.
- Prime: Only if going from dark wood to a light paint color.
- Paint: Use thin, even coats for a professional look.

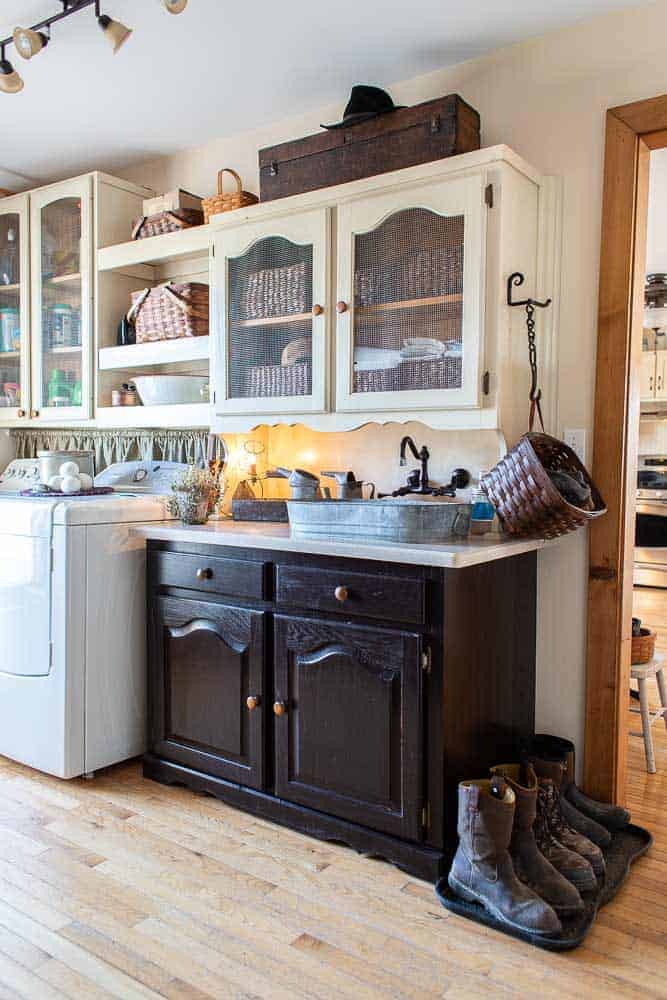
Styling with Vintage Farmhouse Decor Touches
The secret to a successful upcycled furniture project is the finishing details. Once the structural work is done and the paint is dry, it’s time to add the character that makes the piece feel like a curated find from a high-end vintage shop.
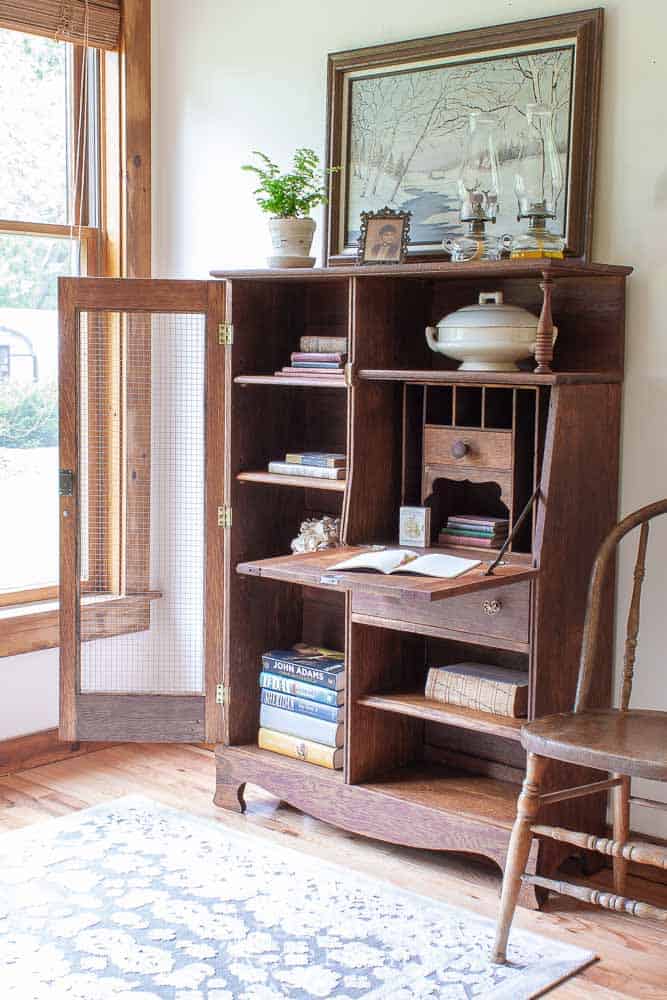
updating china cabinet doors with hardware cloth
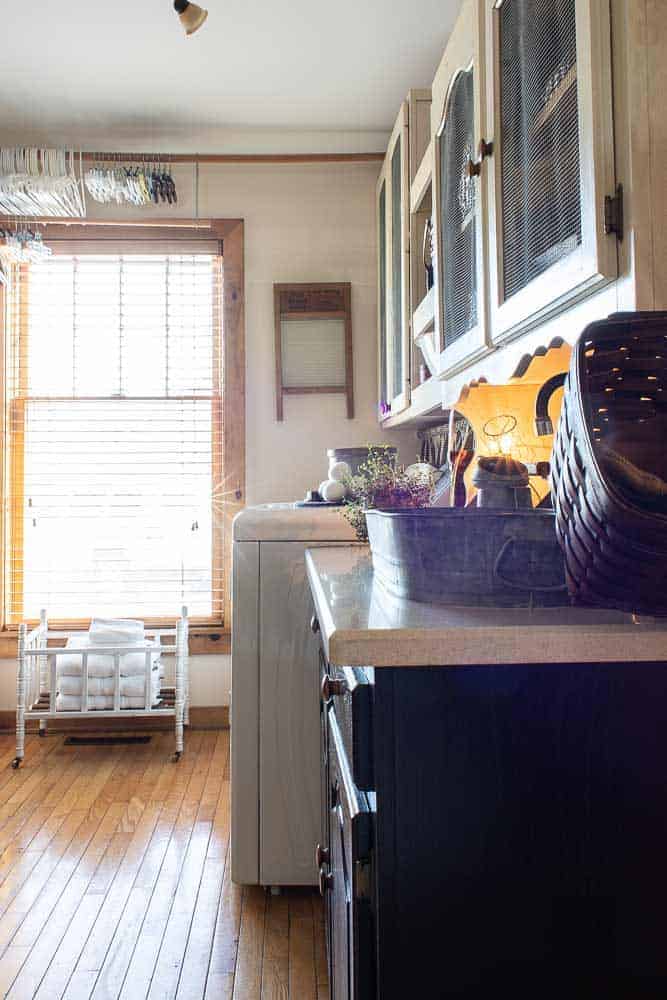
One of my favorite ways to instantly change the look of a china hutch is to remove the original glass. We replaced the glass panes in the upper doors with hardware cloth (a fine wire mesh).
- The Benefit: It adds a rustic, industrial texture that is perfect for a laundry room or pantry.
- Pro Tip: Behind the wire, I use baskets to store laundry essentials. It keeps the “clutter” hidden while maintaining that airy, open feeling.

cohesive decorating with paint and stain
Even though this unit is a “mish-mash” of different components—the hutch, the free wall cabinet, and new lumber—the paint finish brings it all together into a cohesive look.
- Visual Continuity: Using the dark Java stain on the base and the lighter Linen paint on top draws the eye upward, making the room feel taller.
- Matching Your Home: This specific color palette ties in perfectly with our kitchen, making the laundry room feel like a natural extension of our home rather than an afterthought.
styling tip for built-ins:
“Don’t be afraid to mix your storage! I used a vintage dark wood toolbox at the very top of the cabinets to carry the dark color of the base cabinet upward. It’s a great way to balance the height differences between mismatched cabinets.”
Creative Ways to Repurpose China Cabinets in Any Room
Once you realize a china hutch is essentially just two versatile storage units, the possibilities for budget decorating are endless. If you don’t need laundry storage, consider these other furniture makeover ideas:
- The Ultimate Bathroom Vanity: Use the bottom section of a hutch as a bathroom vanity base. Add a vessel sink and a stone or wood top for a high-end look on a thrift store budget.
- A Statement Buffet: Use the top section as wall-mounted shelving above a sideboard in your dining room. Removing the doors creates beautiful open shelving for your ironstone collection.
- The Potting Bench: These solid wood pieces are perfect for a covered porch or “she shed.” Use the hutch to organize your upcycled planters and garden tools.
Frequently Asked Questions about China Cabinet Makeovers
To help you with your own DIY project, here are some of the most common questions I get about upcycling these vintage pieces:
The fastest way is to remove the dated “curvy” trim or glass and replace it with clean lines or hardware cloth. A fresh coat of contemporary paint, like a soft olive or a crisp linen, instantly updates the look.
While you don’t need to strip the wood to the bare grain, I always recommend a “scuff sand.” This ensures your paint adheres properly, especially in high-moisture areas like a laundry room.
Both are great for vintage home styling. I used General Finishes Milk Paint for this project because of its incredible durability and smooth finish in high-use areas.
before and after upcycled china cabinet
Here is a fun before and after I took when we first finished the project several years ago!

Final Thoughts & Inspiration
Don’t be afraid to think “outside the furniture box!” Whether you are browsing an estate sale or cleaning out your own garage, remember that the “old and forgotten” pieces often have the most potential.
What do you think? Have you found a hutch at a thrift store that you’re ready to reinvent? Let me know in the comments!

I hope you found this post helpful! If you have any questions about this china cabinet makeover, please feel free to ask in the comments!

The Laundry Room Evolution: What’s New?
Since we first finished this upcycled china cabinet project, our laundry room has continued to evolve! We’ve made several updates to make the space even more functional and beautiful. If you loved this makeover, you’ll want to check out these related projects to see the full transformation:
explore more of the reinvented laundry room:
- The Master Plan: Laundry Room Makeover Plans – See the original vision and how we mapped out the transition from a utility space to a curated room.
- Pro Painting Tips: Tips for Applying Painter’s Tape – Get a professional finish on your built-ins and walls with my favorite taping secrets.
- Small Space Storage: Easy Pantry Makeover – How we maximized every inch of storage alongside our upcycled hutch.
- Function & Beauty: Create a Functional Laundry Room – My best tips for organizing a space that works as hard as you do.


Cindy Rust
Cindy has been decorating her home with thrift store finds for 40 years. She is an avid thrift store shopper who loves to makeover the items she finds into vintage-inspired home decor and furniture. When she isn’t thrift shopping or painting a piece of furniture, you can find her making homemade butter, working in her garden, or painting with watercolors.

Lovely way to repurpose something you have and use!
Thanks Jenn!! ?
I love that you thought outside the box and found a meaningful and useful way to incorporate this hutch into your home. Oh – and they sure don’t make hutches like they used to.
Hi Cyndi, can I call you Cyndi? This was a great way to save the out dated hutch. They just dont make them like that anymore without a huge price tag. So cool.
Yes! Call me Cindy!! We just spell out names differently. We loved this cabinet and wanted to it to good use! Thanks for stopping by!!
Love this remake! You two remind me of myself and my late husband. We were always doing things like this together. Can’t tell you how many walls we’ve knocked down, repainted furniture, remade it, thrifted pieces, etc. Good times!!!
It sounds like the two of you were quite the team! My hubby and I enjoy these sorts of projects too. Thanks for stopping by! Be sure to join me on YouTube for more projects!
It turned out to be a great area. I had a cabinet from when we were first married too. Just could not part with it. I repainted it and using it in my craft room for storage. It’s better than anything that I could have bought in a store.
The old stuff is the best stuff, right??
I love how this project came together! It’s such a practical way to add storage, character and charm to a laundry room! All in a budget friendly way.
Awesome job
Great repurpose of a China cabinet, Cindy. I love how you blended it in with your other cabinet uppers. It gives me ideas. Thanks for sharing. Pinned 📌 😘 xo
Gorgeous!
I love how you repurposed it Cindy!!