
Rub On Transfers for Furniture Step-by-Step Tutorial
Learn how easy it is to use rub on transfers for furniture with Dixie Belle transfers! This is a great way to add a custom look to furniture!
The following post may contain affiliate links. That means if you click and then buy something, I will make a small commission at no additional cost to you! Thank you for supporting my blog. full disclosure here.
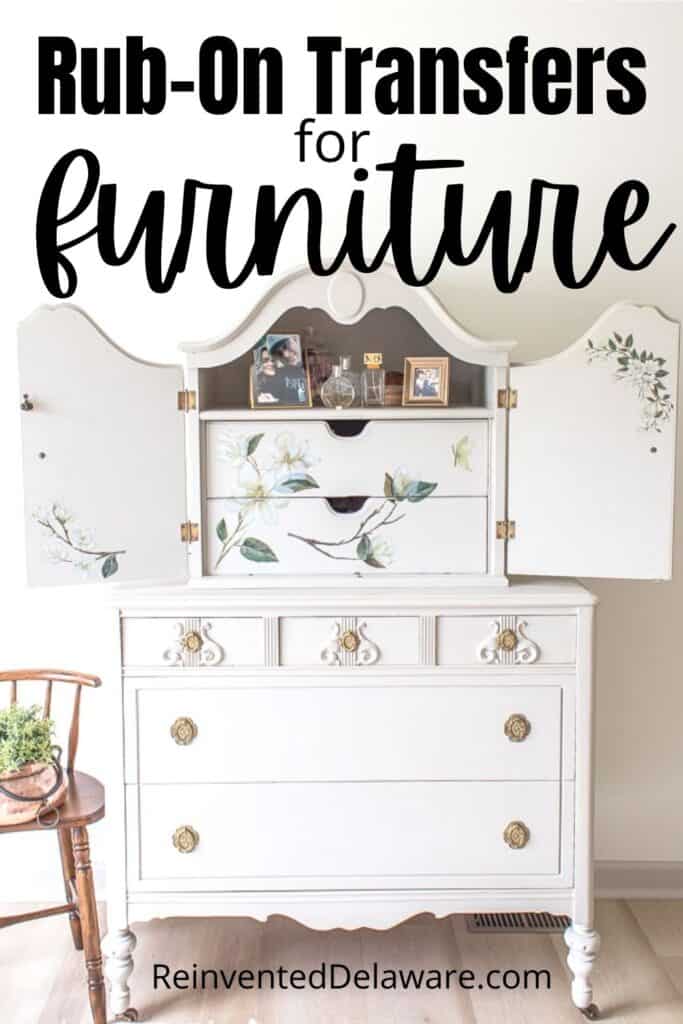
rub-on transfers for furniture
Have you seen the amazing rub on transfers for furniture lately? They are works of art in themselves but when applied to furniture, well, my friend, they are even more gorgeous!
They’re the perfect way to add instant beauty to any piece of furniture!
Decor transfers are also incredibly easy to use. Although I love the look of painted furniture, there’s something especially beautiful about these furniture decals. They really take the whole look to the next level!
Plus, they come together really quickly. Simply cut, stick, and burnish the pieces onto any painted surface, then give them a good seal. They’re such an easy way to update a piece; the hardest part is deciding exactly where you want to use them!
best rub on transfers for furniture
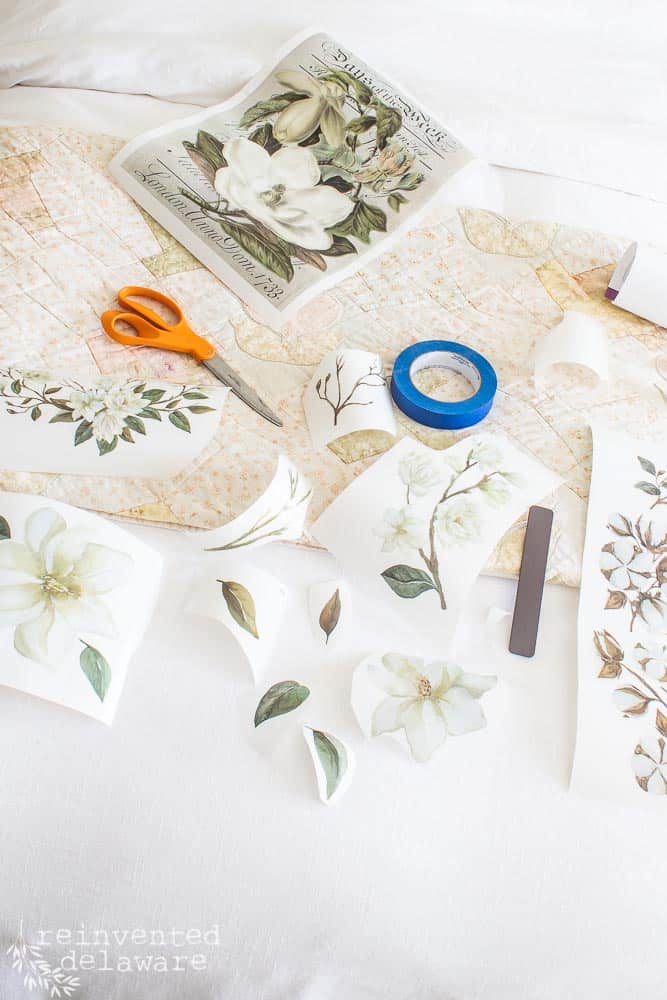
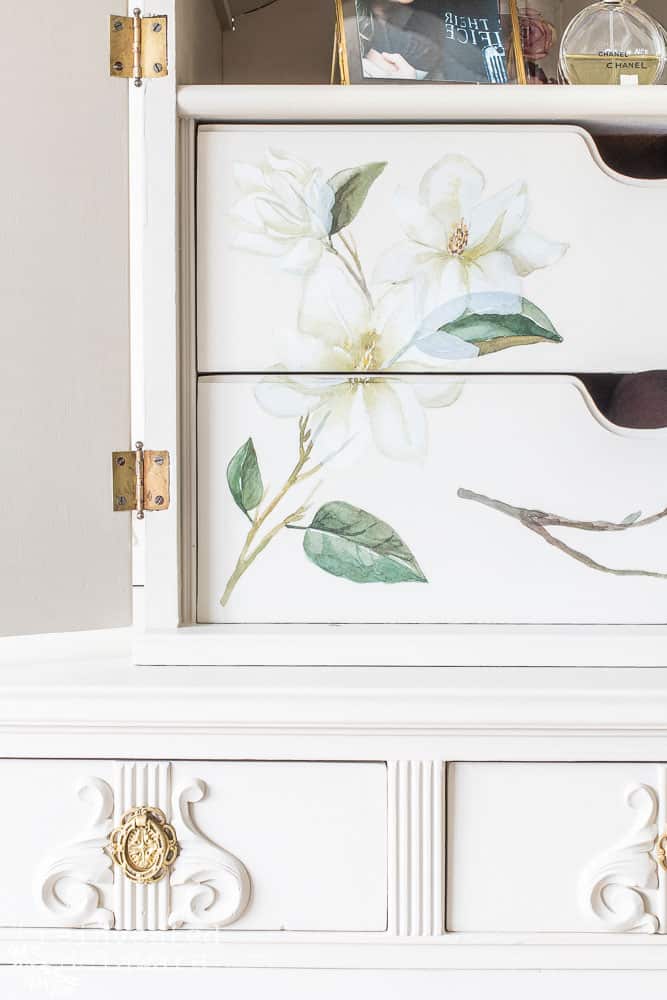
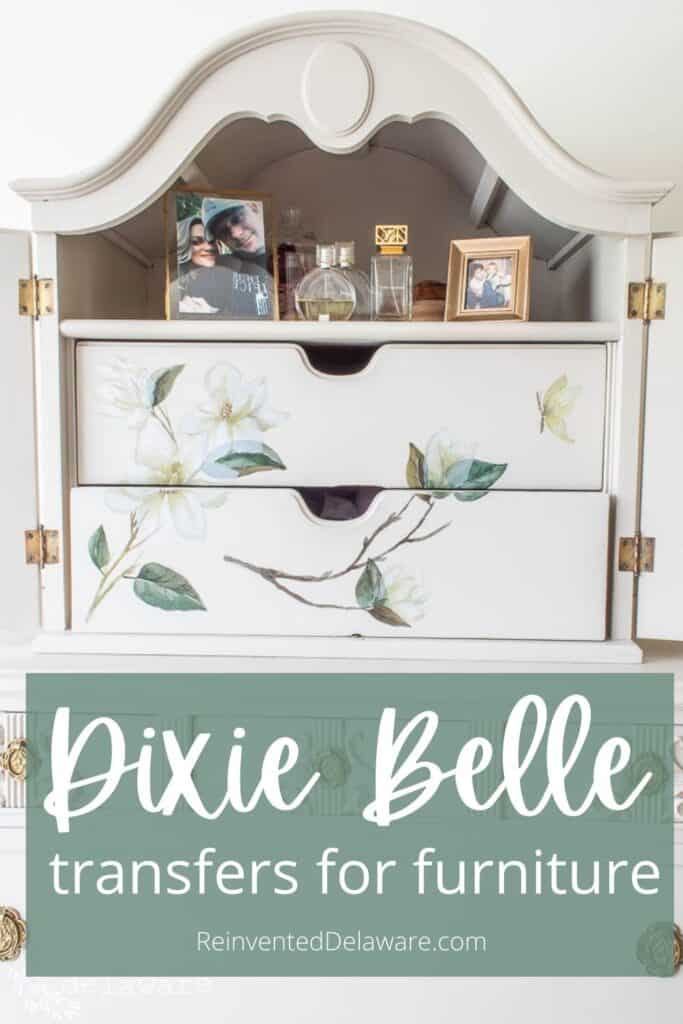
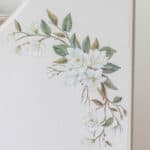
The rub on transfers I will be using today are from Belles and Whistles, by Dixie Belle Paint Company. They have so many to choose from and I chose one of the gorgeous florals called Magnolia Garden.
The designs came in four sheets. Three were used for this project and I am saving the other for a an old milk can that needs to be updated!
Let’s take a look at the supplies for this rub on transfer project. If the project you work on is already painted, you’ll only need a few supplies!
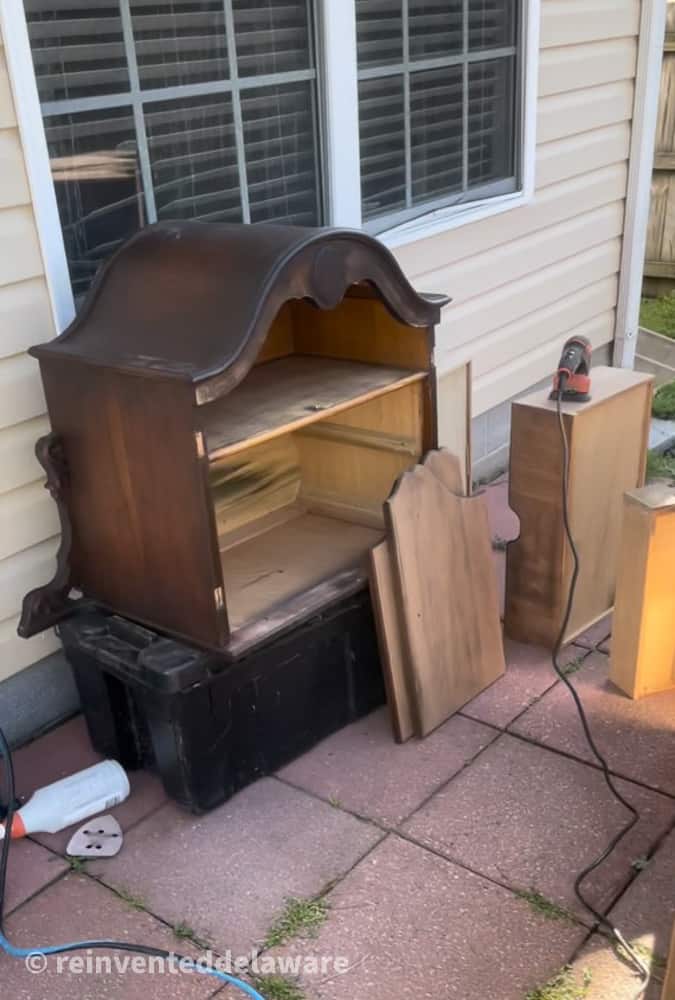
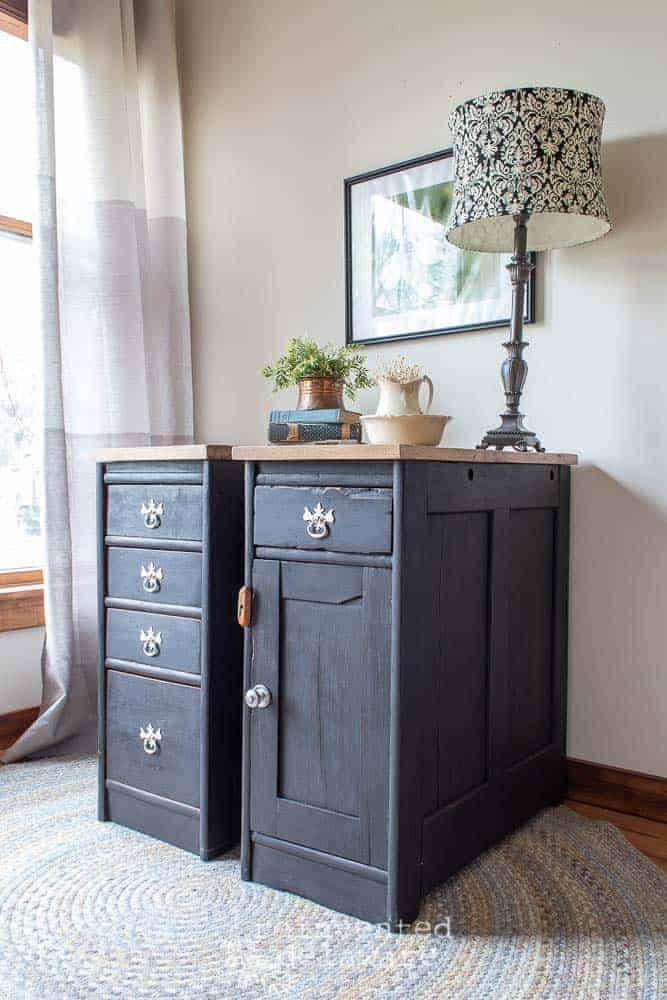
BTW, I was able to visit one of my daughters in Virginia while we both worked on this gorgeous antique armoire she purchased a few weeks back. More on that later in the post!
list of supplies:
- Magnolia Garden Transfer (you can choose any transfer you like!)
- Chalk mineral paint in your choice of color (this color is Sawmill Gravy)
- water-based sealer
- paintbrush for sealer and painting
- sharp scissors
- painters tape
Use the links above to purchase some of the supplies for this project! You are helping to support this blog and all the free tutorials we offer here! Thanks so much!😊
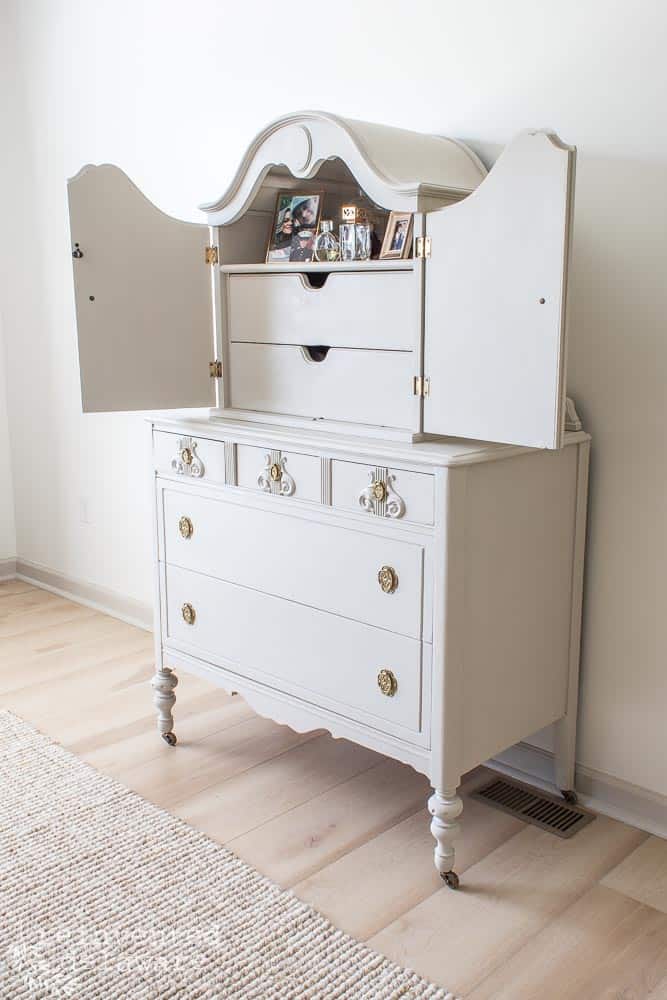
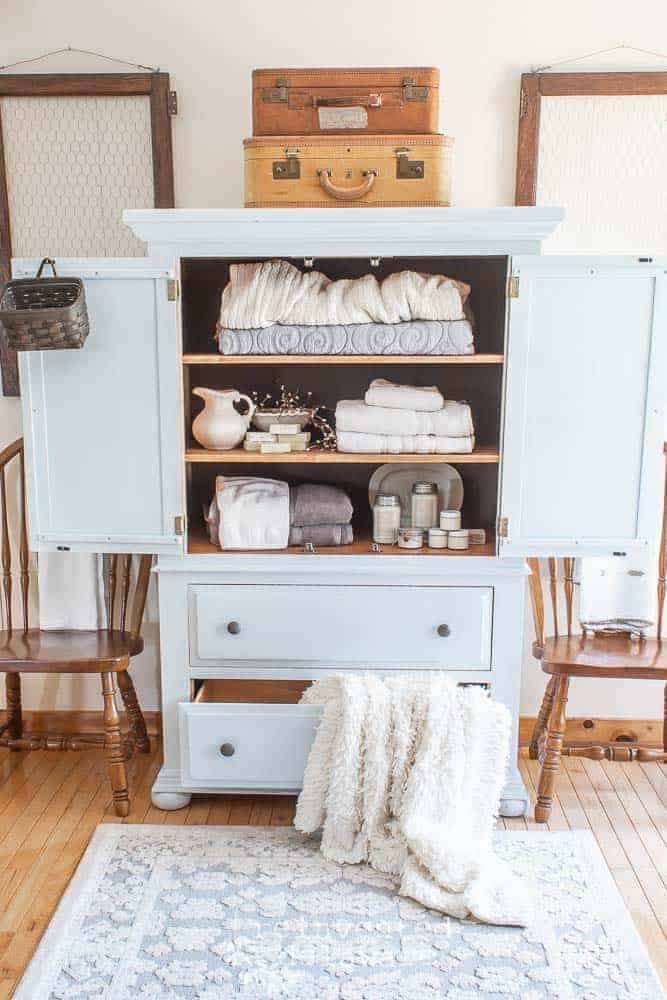
before and after painting
Here is a before shot of the armoire before my daughter painted it. Can you believe she got it for only $50? She definitely has my eye for good deals on furniture!
It needed the basic prep of cleaning, sanding, and hardware removal. She also removed the doors to create easy access to paint the interior of the cabinet.
how to use rub on transfers
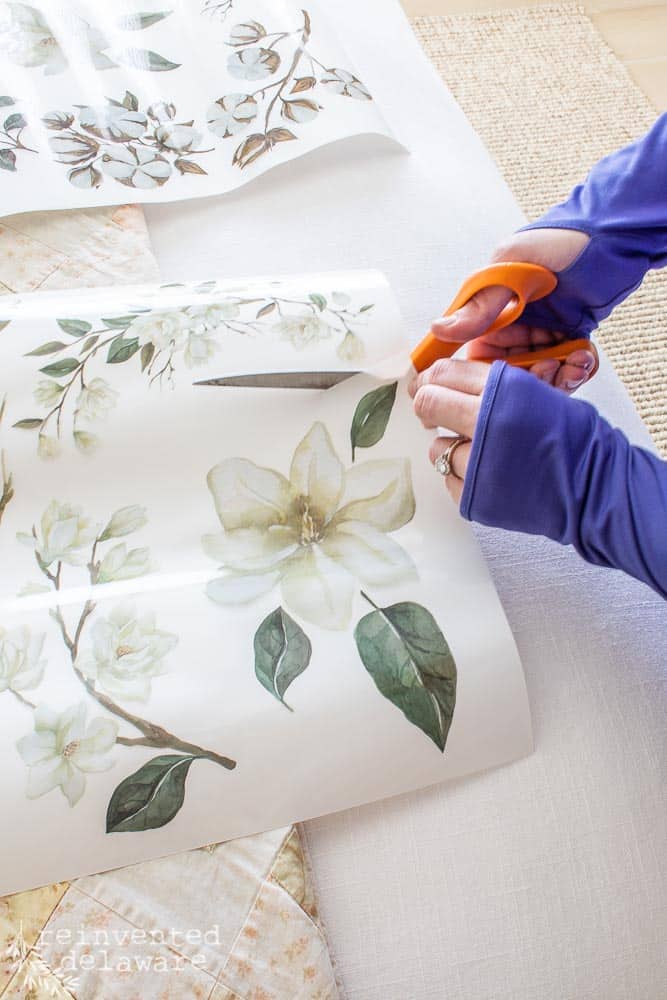
step one: separate the sections
The first thing we decided to do was to cut the designs apart. The floral designs are spread out over the sheets so that they can be separated and arranged on the furniture piece in the way they will look and fit the best.
DIY furniture transfer
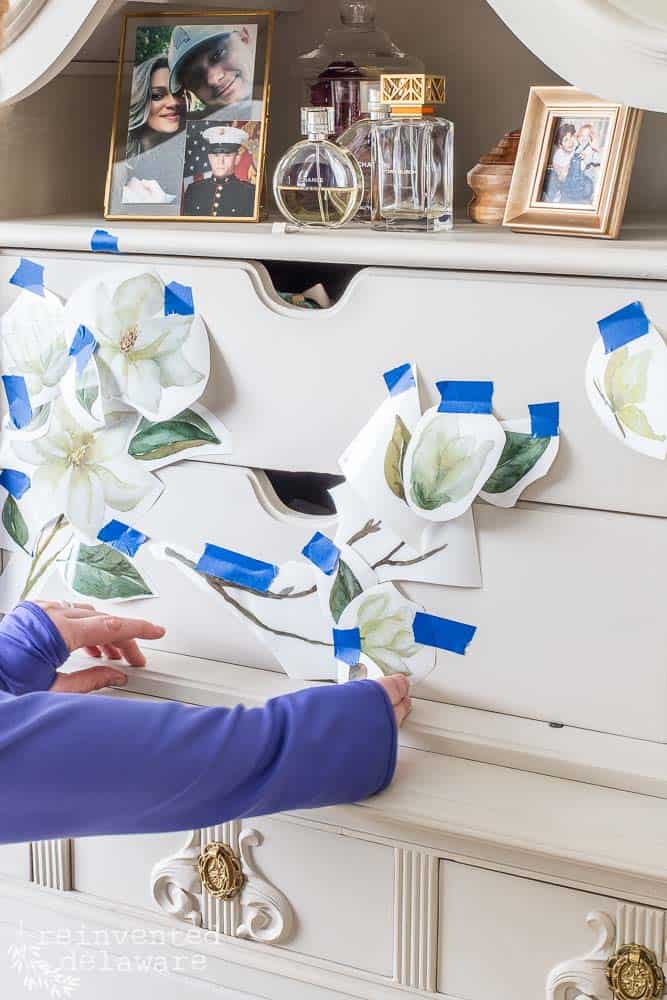
step two: lay out the design
Laying out the floral designs is the next step. Painter’s tape will gently hold the pieces in place as they are arranged. When you’re ready for the next step, remove the white sheet and let the adhesive side of the transfer stick to the wood.
My daughter carefully placed each flower and leaf keeping in mind whether she wanted them to lay behind or in front of other sections. Can you see why this was the hardest part?
A couple of the designs included all of the florals and leaves together and didn’t need to be separated or layered. We figured those would be the easiest to start with.
how to put a transfer on a piece of furniture
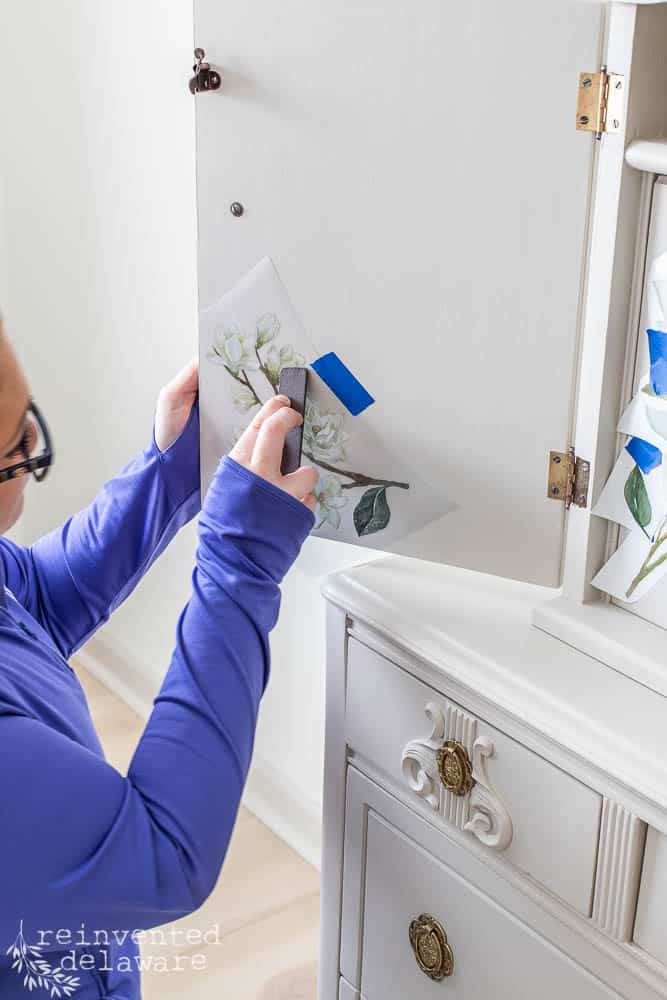
step three: burnish the transfers
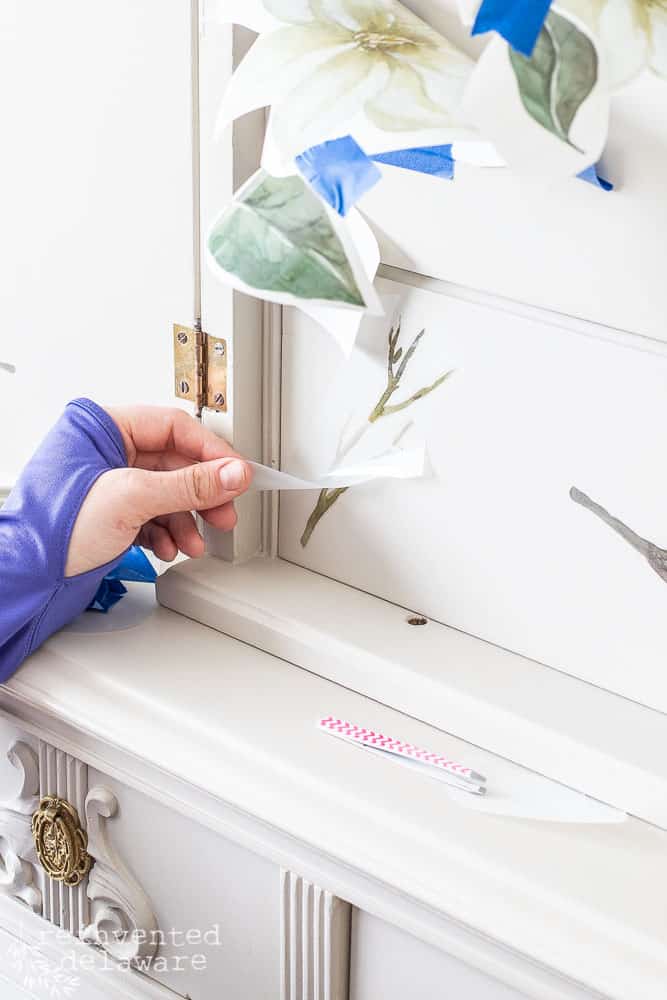
Dixie Belle transfers come with a burnishing tool for easy application. The technique is simple: use the tool to rub against the surface so that the design comes off of the clear protective sheet. By carefully lifting one edge, you can tell when the design is starting to adhere to the surface.
If the design isn’t completely adhered to the surface of the furniture, just lay the protective layer down and continue to burnish the design!
Approaching the layered section of the design took a bit more thought. Remember I said that my daughter carefully thought through the pieces that would be in front or in the back of others?
This has to be kept in mind as you move from section to section. Start with the pieces that will be the furthest back in the layers. Then move toward the top layers. Think through each step before you begin to add a new layer.
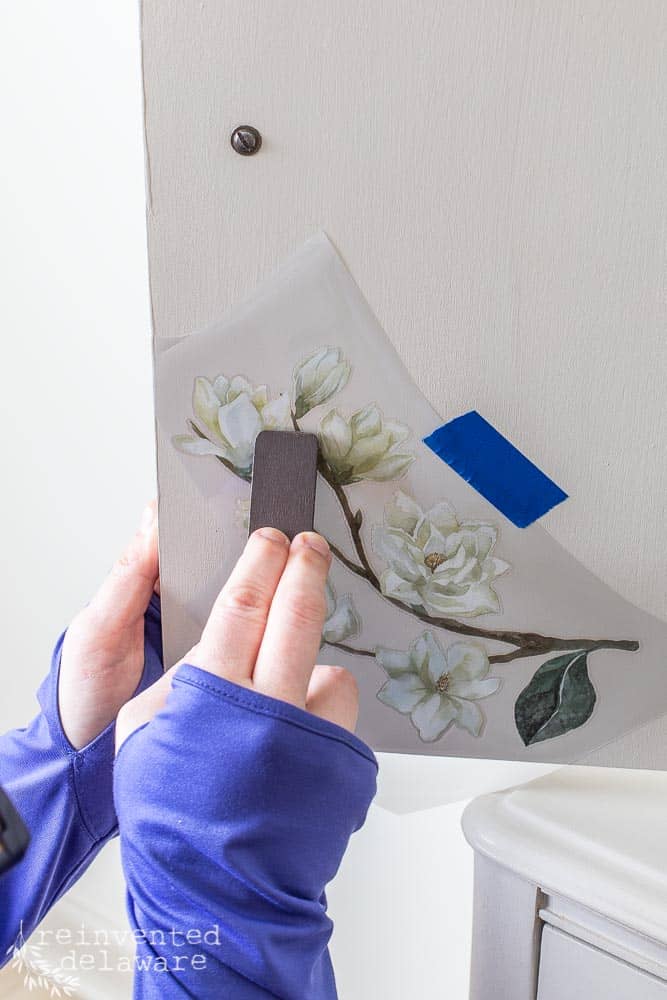
Handy tip: Painters Tape
Use painter’s tape to temporarily hold the designs on the piece of furniture. You can easily move the sections around until you have the look you want!
do you have to seal furniture transfers?
These rub on transfers for furniture don’t necessarily have to be sealed. The areas that we applied the Magnolia Garden transfer to won’t be touched very often.
If we had applied them in areas that would be touched like the cut-out for the drawers, then I would recommend this piece be sealed using a water-based sealer. If you don’t have that, you can add a layer of clear coat instead.
step four: seal if desired
The water-based sealer that Dixie Belle has is awesome! You will need a good synthetic brush to apply it. Both are linked in the supplies list at the top of this post!

rub on transfer by Dixie Belle
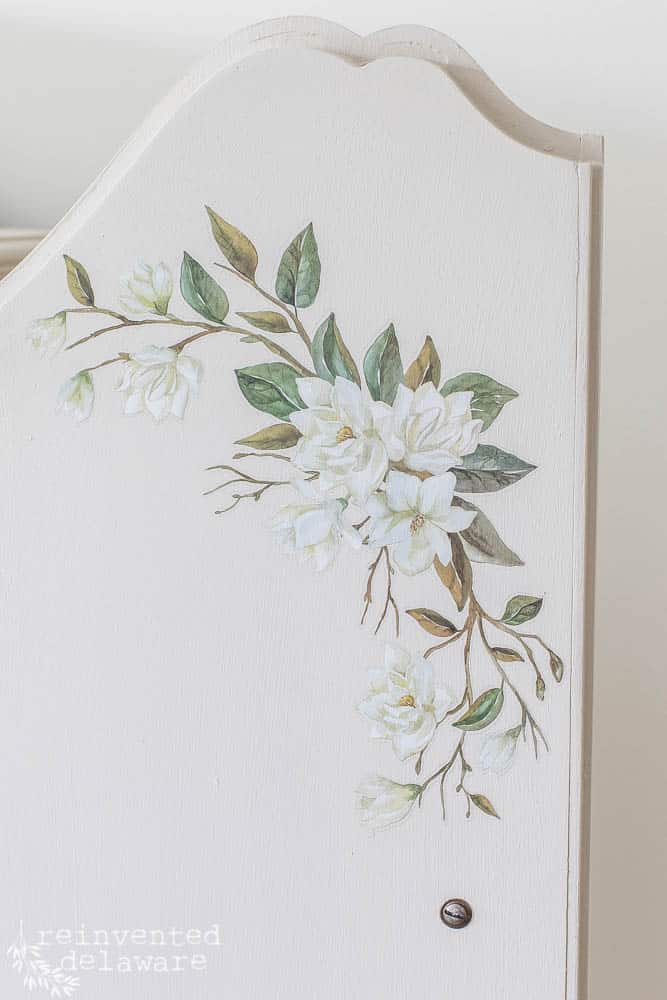
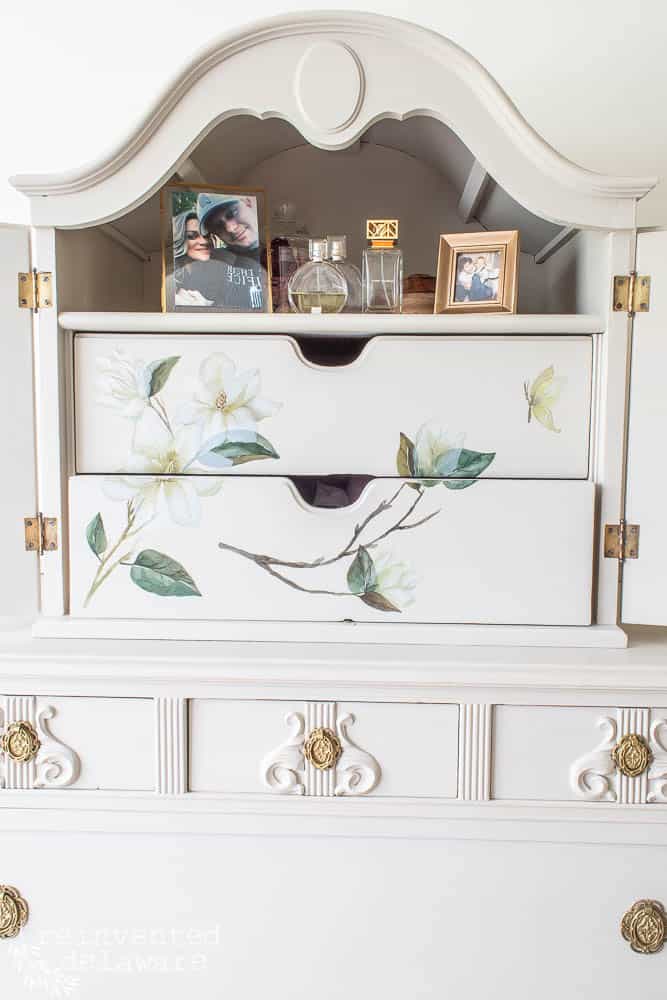
step five: enjoy your piece for years!
What do you think of this beautiful design by Dixie Belle? Gorgeous isn’t it?? The whole piece looks like a work of art now!
The transfer adds a bit of a surprise each time the doors are open. In fact, if this piece were in my house, I might leave the doors open all the time!
where to buy furniture transfers
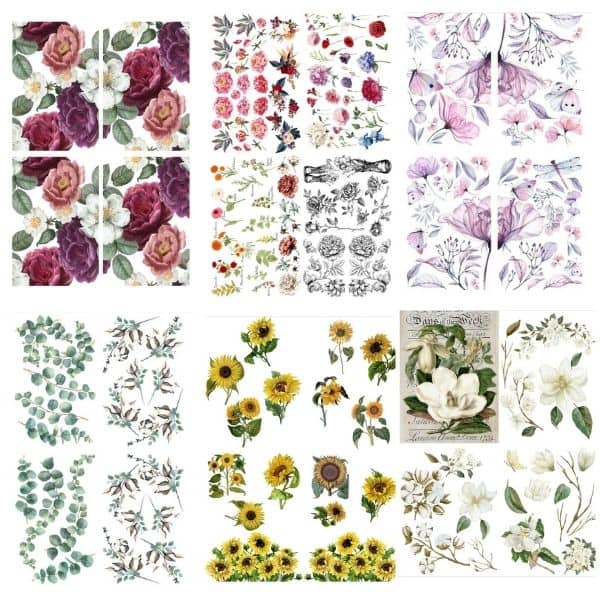
Here is a sampling of the furniture transfers Dixie Belle has to offer. There are more designs on their website. Click the button below to head over to their site to see them!
The samples I have gathered from left to right, top to bottom:
- Floral Romance
- Vintage Floral
- Translucent Garden
- Cotton and Eucalyptus
- Sunflowers
- Magnolia Garden (that’s what we used!)
FAQs
Do you seal furniture before applying transfer?
If you just refinished a piece of furniture and want to decorate it with your own designs, the easiest option is to leave the piece unsealed. Add the transfer, then seal the entire project. This will ensure each piece of the rub on transfer is completely secure and save you a bit of work.
How do you use Dixie Belle transfers?
We were thrilled with how easy the transfers from Dixie Bell worked. The designs were so beautiful and surprisingly easy to use. It’s a simple 4 step process:
- 1. Separate or cut out the sections.
- 2. Lay out your design using painter’s tape to hold each piece in place.
- 3. Burnish the transfers onto the furniture then peel off the plastic sheet.
- 4. Seal with Dixie Belle’s water-based sealer (optional).
How do you seal rub on transfers on furniture?
The easiest way to seal your transfers is to use a high-quality water-based sealer. The sealer from Dixie Belle should be applied with a good synthetic paintbrush. Add a thin coat, let it dry for about an hour, and you can add a second thin coat if needed.
Did you enjoy this easy rub on transfers for furniture projects? Let me know what you think of it in the comments!
Better yet, what transfer design is your favorite? Tell me what piece you would use a transfer on for your home!
more inspiring posts!
Click the image to see the whole tutorial! Hope you enjoy the projects!


Pin the image below to your home decor and furniture boards! Just click the pin button at the top left corner!
How to Apply Transfers to Furniture
Equipment
- decorative transfers
- burnishing tool
- sharp scissors
Materials
- decorative rub on transfers
- sharp scissors
- water based clear sealer
- chalk painted furniture
- painter’s tape
Video
Notes
- Separate the transfer designs using sharp scissors
- Lay out the designs in a way that looks good to you. Hold the pieces in place with painter's tape.
- Carefully remove the backing sheet when you are ready to apply the transfer to the surface.
- Lay the design on the surface and do not pick it up! Use the burnishing tool to apply the transfer design onto the surface.
- Use the clear plastic sheet to rub over the design to ensure it is completely adhered to the surface.
- Seal the transfer with a clear water-based sealer to protect the transfer design.
Thanks for joining our journey!
Thanks so much for joining us for this post! Join our journey so you don’t miss any of the fun projects, tutorials, and inspiration that we share with you each week! You can follow us on Instagram, Facebook, and YouTube. We share even more inspiration on Pinterest!
click below to purchase supplies!
Visit my Amazon Storefront!
Click the button below and head over to our online shop on Amazon!

UPDATED: August 2023
I absolutely love everything you do !!’ You and your daughters are just naturals at finding things that have promise and then create a masterpiece! Please know I am always looking at your posts and get so inspired ! Thank you for sharing all that you do! It livens up the dreary days we have been having !!!’
You are so kind Jan! Your words made my day. I appreciate your kind words about our posts so much! Thank you 🥰 Have a great day!
Cindy, I love it and I agree. I would have a hard time closing the doors too.
This is a fantastic find too!
Isn’t this piece so unique? It’s the first armoire I’ve seen like it. Thanks for stopping by Cindy!😊
I just finished a set of nesting tables with a chippy finish and was trying to decide what to do on the flat tops. These transfers are the answer and I can’t wait to put them on and finish my project. Thanks so much for sharing this tutorial. I love watching all your makeovers.
Your tables sound amazing!! These transfers are sooo easy to use – let me know if you have any questions 🙂
How adorable! You and your daughter did a fantastic job! Truly inspiring, Cindy. Makes me want to reinvent all of my wood furniture!
Thanks, Karen! Painting furniture and adding transfers can bring freshness to a whole room!
It’s beautiful, definitely gave a push to do my two night stands.
Your nightstands will love you for making them over!
This armoire is stunning, Cindy. I love the color of it and your use of the transfers. Stunning, my sweet friend!!!!
You’re so kind Tammy! The transfers create such a custom look – I’m obsessing over them!
OMG STUNNING!!!! I want to run out and try this technique on my next project. And finding the piece of furniture for $50 – holy smokes. I need to go shopping with you and your daughter. Thank you for step by step tutorial. Pinned!! Several times!!!
Can you believe the armoire was so cheap?? She did an amazing job in painting and the transfers were the cherry on the top! Thanks for pinning Anna!🥰
What a gorgeous addition to any piece and relatively easy to DIY – at least you make it look easy :)! Thanks for sharing this terrific resource, these are so pretty!
Rub-on transfers are easier than I thought! Thanks, Janet!😊
I love this piece so much! The magnolias were literally *THE* perfect addition. This piece became so special to me now that we made memories creating it together. I want to put transfers on every piece of furniture I own now!
Yes, yes, and yes! Bring on all the transfers! This was a fun project to work on together! 🥰
Did you intentionally make it look like it was winking and smiling?
No, we didn’t but I like the idea of that! It can wink and smile each and every day!😊
Wonderful furniture makeover and the magnolia transfers add an extra wow factor! The pretty magnolias remind me of my southern roots. Come share your links at “Happiness is Homemade” every Sunday through Thursday.
Magnolias are plentiful in the south! Thanks for the invite, Allyson! I will check it out.😊
Such a pretty piece, Cindy!! I love the shape of that furniture piece and those transfers are so lovely. You are so talented at what you do.
Well, golly Rahcel, that just made my day! Thanks so much!😊
GORGEOUS!
Thank you!