Early 1900’s Dining Table and Chairs Refinishing Series – Part One

Good day to everyone! Thanks for dropping in for this table and chairs refinishing tutorial. I am excited to teach you how to transform furniture into something useful and gorgeous for your home!
The furniture of days-gone-by is beautiful and rich. Usually, the older pieces have character and qualities that sadly, today’s furniture does not. Care was given when constructing each piece. Details and quality of the workmanship were high on the list for the one’s building the furniture. Their reputations were on the line and they cared about that. They wanted the people that would be using their furniture to know that it was a quality piece. That’s just one of the reasons I love older furniture.
This beautiful table and chairs came our way from a lovely lady we have known for years. She sat at this table as a child with her family while growing up. They shared meals, memories and hopes & dreams around this table. Homework was completed and garments were sewn on the sewing machine around this table. Her parents had bought it for their growing family knowing that the table would be an integral part of their lives and a place to share so many wonderful conversations with family and friends. Gathering around a table is so American! We love food and we love spending time with those we love – what better place than around the family table 🙂
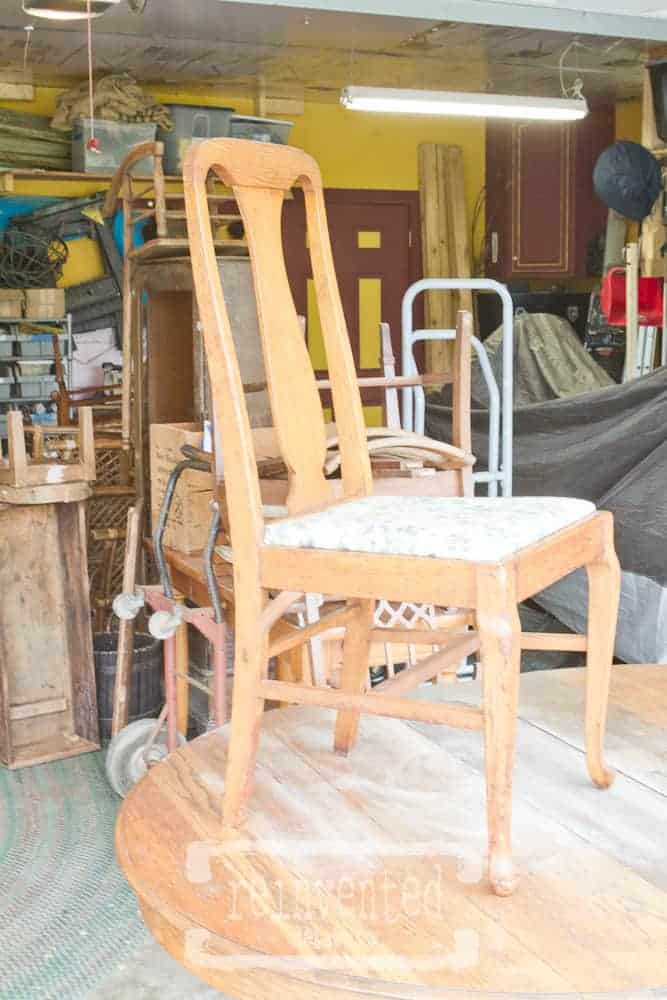
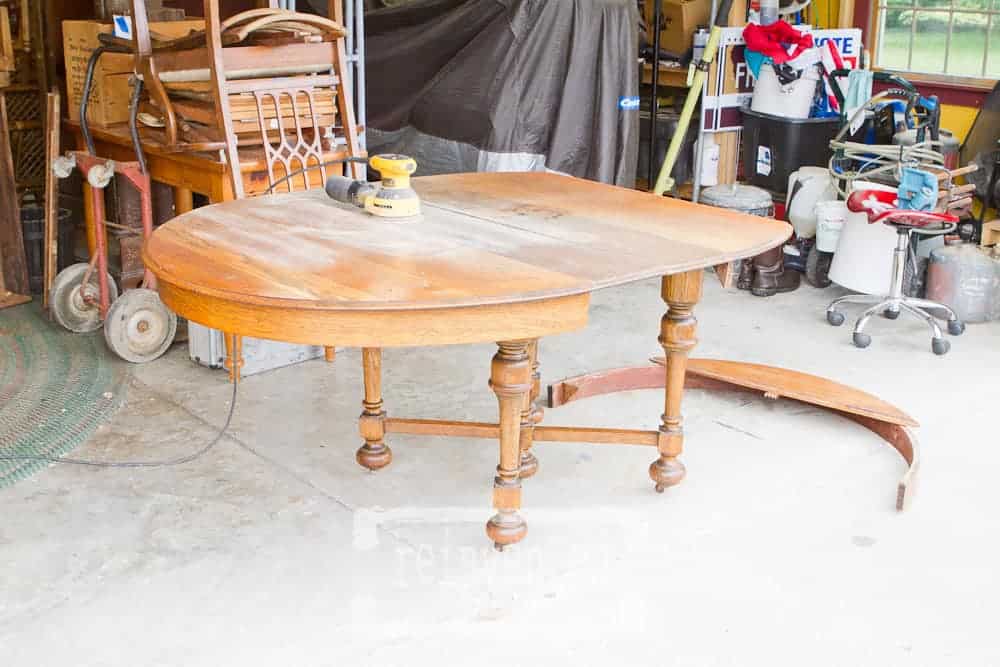
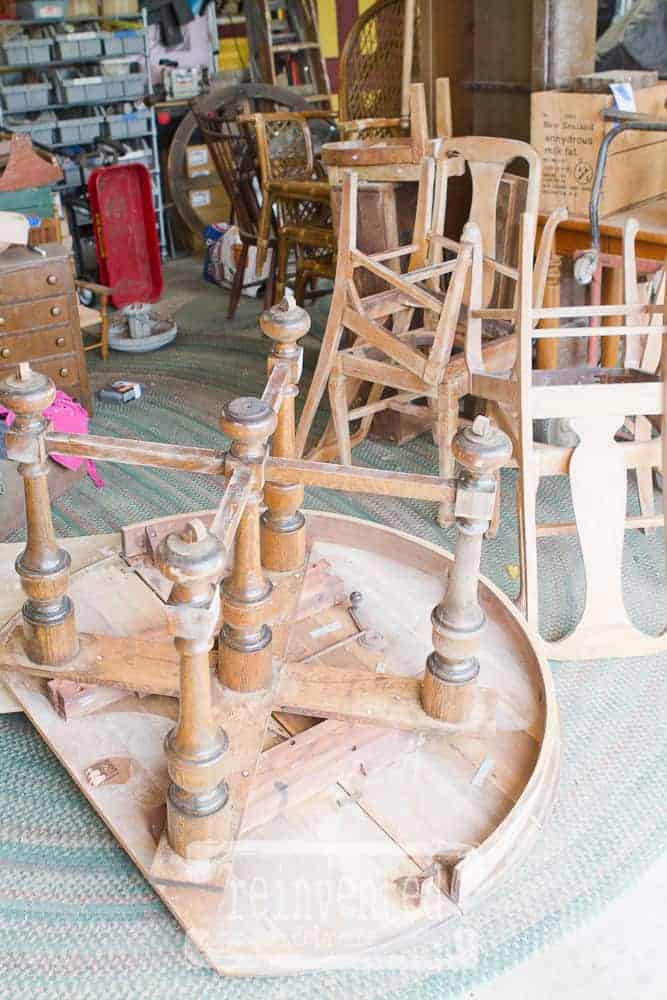
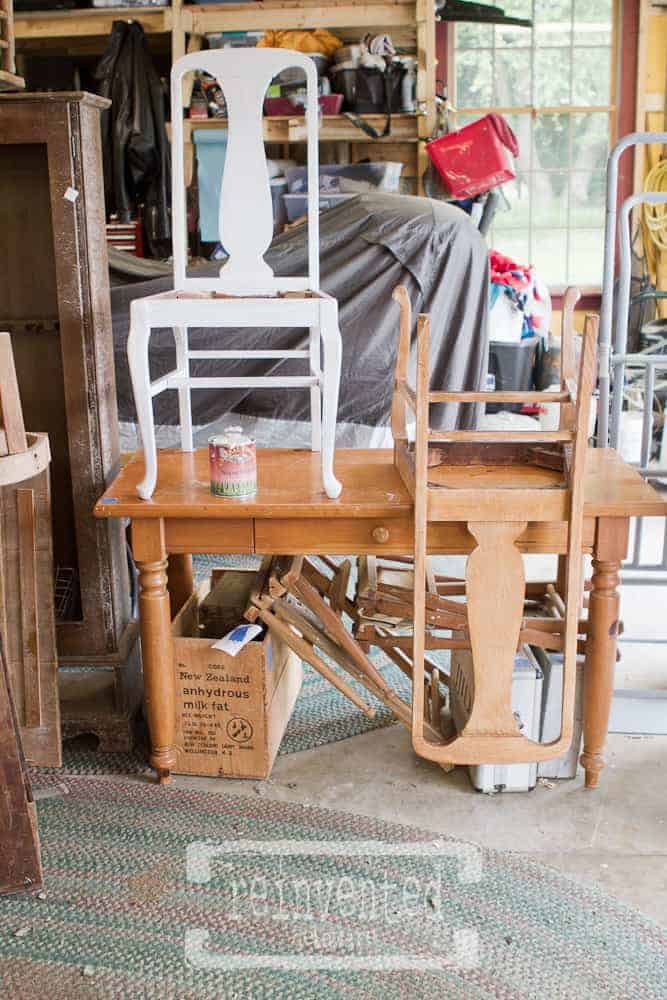
We were so privileged that she entrusted us to bring new life to this table and chair set so another family could use and cherish it as well . Here are a couple of before pictures. The set is solid oak with no veneer! Even the upholstered chair seat was solid oak – not the usual cheaper version of wood! Part two of this series will cover the reupholstered portion of the project.
I was pretty excited to get this project underway and started sanding before I picked up my camera! This always happens to me 🙂 Don’t freak out about the broken part of the table laying on the floor. The table had been well loved for many years but was damaged while moving it into storage for a period of time. Also, you will notice the leaves in the center of the table are a different color. This is probably due to them being stored away most of the time and only pulled out when larger groups would be around the table. I’ll talk more about how to solve that problem in part three of this series.
I sanded the table top first. Their were some marks that I wanted to remove, but not all of them. I still wanted to keep the feel of the use this table had experienced. That’s part of the character and memories of the piece. I usually start with 120 grit sandpaper and work up to a finer grade like 220. I like to get as many of the swirl marks out that were left from the sander as possible. Sometimes I do the last sanding by hand with a sanding sponge being sure to go in the direction of the wood.
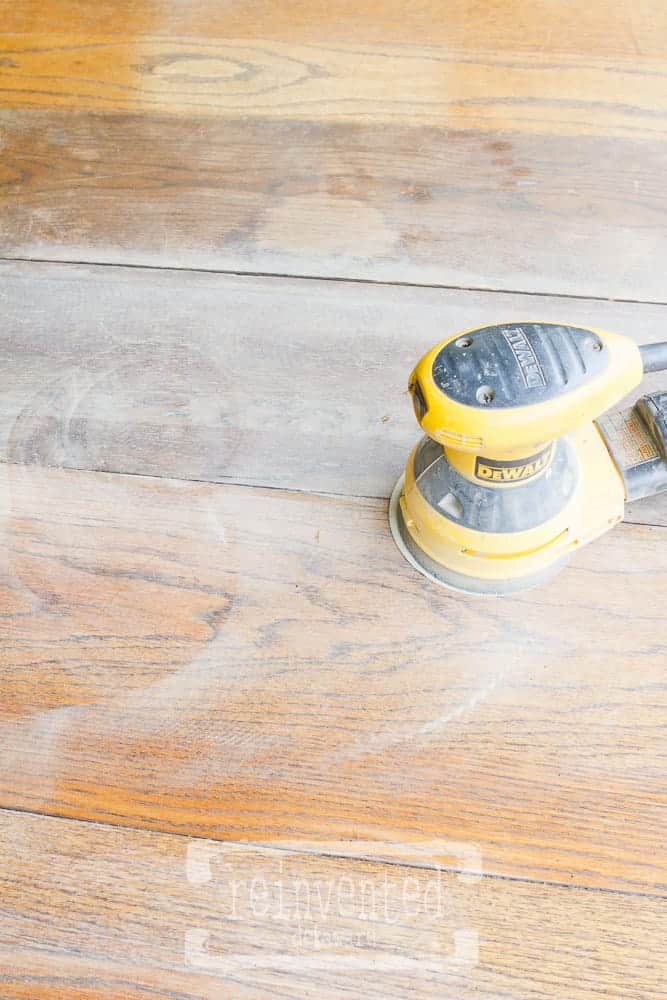
You can also see the difference in color between the leaves and the main part of the table. We will deal with that in just a bit 🙂 For now, I just finished the sanding. I turned the table upside down for better access to the legs and bottom of the table. It’s a little easier on the lower back 🙂 I sanded the legs and the base of the table by hand. I’m not a fan of using the sander on the curved parts of the legs. It can get out of control pretty fast. I used a sanding sponge and lightly sanded.
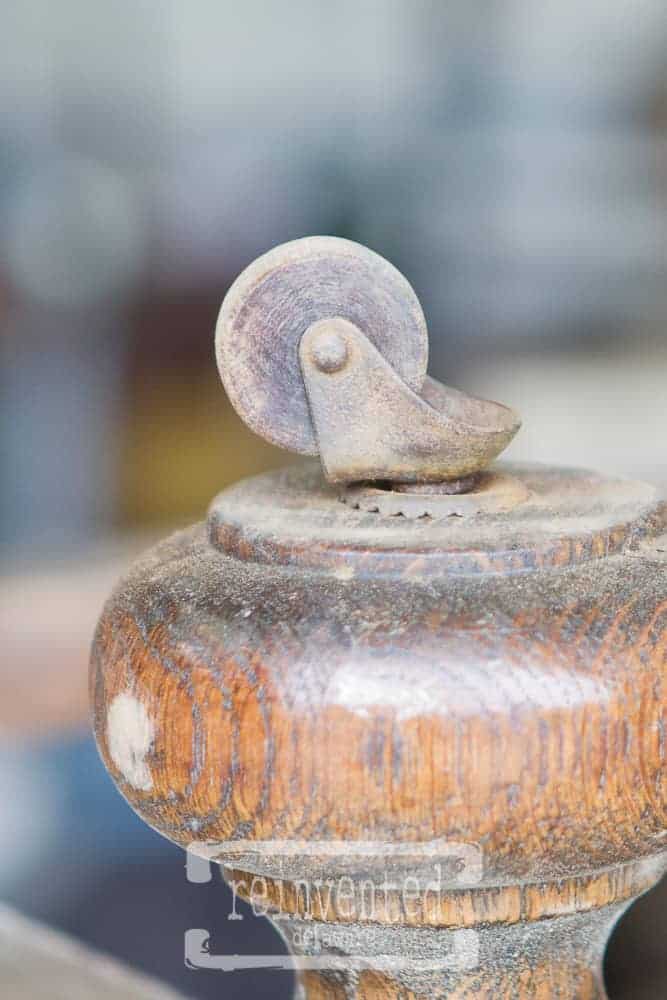
This kind of detail is exactly why I love older furniture! These wooden casters were in perfect condition. All they needed was a little #0000 steel wool and a brass wire brush for a little clean up.
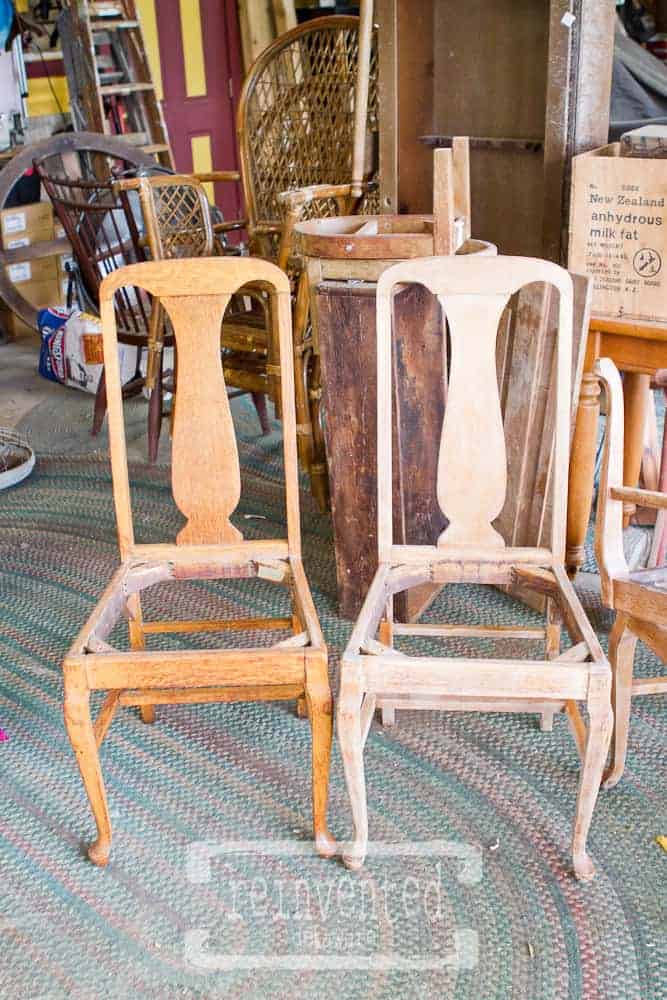
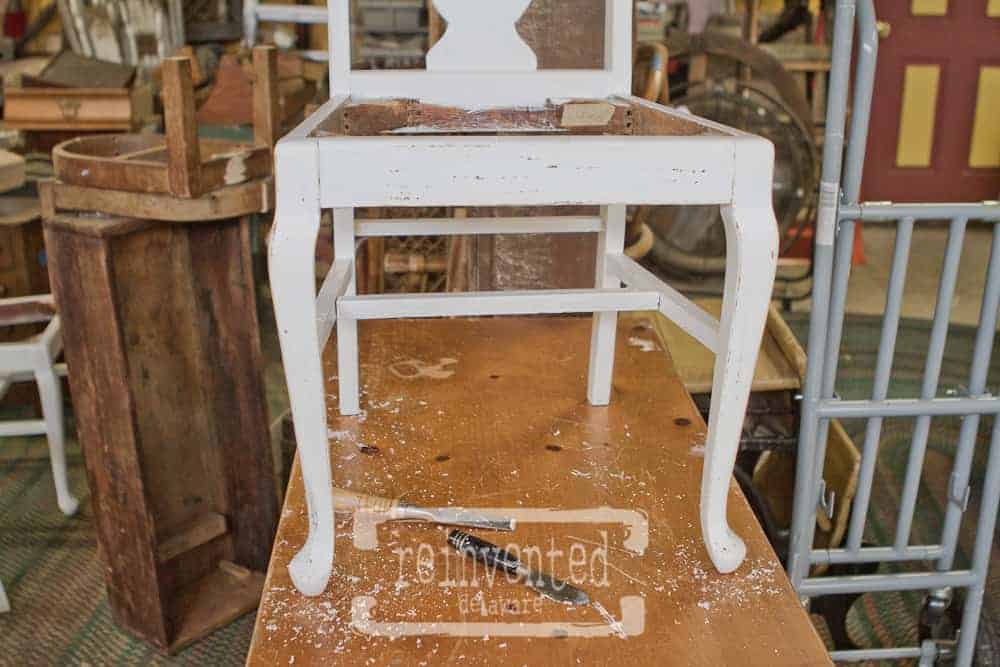
You can see the difference with these two chairs in that a little sanding can do. I do not sand down to bare wood. Keeping some of the natural color and finish will produce a beautiful distressed look to the finished pieces. A good vacuuming with the brush end of the shop vac helped with clean up. Then I used a lightly dampened microfiber cloth and went over all the pieces to remove most of the dust. I forgot to mention that I removed the upholstered seat cushions at the beginning of the process. Part three of this series will cover how to re-upholster the cushions.
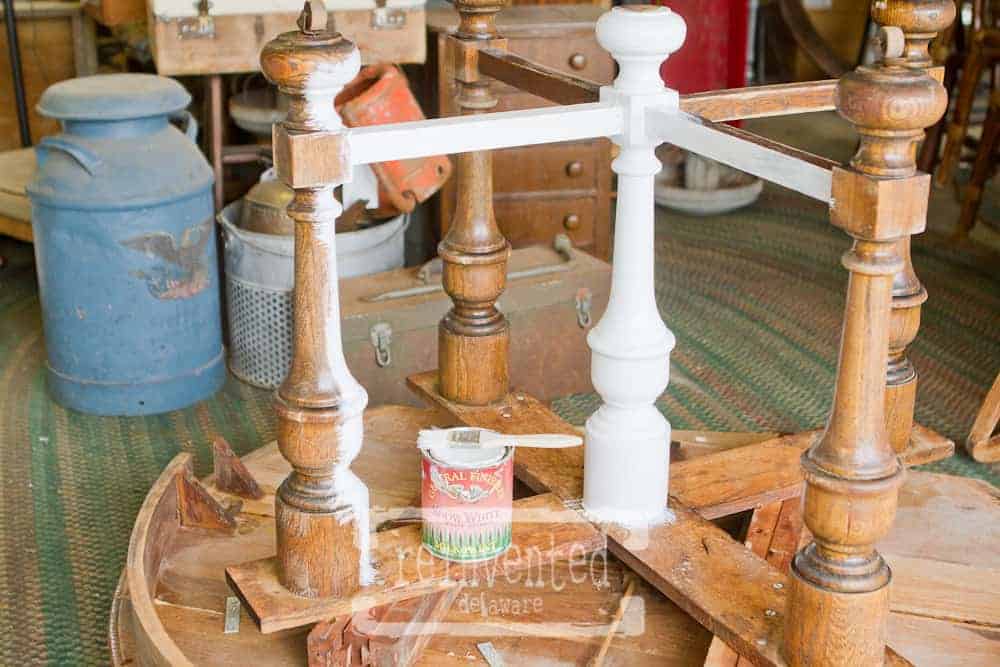
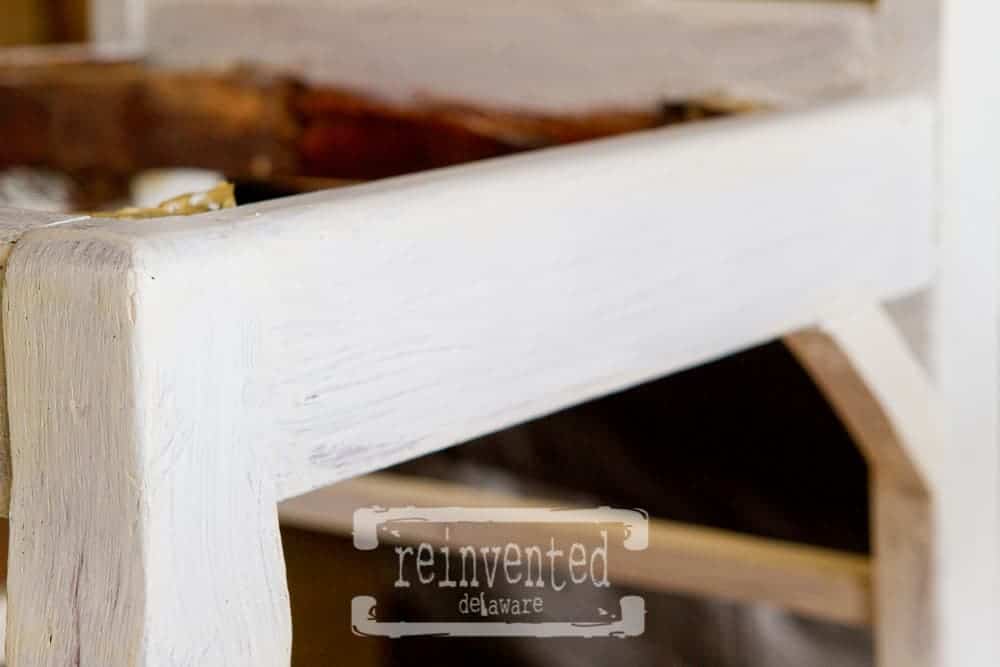
Next step is painting. I love General Finishes Milk Paint. Although it is not a true milk paint because it is acrylic based, I love the application of it. The paint is water-based and cleans up so easily. But don’t let that fool you into thinking that it won’t stick to the wood – you can paint just about anything and the adhesion is strong! It is pre-mixed and ready to use right out of the can (true milk paint usually comes in powder form and you mix it yourself.) The color I chose for this project is Snow White, a beautiful farmhouse white. I also use chip brushes. These are inexpensive and very easy to clean. Yes, I clean them – you can just toss them in the trash but I like to get my money’s worth! I even save the used brushes to apply wax into tight spots of the furniture! Some of the littles natural bristles can fall out while painting – no worries – just use your finger to remove it and paint back over the spot. They will leave brush marks but that is the main reason I love them. I want the pieces that I refinish to have a handmade and hand-refinished look to them. If I used the ‘proper’ brush or roller, it might look a bit factory-produced. That is not the look I prefer. If you are concerned about this, I would suggest you test the chip brush with a standard style brush. Use whichever one gives your desired look. Two coats should be just right!
Here is a before and after of the chairs. I used the small table that the chairs are sitting on to paint the chairs. The chair on the right is how I start out – turning the chair upside down so I can paint the legs first then flipping the chair (like the one on the left) to finish. The paint dries fairly quickly depending on the weather. Cold and rainy days slows the drying time. Hot and sunny days speed the drying time.
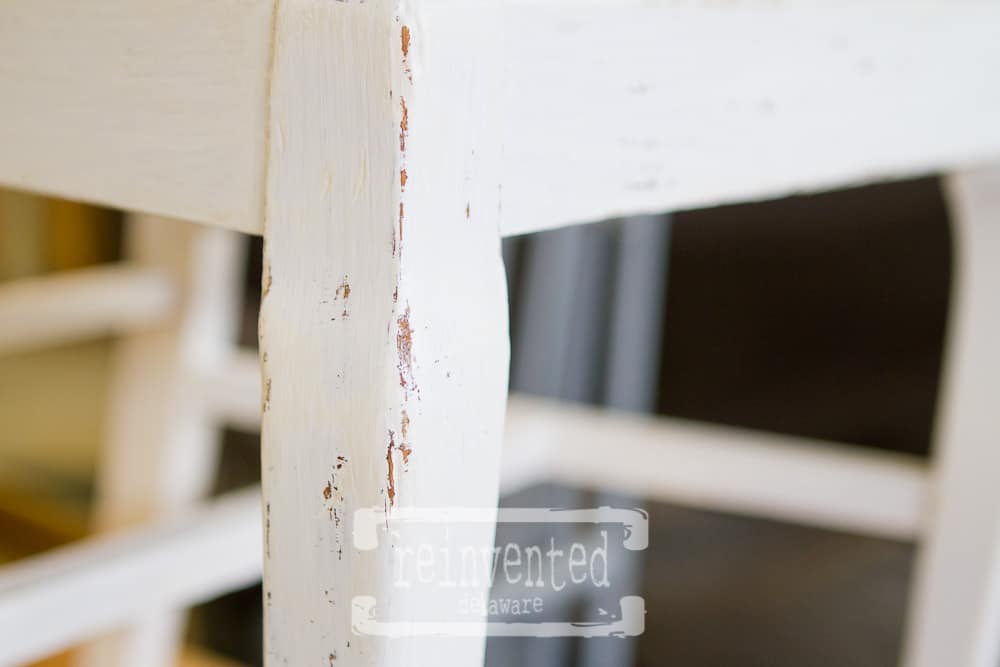
This is a quick look after the first coat. You may notice some yellowing coming through the paint. Some furniture pieces will do this depending on the age and original finish of the furniture. I love the look of the old finish coming through. Again, remember I am going for an aged, well used and loved piece. I am not going for the pristine, factory finish 🙂 If you do not want the yellowing, I suggest you spray or paint on a shellac before painting. This should prevent any show through.
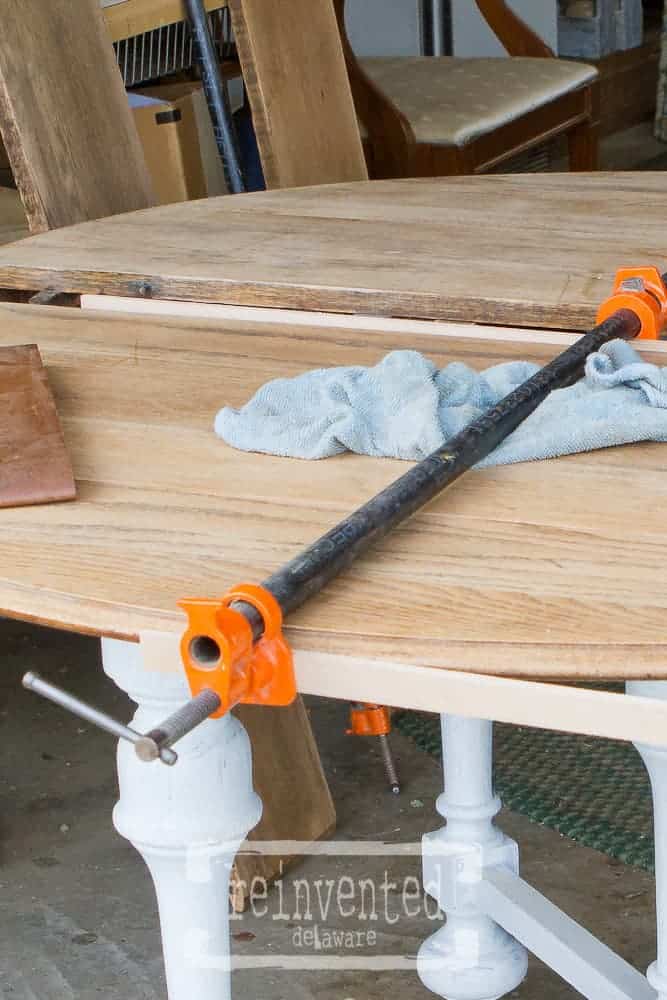
My husband and I work as a tag team. He was ready to repair the broken table top so he brought his trusty furniture clamps. These babies are so dependable – heavy weight and very strong. Unfortunately, I did not photograph the underside of the table after he did the repair. I can tell you that he cut approximately 1/2″ wide oak boards down to size to stretch across the broken part of the table – connecting it to the main part of the table top on the underside.. He used screws and glue to attach them. He used the larger furniture clamp to keep the glued joint snug (notice we used toweling and a strip of wood to protect the top and the edge of the table – the clamps can cause damage when tightening the adjusting bars.) He also used smaller clamps to ensure the joint would be level with the existing table. Again, we used scrap wood pieces to protect the table top. I promise to have a future tutorial on a repair like this! Excitement to work on the project always gets in my way of photographing it 😉

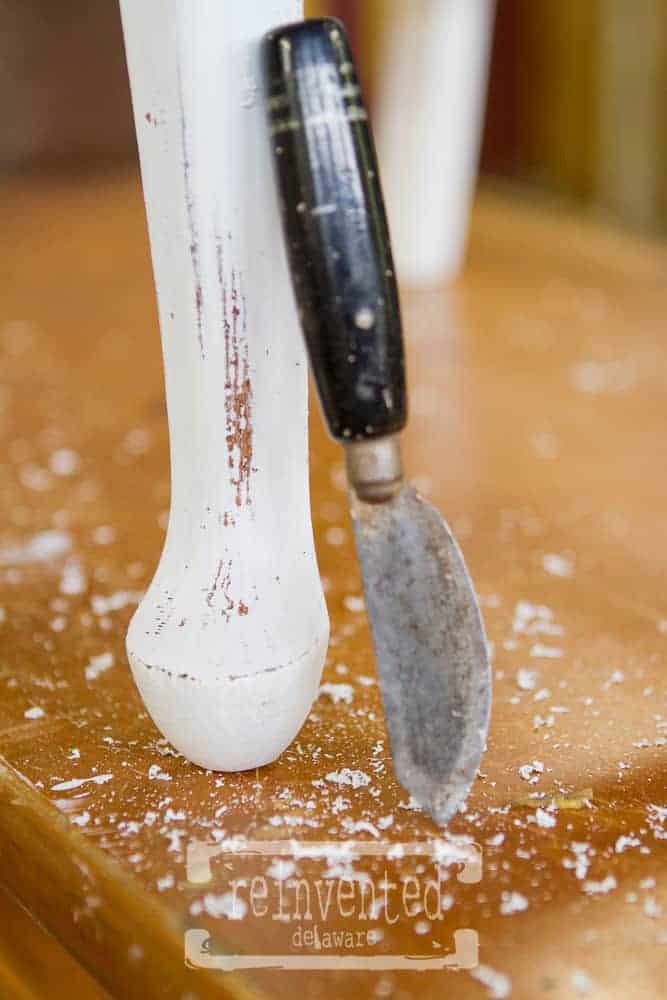
Now for the distressing! I love this part! Although I really say that about each step 🙂 Transforming the old into the new is so rewarding! Using a small knife works perfect for distressing pieces. The milk paint just flakes off as though time had flaked it of itself! Notice the flaking paint all over the place! Keep in mind not to gouge the furniture – use light,feathering strokes with the knife. Be sure to hit the ‘high’ spots – the spots where normal wear and tear would happen. For example, with the chairs think about where feet might repeatedly touch or kick the chair. Or maybe where the chairs would knock against each other or the table base. Those are the places you want to distress. Distress to your hearts content! Asking yourself, ‘How worn do I want my piece to look?’ will help you in deciding how much distressing to do. I tend to use a middle of the road approach with this step. Check out my Instagram @reinventeddelaware to see a quick little video about knife distressing!
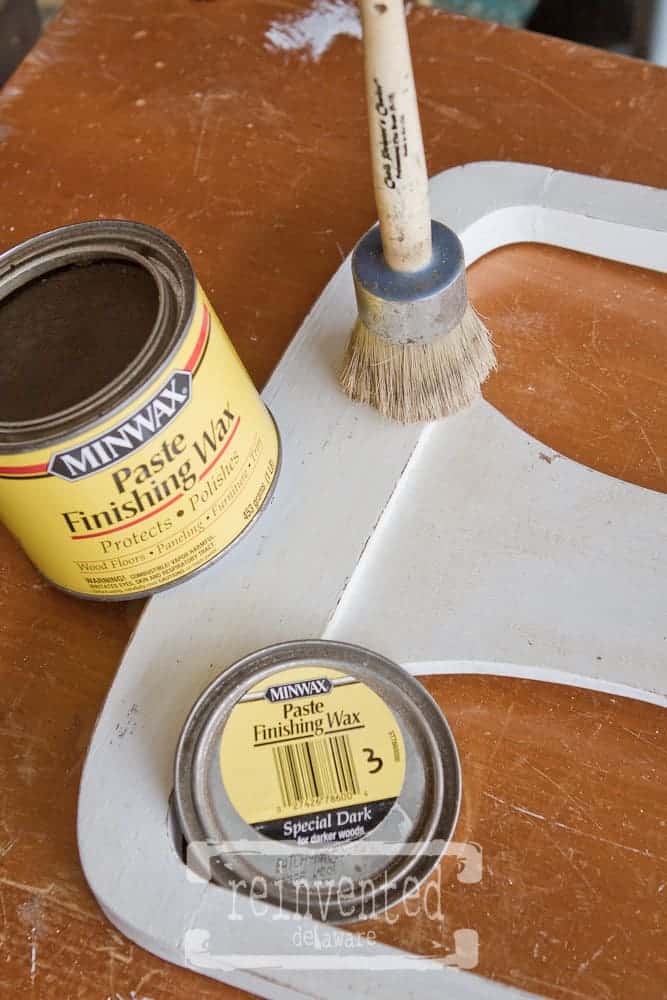
Now onto the waxing! I love using Minwax Paste Finishing Wax. It is relatively inexpensive but it produces a beautiful, soft sheen depending on how many coats you use. I generally use one coat to produce the look I’m going for. I also use this waxing brush. The coverage is great – it applies a thin coat with minimal effort. The wax comes in natural and special dark. This project called for special dark. I wanted the look of a ‘years and years of old-school polishing’ for this dining table and chairs. **Side note: I decided to add green painters tape to those adorable wood casters to protect them from the paint!
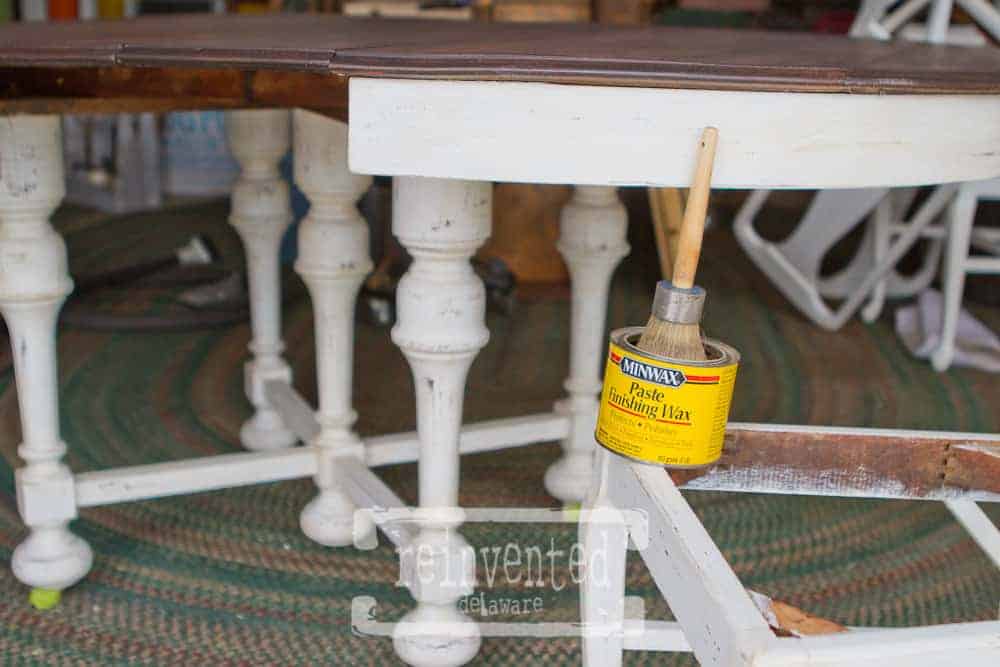
I get a little on the brush and then apply it to the painted and distressed surfaces. Be sure to get into all the nooks and crannies. Often I use a chip brush to get into the tight places. Because they are small, they get in there really good 😉 Generally, I will wax all the pieces and then go back and buff them. Sometimes, if the wax dries quickly, I will complete both steps of this process one piece or section at a time. Notice how the special dark wax settles in the paint brush marks that I mentioned earlier in the post. Just what I’m going for!
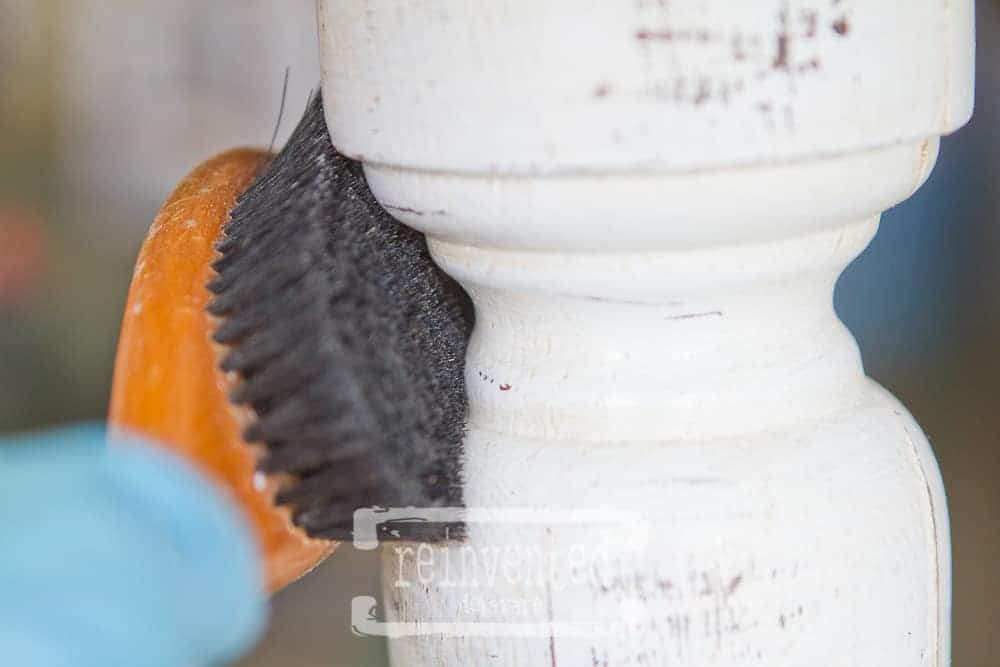
Now it’s time to buff. Again, I am a bit untraditional in my approach to this step. Some of you might be hitting the ceiling when you see the image below with #0000 steel wool and a shoe polishing brush! Stay with me here! The #0000 steel wool really is a polishing tool. It is super fine and buffs out the wax easily and quickly. Use a light touch here – if you have buffed a piece before with a microfiber cloth or other soft cloth, you will notice the steel wool works a bit faster. I also use gloves when doing this step. The steel can be harsh on your hands especially if you are working on a large project like a dining table and four chairs! I use the shoe polishing brush to really get into the tight spots and grooves of the spindled legs. It is made of natural horse hair and I bought a box of them at an auction. We like reinventing around here – from shoe polishing to furniture refinishing 🙂
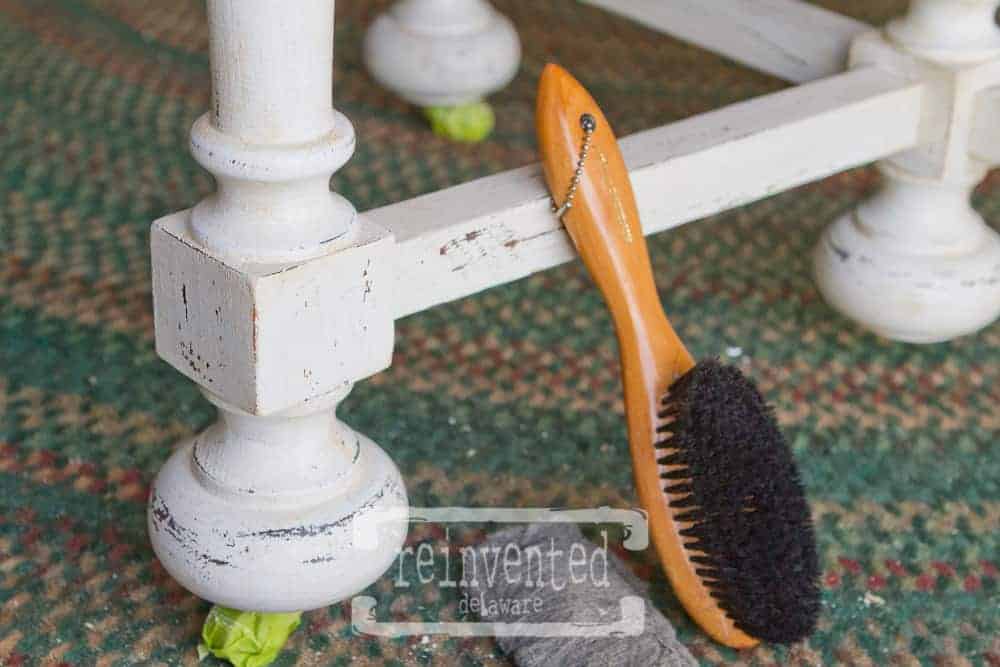
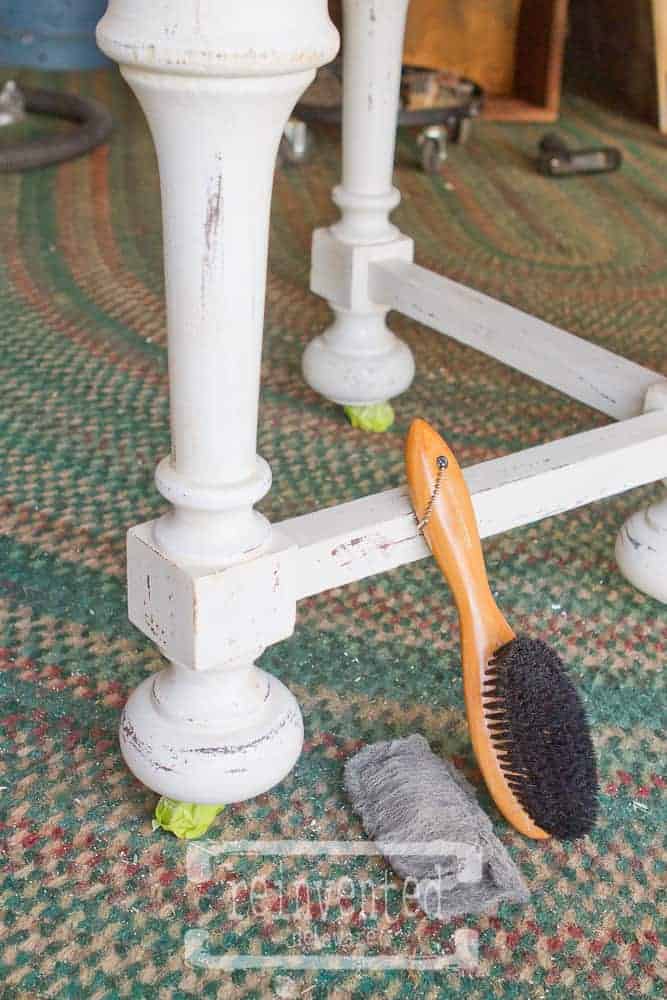
This shoe polishing brushes really saves my hands! She’s a hard worker! Notice how the dark wax stays in the the deeper places of the piece. The paint brush marks add to the aged look of this dining table and chairs.
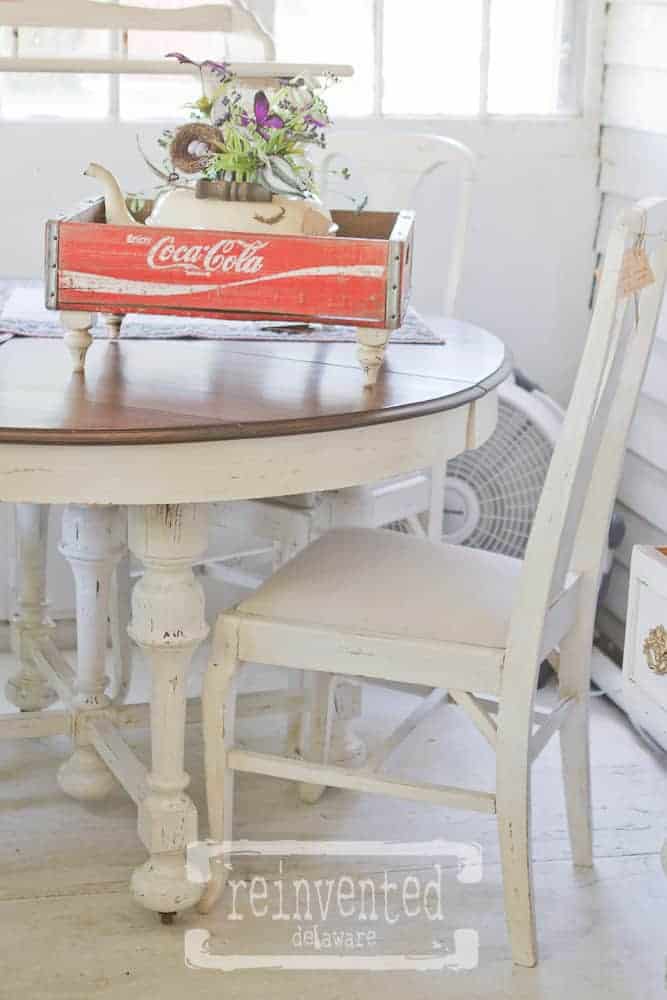
Here is the finished product! Be sure to check out the other two parts of this series to see how we refinish the table top and reupholster the chairs. Feel free to pin this post for future reference!

I would love to know how you were able to put this tutorial to good use for your own home. Leave a a little love below in the comments section! Have a blessed day!