
The Easiest Way to Fix a Broken Chair Seat
Discover how to repair a broken chair seat with this step-by-step tutorial. Fixing a broken chair is not that difficult!
Hey there, fellow DIY enthusiasts! Have you ever found yourself in a situation where your favorite chair’s seat suddenly gives out on you? Don’t worry, we’ve all been there.
But don’t worry, because today we’re going to show you how to easily repair a broken chair seat and have it look as good as new in no time. So grab your tools and let’s get started on this fun and rewarding project!
Broken chair seats are part of the adventure when restoring thrifted and vintage furniture. Here is a quick and easy fix for a broken chair seat.
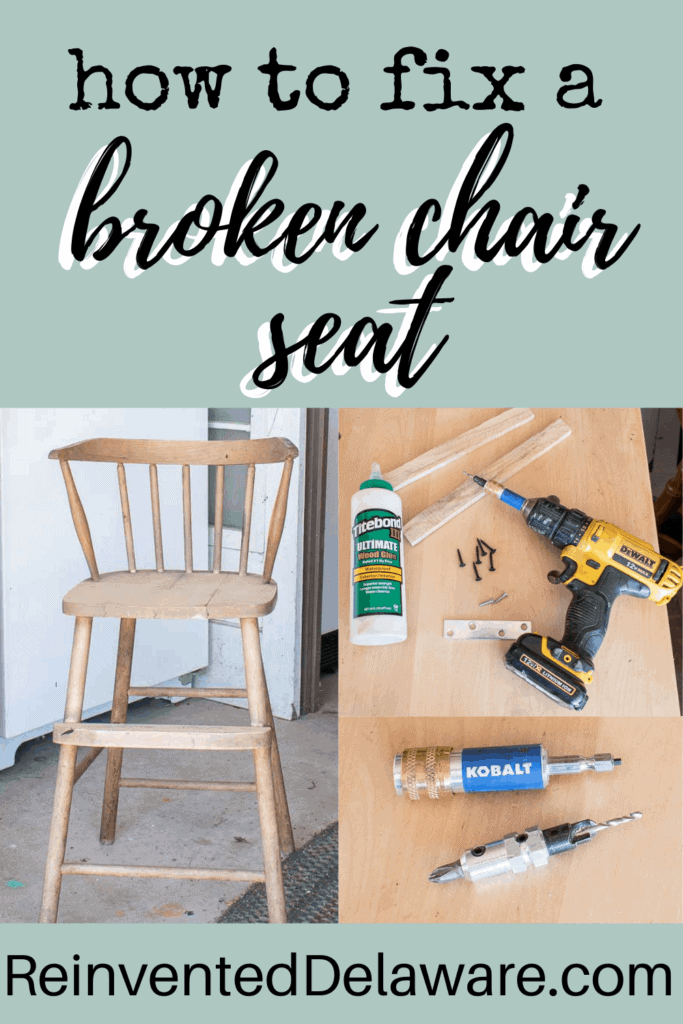
How to Fix a Broken Chair Seat
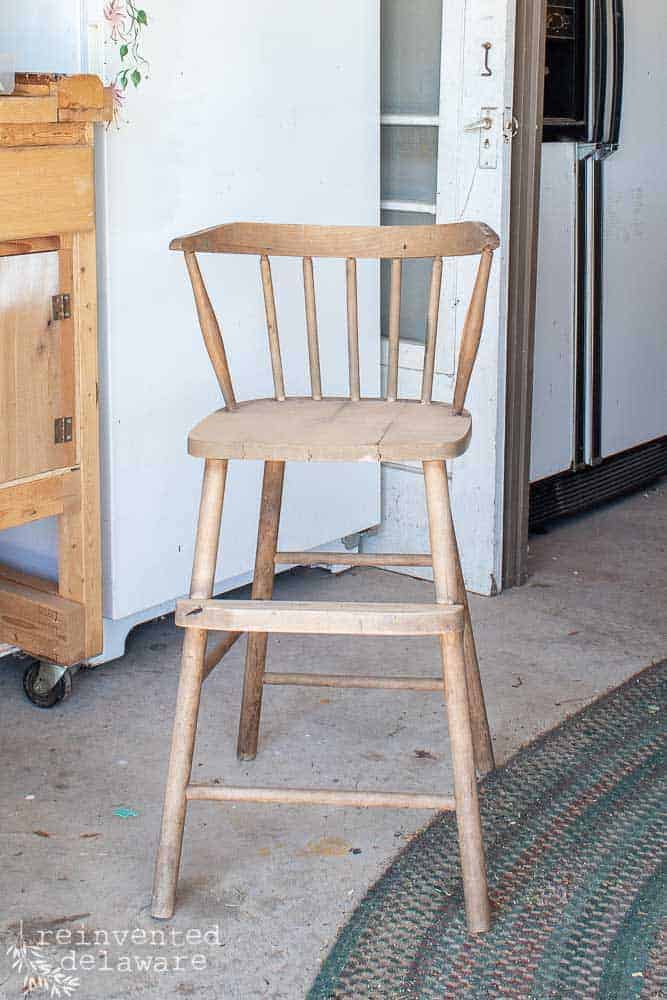
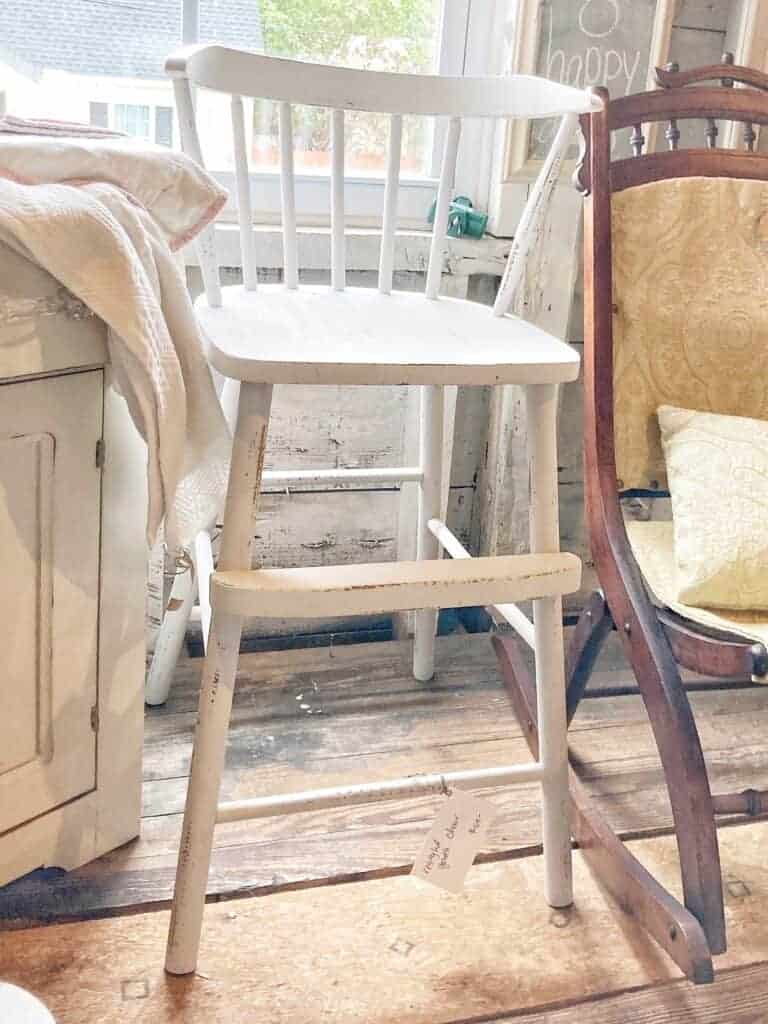
This adorable youth chair was gifted to me. Isn’t it so sweet? Think about how many meals a toddler would have participated in sitting in this adorable child’s chair at the family table!
The only problem with this chair was the broken seat. I knew it would be a simple task to fix a broken chair seat and I couldn’t wait to get started
It is important to have a safe spot for a child or anyone for that matter to sit in. The last thing you want to happen is for someone to sit down and the broken chair gives way under them!
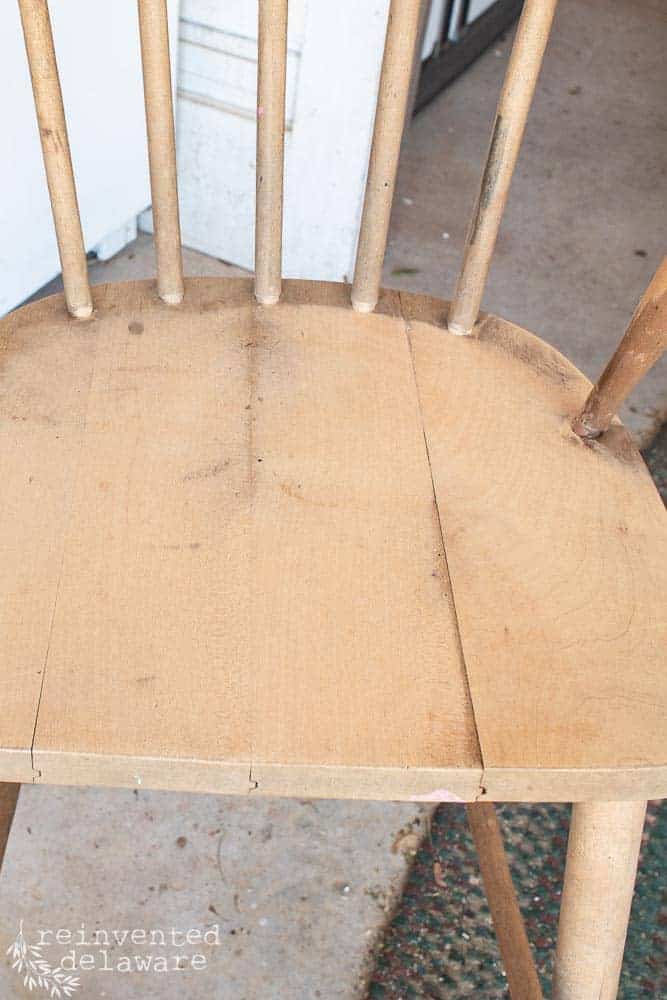
Access the damaged chair
The seat of the chair is showing the use too. Most chair seats are made from individual boards that have been joined together to accommodate someone’s bottom. In this case, a little toddler’s bottom.
Over time those boards can loosen and the joinery can become weak. That is the problem with this chair. The individual boards had loosened with use and over time.
This is a simple repair that any beginner can do! Some repairs can be more involved, but when the repair is just a broken chair seat, the repairs are simple and quick!
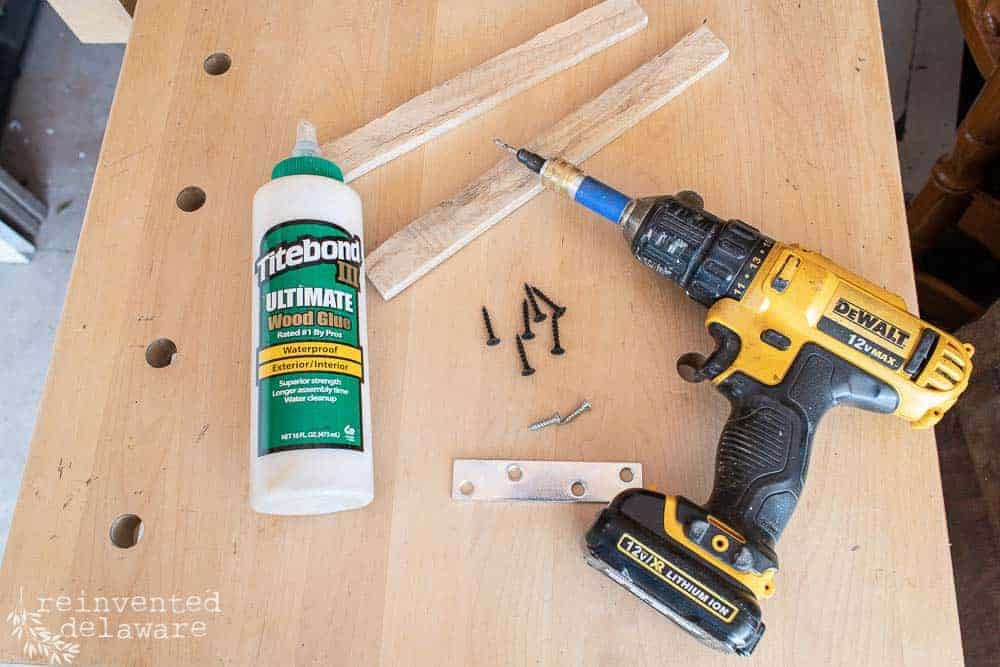
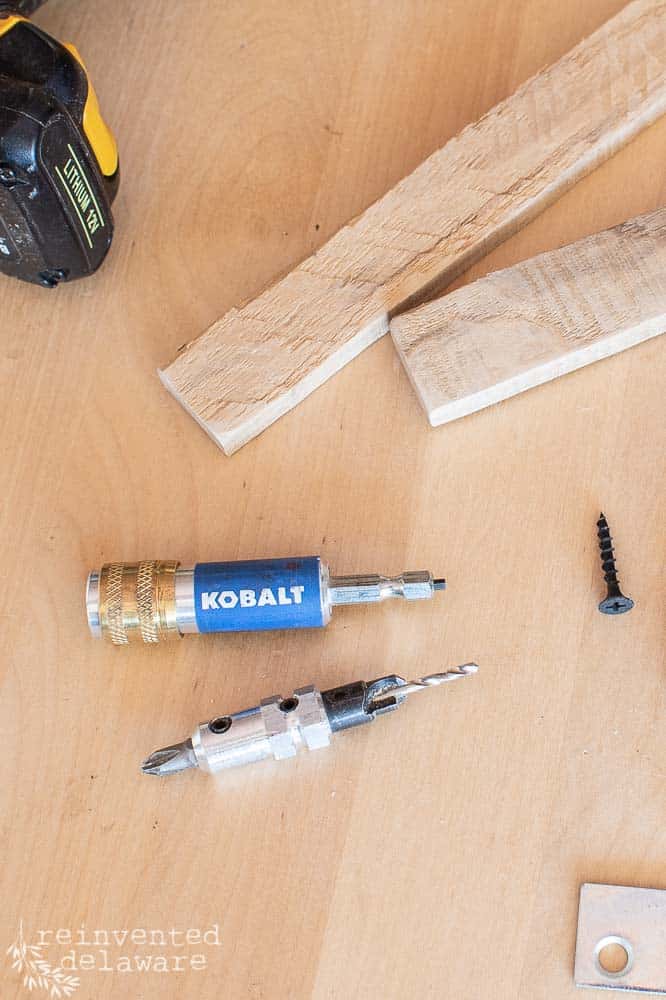
chair seat repair materials
The first thing you should consider is the materials you need to repair a split wooden chair seat. Here are the basic tools and supplies needed to fix a broken chair seat. You might already have most of the supplies on hand to fix a broken chair seat!
- power drill
- counter-sink drill bit attachment
- wood glue like Titebond III
- metal mending brackets (optional)
- hand-made wood mending bracket
- 1″ wood screws
- furniture bar clamps (not pictured)
thanks for being here!
I hope you are enjoying this project! Let me know if you have any questions. Or leave me a comment to tell me about your project and ideas!
thanks, Cindy 😀

countersink drill bit attachment
You may or may not have a countersink drill bit attachment but let me tell you, it is a handy accessory to have for your drill!
This is a close-up of the counter-sink drill bit attachment that lives on my DeWalt power drill. It not only drills the hole for the screw, but it also cuts into the wood so that the head of the screw recesses into the surface.
This makes for a finished look without the head of the screw sticking out. That is very important when you are repairing a broken chair that someone will eventually sit on!
step by step to fix broken chair seat
- Turn the chair upside down on the work bench to access the underside of the chair seat.
- Measure the width of the seat and subtract about 1″ on each side. Measure across the broken or separating boards. The scrap wood boards need to span the width of the chair seat.
- Cut two pieces of scrap wood approximately 1″ wide by the measurement in step one. Depending on the shape of the chair, the two pieces of wood may be different sizes.
- Sand the two hand-made wood brackets to remove any rough edges.
- If the chair boards are completely separated, apply wood glue to each side and clamp them together using bar clamps large enough to hold the side of the chair seat together.
- Lay the boards on the underside of the broken chair seat, spanning the width of the bottom of the chair and evenly spaced.
- Using the countersink drill bit, pre-drill holes in the wooden bracket so that there is a hole to insert a screw in each of the wooden boards on the chair seat.
- Before attaching the wooden bracket with screws, apply a bead of glue to the wooden bracket.
- Secure the wooden bracket with the screws.
- Repeat on the second wooden bracket.
- Wipe away any excess wood glue and allow it to dry completely.
If you decide to use store-bought metal mending brackets, you will not need to glue them. Buy enough of the metal mending brackets to secure the separated boards.
YouTube Video
I thought a video might be helpful for you. Seeing exactly how I repaired this chair will make the repair that much easier!
This is what I will go over in the video:
- description of the repair we will make to the broken chair seat
- supplies and tools
- how to make custom wood mending bracket
- how to use counter-sink drill bit attachment
- attaching custom-made wood mending brackets
- how to use a furniture bar clamp
Tap the image below to watch this simple step by step Easy Chair Seat Repair video!

Finishing Touches
Once the chair seat repairs were finished, I thoroughly cleaned it with hot soapy water. Then I wiped it down with a clean damp cloth and allowed it to dry.
Then I painted the vintage child’s chair in Miss Mustard Seed Milk Paint ‘Farmhouse White’. To go with the vintage aesthetic of this chair, I distressed it to give it a chippy paint finish. Then it was sealed in Miss Mustard Seed Hemp Oil by brushing it on and wiping away the excess with a clean shop towel.
BTW, this is certainly not the best photo I’ve ever taken but in a pinch, it will do! The chair sold as soon as it was in our vendor booth!
Tips for Care for the Chair Seat Repair
It’s a good idea to periodically check the repair. Simply turn the chair upside down, and make sure all of the screws are intact and tight. Once the chair has been used, it could come loose so it’s a good idea to check them.
Be sure to not overload the chair with a weight not meant for the size of the chair. A child chair is not made for an adult! Once the child can sit in a regular-sized chair, it’s probably a good time to retire this small child’s chair.
It could be used as a decor piece like a plant stand. Get creative and put this chair to good use!
Another Simple Chair Repair
Just for fun, here is another chair seat repair. It’s a different type of repair and I think you will love the results!
FAQs
How do you fix a broken chair seat?
First, access the damage. Then inspect how the chair was assembled. From there, determine the best way to repair the chair. Use a bracket to rejoin separated boards. Use wood glue to reattach loose spindles.
What is the best glue to fix a broken chair?
The best glue to fix a broken chair is wood glue. If the chair is wooden, wood glue is the best glue to use since it is formulated specifically for wood.
How do you fix a broken dining chair seat?
Use a mending bracket, wood glue, and screws to fix a broken wooden dining chair. Attach the bracket to span the separated boards and secure them with wood glue and screws. If you use metal mending brackets, you do not need to use wood glue.
Thanks for joining our journey!
I hope you enjoyed this project! If you have any questions about this repair or a repair you need help with, please ask me in the comments! I will help the best that I can!
Thanks so much for joining us for this post! Join our journey so you don’t miss any of the fun projects, tutorials, and inspiration that we share with you each week! You can follow us on Instagram, Facebook, and YouTube. We share even more inspiration on Pinterest!
Recreate and Decorate
Join the Facebook Group and Share Your Projects With Us!


Cindy Rust
Cindy has been decorating her home with thrift store finds for 40 years. She is an avid thrift store shopper who loves to makeover the items she finds into vintage-inspired home decor and furniture. When she isn’t thrift shopping or painting a piece of furniture, you can find her making homemade butter, working in her garden, or painting with watercolors.
How to Fix a Broken Chair Seat
Instructions
- Turn the chair upside down on the work bench to access the underside of the chair seat. Measure the width of the seat and subtract about 1" on each side. Measure across the broken or separating boards. The scrap wood boards need to span the width of the chair seat. Cut two pieces of scrap wood approximately 1" wide by the measurement in step one. Depending on the shape of the chair, the two pieces of wood may be different sizes. Sand the two hand-made wood brackets to remove any rough edges.If the chair boards are completely separated, apply wood glue to each side and clamp them together using bar clamps large enough to hold the side of the chair seat together.Lay the boards on the underside of the broken chair seat, spanning the width of the bottom of the chair and evenly spaced.Using the countersink drill bit, pre-drill holes in the wooden bracket so that there is a hole to insert a screw in each of the wooden boards on the chair seat.Before attaching the wooden bracket with screws, apply a bead of glue to the wooden bracket. Secure the wooden bracket with the screws.Repeat on the second wooden bracket.Wipe away any excess wood glue and allow it to dry completely.

Such a great post and I love that it references your video. That high chair is adorable!
Thanks Anna! The video definitely is not my best but it serves the purpose! Thanks for reading the post😊😊
Nice video CG. Kind of amazed that you can drill 4 holes in a brace and have them all lined up at the end :)… I usually (have to) put a screw into the first one or two to keep it from moving when I drill later holes..
Thanks for watching and I’m glad you enjoyed it! Putting the first screw in is definitely the better way to do it!