
How to Transform a Vintage Vanity into Nightstands or Side Tables
Discover how to transform a vintage vanity into nightstands or side tables to add vintage charm and character to our home!
As someone who loves to repurpose old items, I was thrilled to come across a vintage 1940s vanity that was no longer wanted. In this article, I will share with you how I transformed this vanity into unique and stylish nightstands that are sure to add character to any bedroom.
Throughout this article, I will take you through the process of updating the original hardware, repurposing the vanity into nightstands, and revealing the final before and after antique vanity makeover. Join me on this repurposing journey and learn how to transform vintage furniture into something new and beautiful.
Key Takeaways
- Learn how to repurpose a vintage vanity into stylish nightstands
- Update the original hardware for a unique touch
- See the stunning before and after photos of the antique vanity makeover
The following post may contain affiliate links. That means if you click and then buy something, I will make a small commission at no additional cost to you! Thank you for supporting my blog. full disclosure here.
History of Vintage Vanity
Antique and vintage vanities have been popular for centuries, and they are still in demand today. The old vanity was typically used for grooming purposes and was often found in bedrooms. The vintage vanity, on the other hand, was more of a statement piece and was often placed in living rooms or parlors.
Dating an old vanity is not always easy, but there are some clues that can help. For example, the style and design of the piece can give you an idea of when it was made. Additionally, the type of wood used and the hardware can also provide clues to its age. It is important to note that just because a piece is old, it does not necessarily mean it is valuable.
Antique vanities, on the other hand, can be quite valuable. The value of an antique vanity depends on several factors, including its age, condition, and rarity. Some antique vanities can be worth thousands of dollars, while others may only be worth a few hundred. It is always a good idea to have an antique vanity appraised by a professional before attempting to sell it.
Overall, vintage and antique vanities are beautiful pieces of furniture that add character and charm to any room. With proper care and maintenance, they can last for generations to come.
Transform a Vintage Vanity into Nightstands
Let’s get this project started. I will give you a list of the tools and supplies I used at the end of this post. For now, grab a ratcheting screwdriver and a chisel!
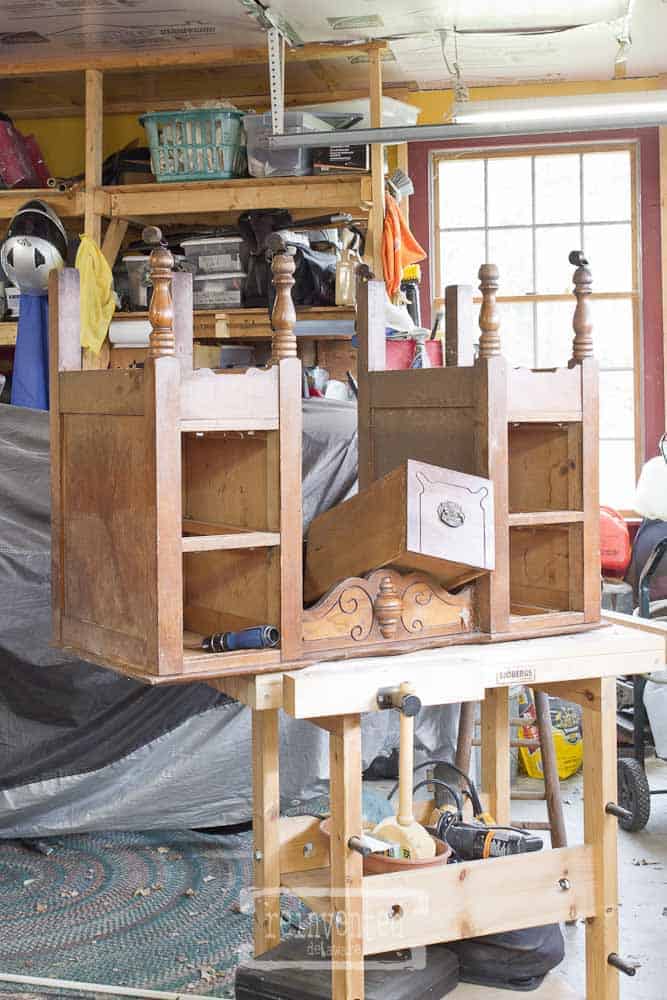
Step One: Remove the Top
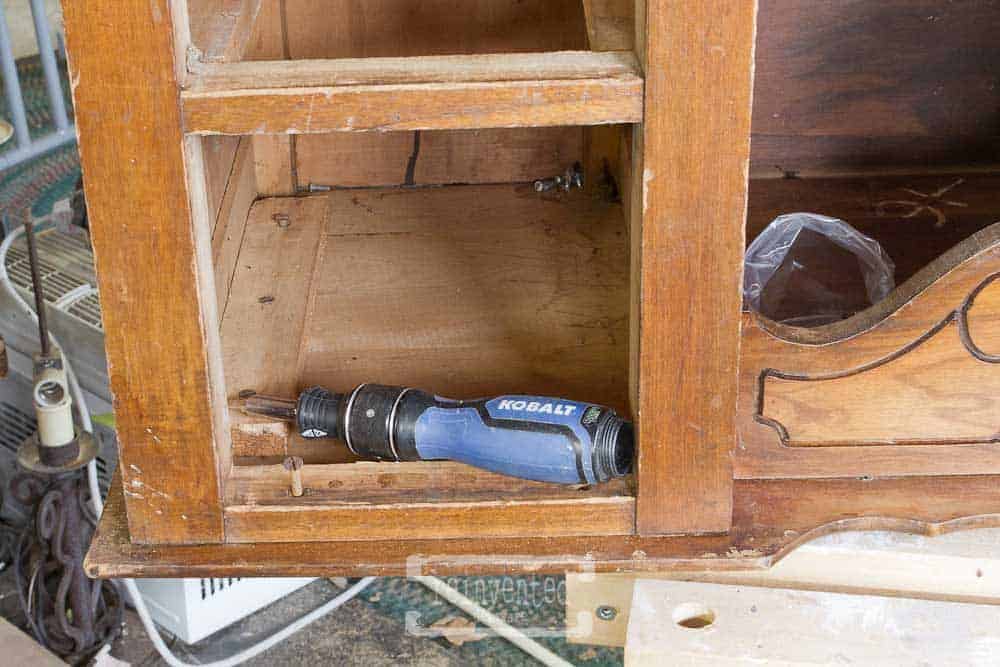
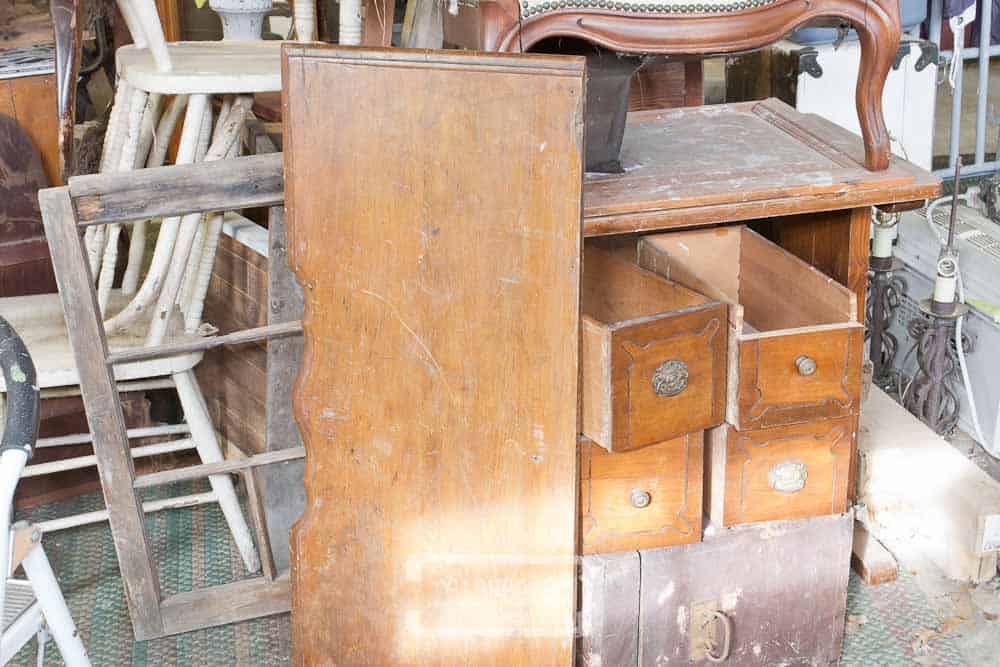
The first step in repurposing an old vanity is to remove the top. Pull out the drawers and you will be able to see the screws that attach the top to the base.
They are usually flat-head screws and can be a challenge to loosen. Be patient and apply even, downward pressure as you turn the screw. You don’t want to ruin the flat head of the screw so don’t be too aggressive. Take your time.
I removed the drawer pulls while the screwdriver was handy. A sandwich baggie comes in handy for keeping all the hardware together!
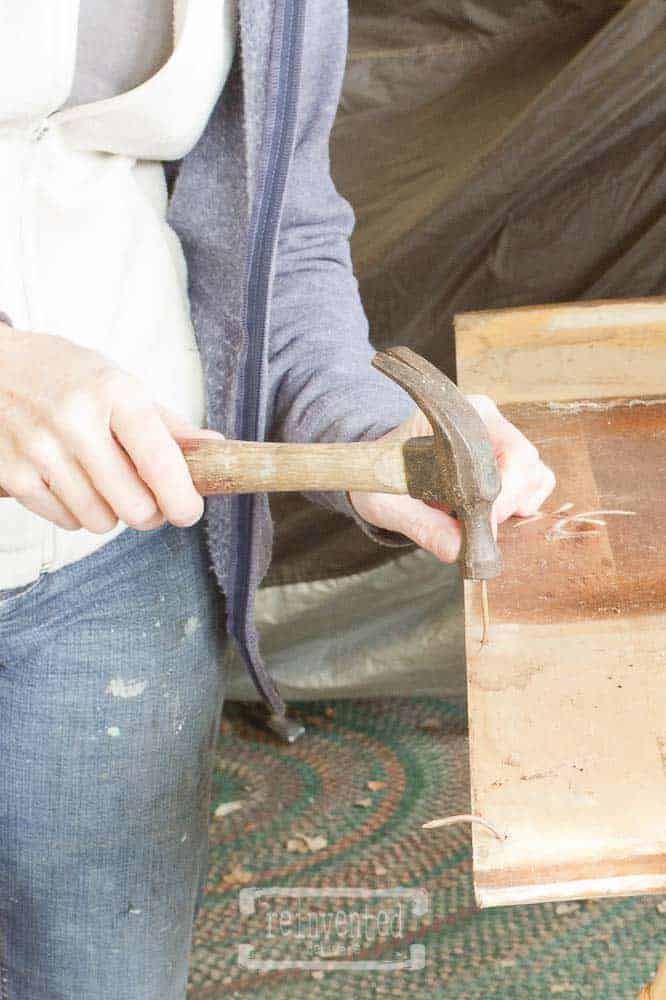
This vanity top was also secured with long nails. Using the chisel, I gently pried and loosened the nails. This took some time – I didn’t want to ruin the top. We have plans for the top of the vanity for another project – an upcycled chair sofa table! You have to see that project!
Once the top is removed from the base of the vanity, tap on the sharp end of the nail to remove it completely.
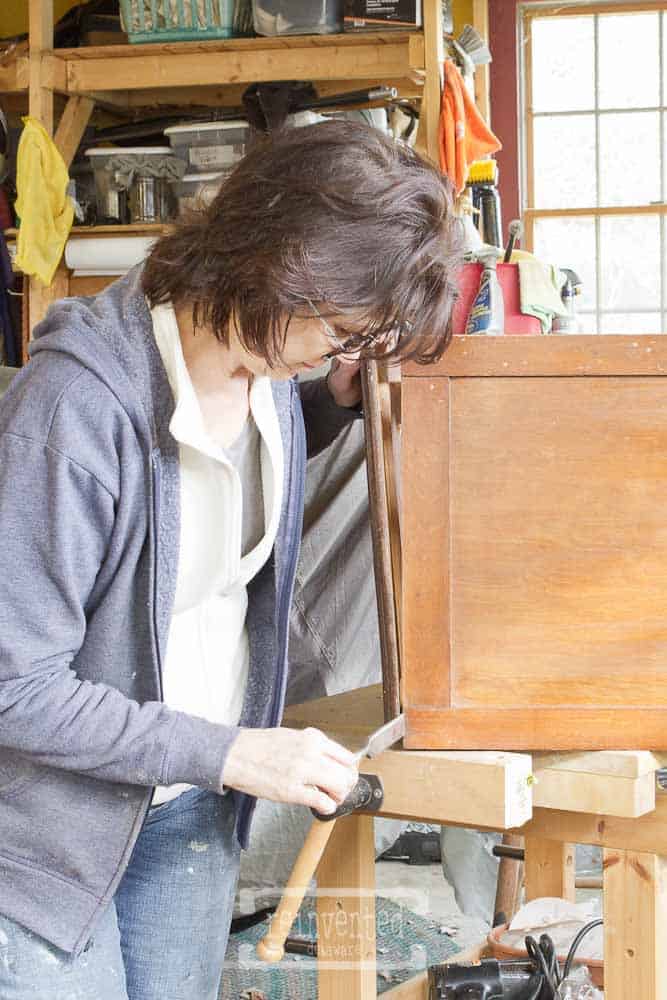
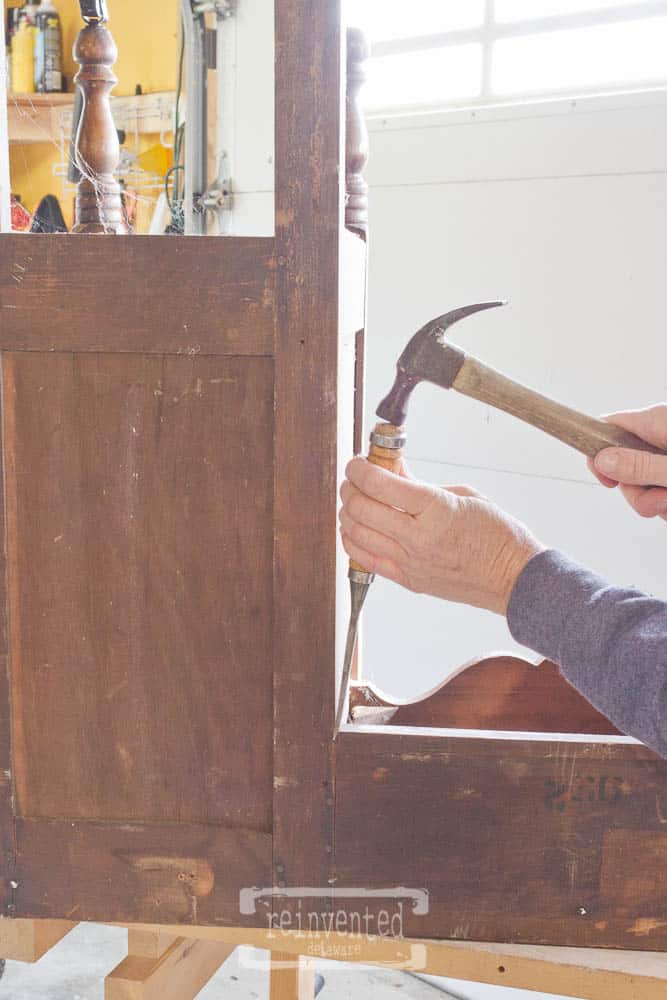
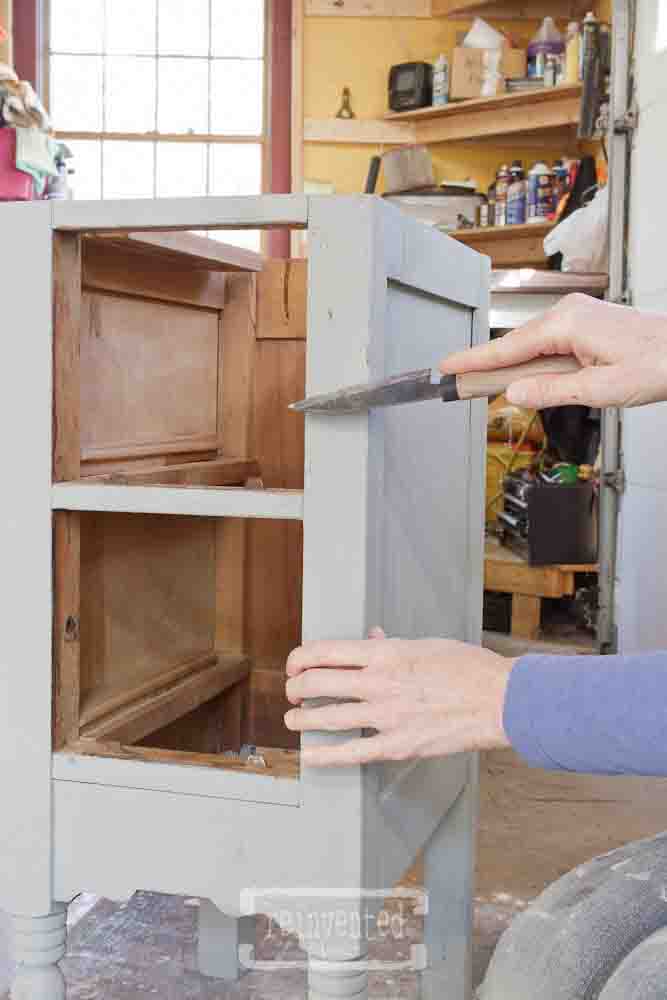
Step Two: Separate the Sections
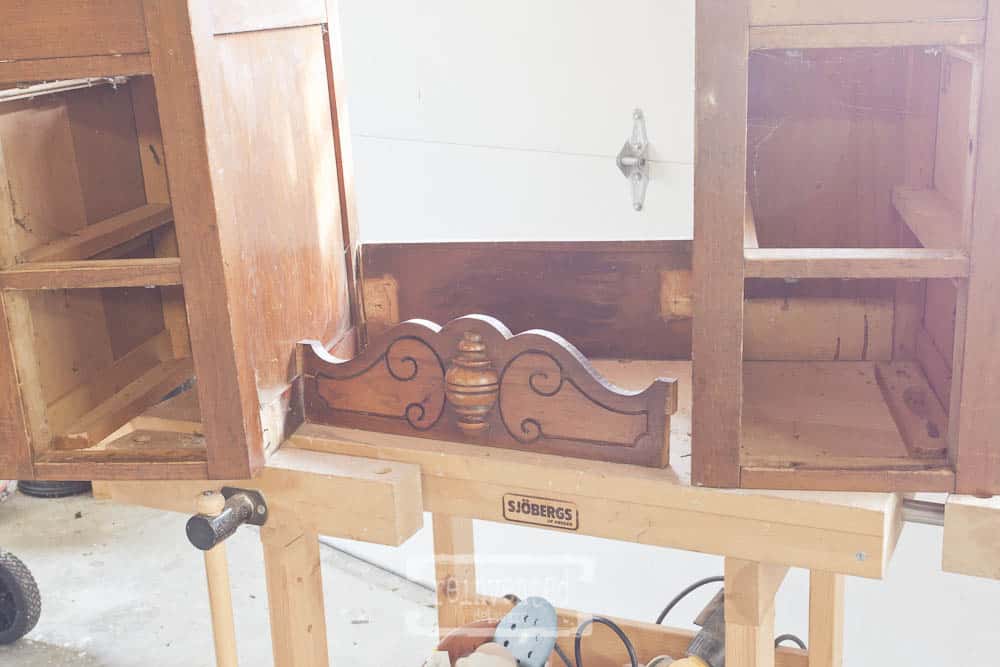
The back of these vintage vanities often have a piece of wood that joins the two sections. I used the chisel and hammer to loosen and pry it away from the sections with drawers.
These leftover pieces of wood are stashed away. They come in handy with repairs for many of the projects we do. We used the back center piece to repair part of this vanity!
The decorative front piece of this old vanity was removed the same way. And of course, it was stashed away for a future project! You never know when you might see that piece pop up again!
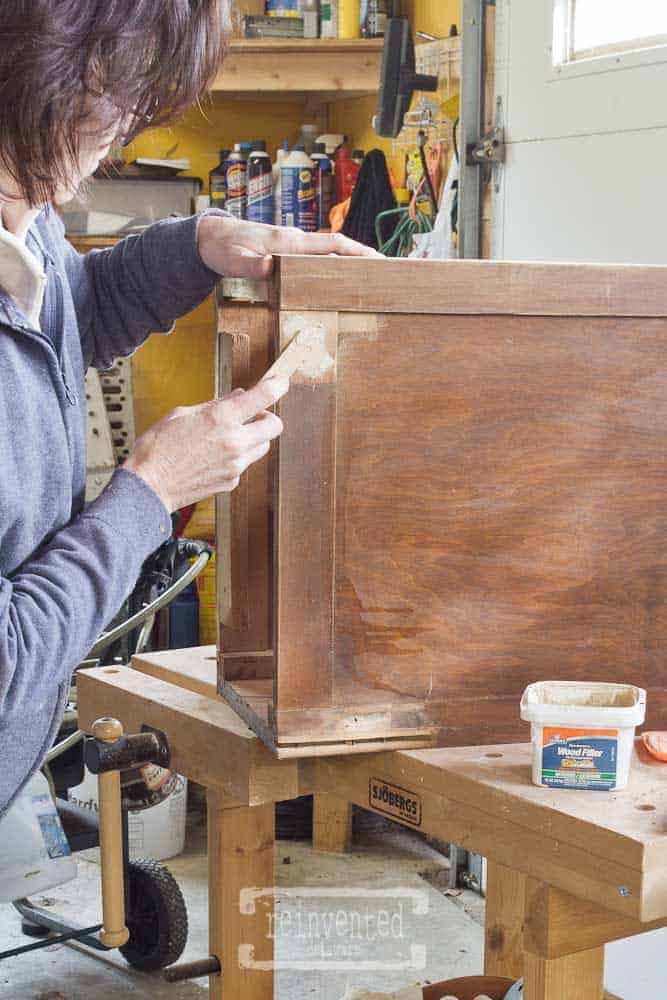
Step Three: Fill Holes with Wood Filler
The holes that the wood pieces left were filled with Elmer’s Wood Filler. I use a couple of different methods for filling holes like this including Bondo and handmade wood filler using wood glue and sawdust. The Elmer’s Wood Filler was handy and quick.
Here you see that I used a craft stick to press the filler into the holes. When it was completely dry, I sanded it smooth.
Step Four: Repair and Clean
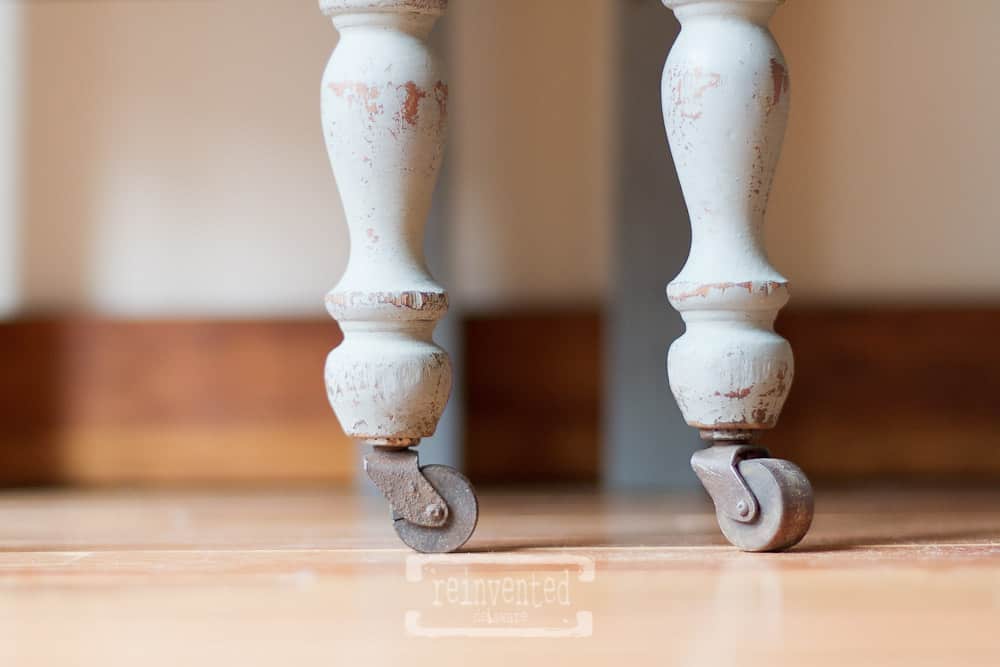
Look very closely at the back legs on the vanity – see that little piece of light colored wood on the back legs? Let me tell you about that – some of the wooden casters were missing.
The best way to remedy this problem (since most of us don’t have replacement wooden casters just lying around) is to move any casters on the back legs to the front legs that have missing caster wheels. My hubby cut a piece of wood to bring the back legs up to the correct height due to the missing casters.
The pieces were attached with wooden dowel rods and glue. We drilled a hole in the new piece of wood as well as the existing short back leg of the vintage vanity. Then we added glue inside each of those holes and inserted the dowel into both holes. A wooden mallet helped to tap the two sections together.
thanks for being here!
I hope you are enjoying this project! Let me know if you have any questions. Or leave me a comment to tell me about your project and ideas!
thanks, Cindy 😀

The seam where the new piece of wood meets the old vanity leg were filled with Elmer’s Wood Filler and sanded smooth. Once the piece is painted, you will never know the difference!
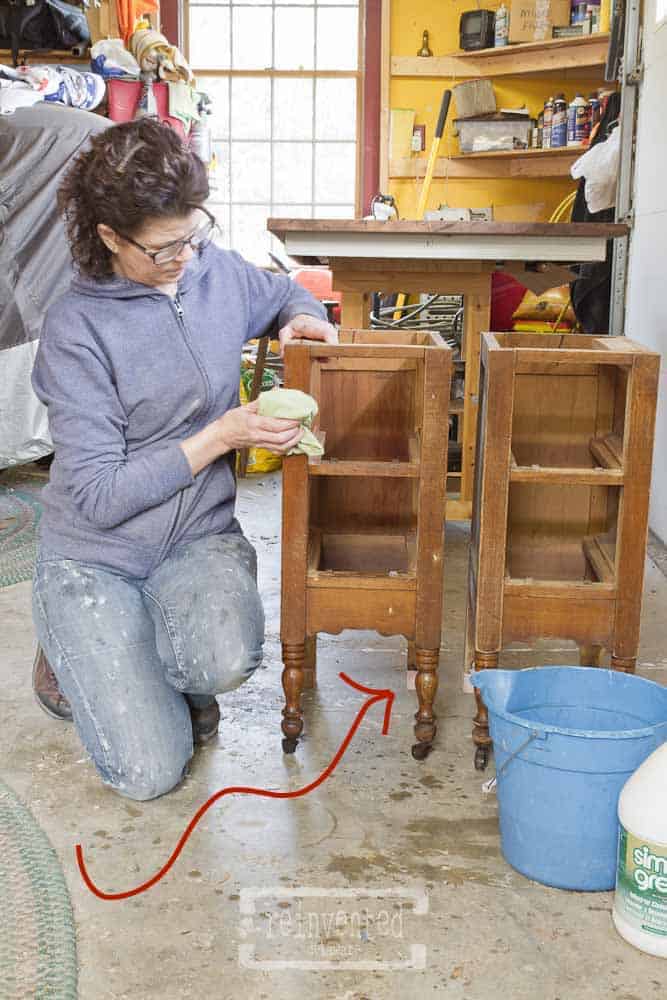
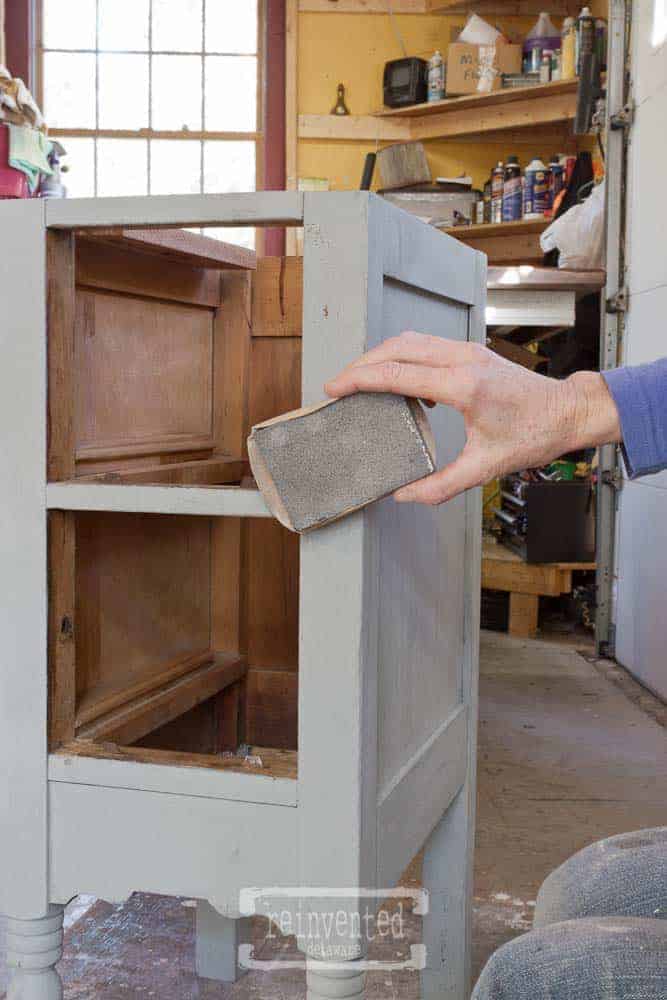
A good vacuuming with the shop vac and then a scrubbing with my favorite cleaner, Simple Green mixed with a bit of warm water. I love using micro-fibre cloths – they seems to grab the dirt off of the piece!
Be sure to wipe the piece down with a clean microfiber cloth and clear water to remove any soap residue.
Replace Vanity Tops
My hubby replaced the original vanity top with two custom-cut pieces of wood to create tops for the repurposed end tables. He used scrap pallet wood and built these two tops similar to the method he used when he built new tops for a pair small desk cabinets.
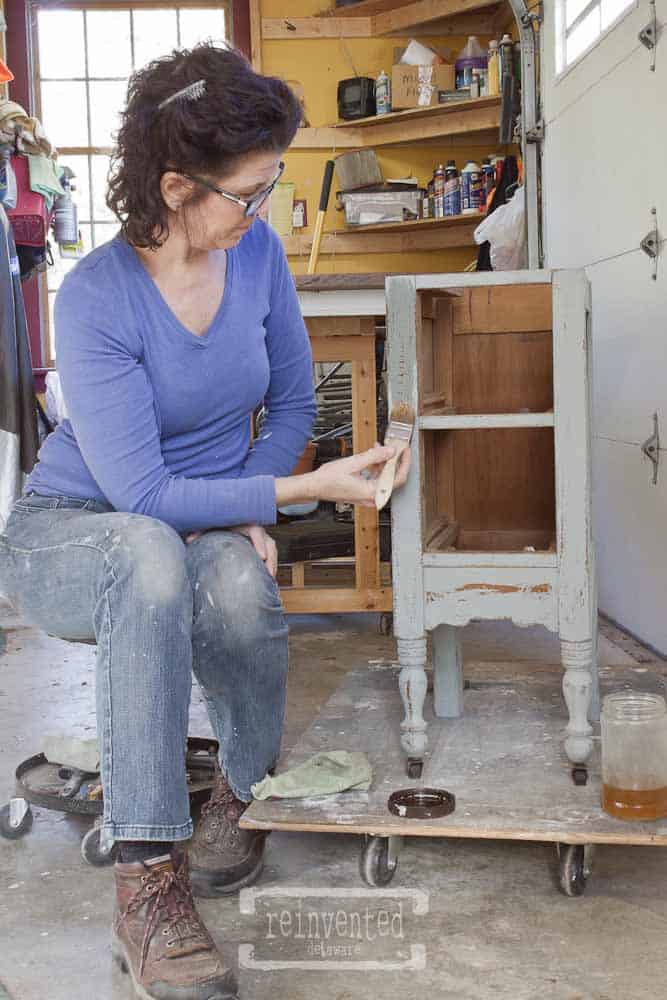
Step Five: Paint the Repurposed Nightstands
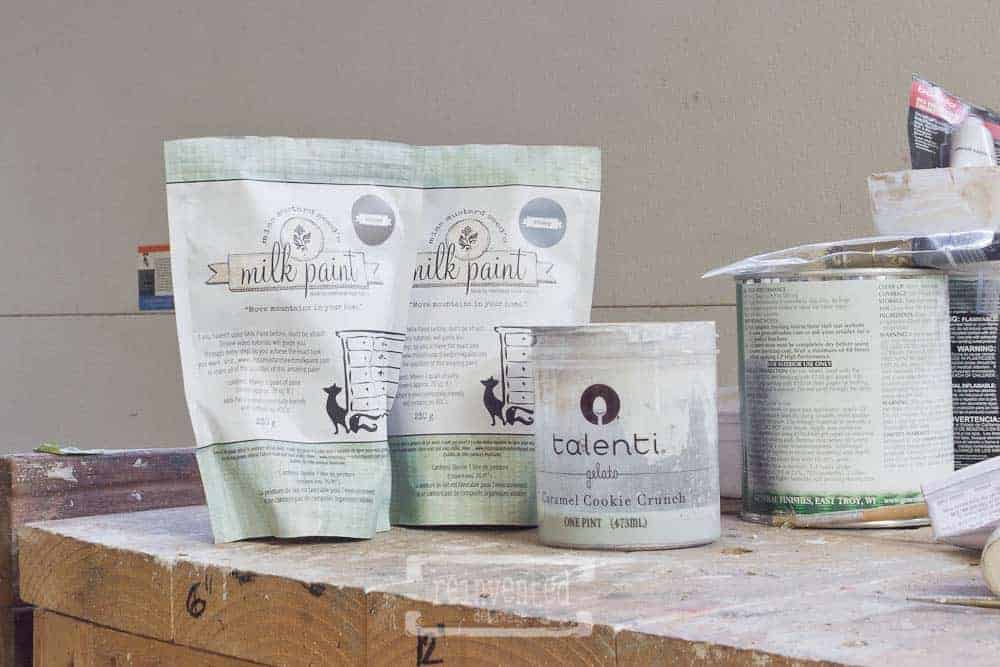
I am a huge Miss Mustard Seed Milk Paint fan! And I love mixing the colors so that the pieces we create are unique. This combination of three parts Aviary (deep blue) and one part Schloss (greige) made a gorgeous blue/gray.
***If you don’t want to mix your own colors, I have a similar color listed in the supplies list later in this post!
You can read how I mix milk paint here. I usually mix the paint before I start cleaning the piece. That gives the dry milk paint plenty of time to soak up the warm water.
First Coat = Scary Coat
The first coat of paint is always the scariest! Any kind of paint you use can look pretty rough after the first coat.
Don’t panic! Just let it dry and press on my friend! It will get better with the second coat, I promise!
repair the drawer fronts
Also, I forgot to mention another repair my hubby made. See the top left drawer and bottom right drawer? They both were missing a chunk of wood so my hubby used the center back piece that I removed earlier to cut new pieces to replace the missing pieces.
The back piece was perfect for this repair because the thickness of the wood was the same thickness as the drawer fronts! Also, since it was an old piece of wood, it had aged just like the drawer fronts had. Perfect for distressing the furniture to create an authentic aged look.

Distress and Age the Antique Vanity Tables
Since these are repurposed end tables, I thought it was best to add some character and age to the final look. Plus, distressing furniture to create a chippy paint finish is fun!
Using the side of a flat knife blade, I gently scrape and chip off the paint. I cannot stress enough how gently I do this step. It can look like I am ruining the furniture, but believe me I am not!
This method, in my opinion, gives such an authentic aging to the piece. You can also use 220 grit sandpaper to distress as well.
Distress on the high spots, edges and places where natural wearing would happen. The amount you distress is completely up to you. I try to imagine the age of the piece and the use it would have taken over the years. Imagine someone touching a piece of furniture at they walk by it, opening the drawers or accidently kicking it!
I go over the whole piece with the 220 grit sandpaper for the final step to create a smooth finish before sealing the milk paint.
Once the distressing is finished, go over the antique side tables with the shop vac and a clean, dry microfiber cloth to remove the dust created by distressing the piece.
Step Six: Seal and Milk Paint
Miss Mustard Seed Hemp Oil is a great choice if you are going for the authentic age in a piece. The milk paint just soaks it up and the wood seems to love it too! Think how good it feels on your skin when you clean it thoroughly and then moisturize it ;). That is what this lovely little stand gets to experience 🙂
I brush it on and then wipe off the excess. Be sure to work it into all the nooks and crannies. I also gave the casters a good coat of the hemp oil. The hemp oil keeps the antique furniture casters in good working order.
You can also apply furniture wax to seal the milk paint. Simply brush it on and lightly buff it. Wax takes thrirty days to completely cure so bear that in mind as your use your antique bed side tables!
The newly built tops for these painted antique vanity end tables were sealed with two coats of clear top coat in flat to give them a waxed appearance with the durability of a poly acrylic.
Update the Original Hardware
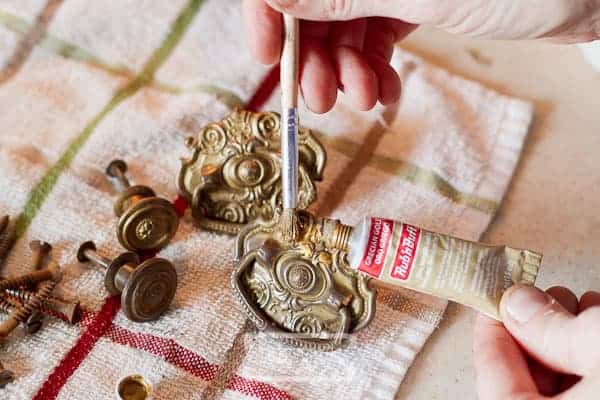
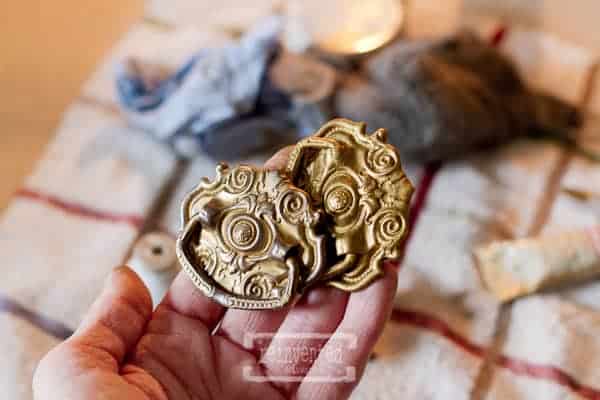
I wanted to give the hardware on my nightstand a fresh new look without having to buy new pulls. After cleaning them with a wire brush, I applied a thin layer of Rub ‘n Buff in Grecian Gold using a stiff artist paintbrush.
This product is amazing and easy to use. It didn’t take long to dry, and the result was a beautiful metallic finish.
To age the finish and give it a softer look, I used #0000 steel wool to buff the drawer pulls. This step was quick and effortless, and the result was stunning. The drawer pulls now have a vintage look that perfectly matches the nightstand’s style.
Overall, updating the original hardware with Rub ‘n Buff was a simple and affordable way to transform the look of my nightstand.
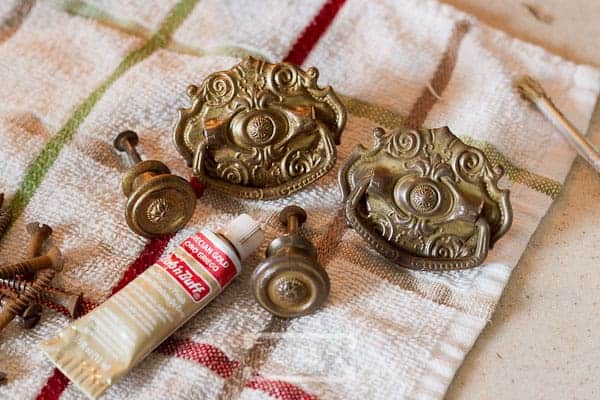
Paint Supplies
Here are some of the supplies you need for this furniture makeover!
Supplies
- Aviary Milk Paint
- Schloss Milk Paint
- Bergere Milk Paint
- Hemp Oil
- Chip Brush
- Furniture Wax
- Clear Top Coat
- Rub-n-Buff
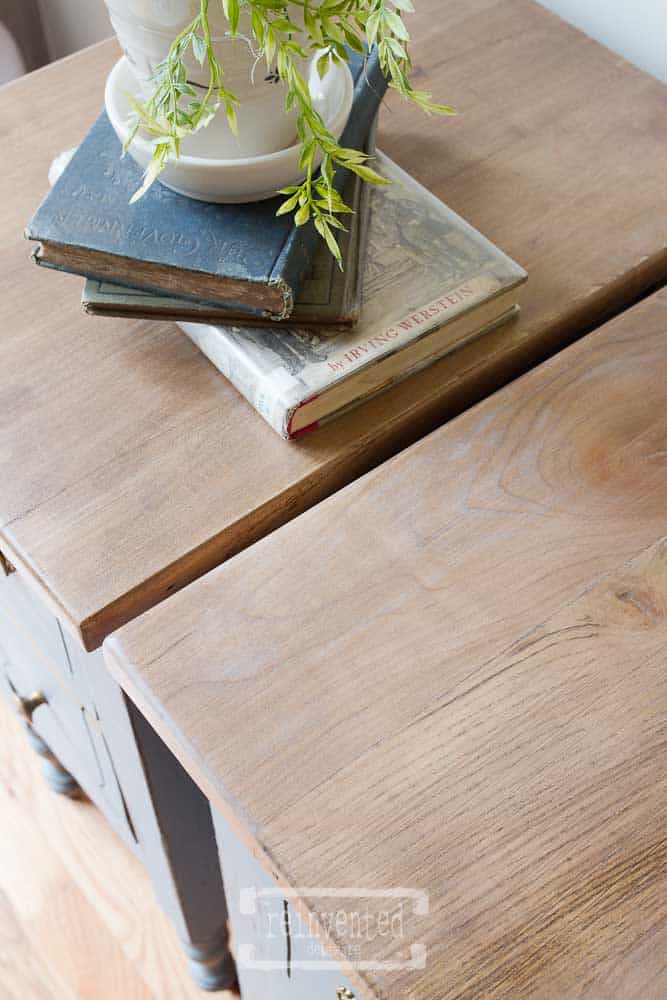
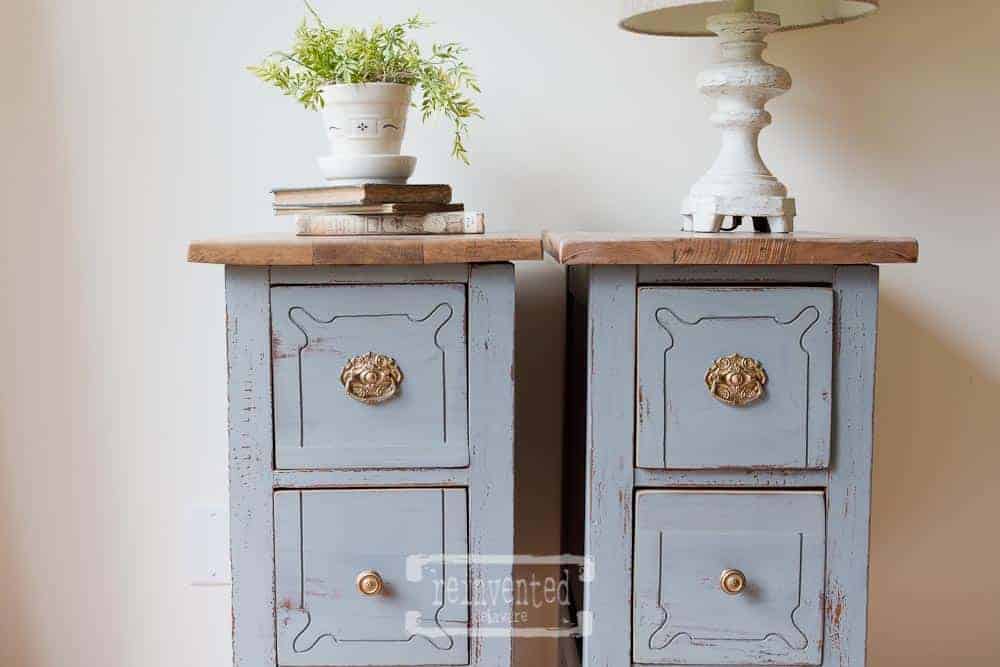
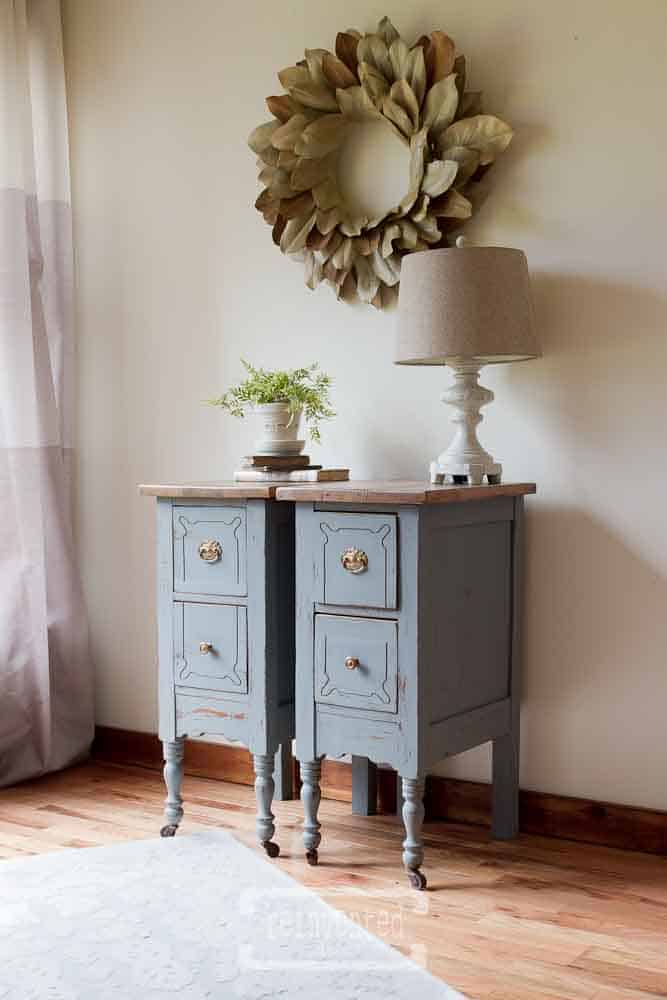
Vintage Vanity Nightstands Reveal
I am thrilled to share the finished vintage vanity nightstands with you! These nightstands are a stunning pair that will make a lovely addition to any home.

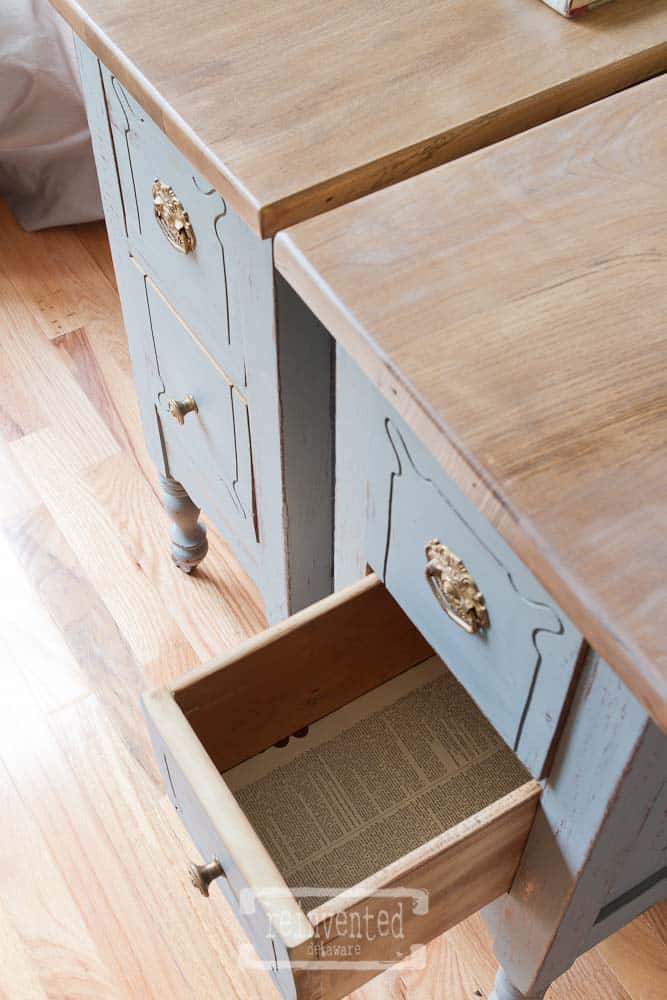
The wood tops built by my husband are perfect on the top of this pair of antique vanity tables. He used industrial pallet wood scraps left over from one of the farm tables he built.
I lined the drawer interior bottoms with vintage book pages from an old dictionary. This small detail helps to add character to this antique vanity makeover.
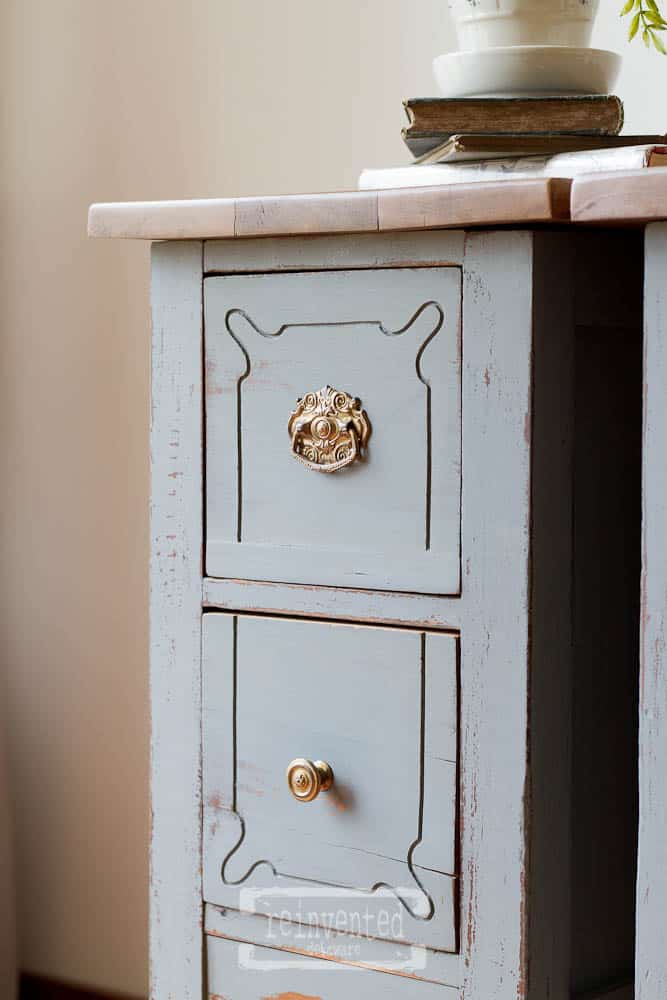
The hardware on these nightstands is simply gorgeous, and I loved using Rub ‘n Buff on the drawer pulls.
The repair we made to the back legs of the stands is completely invisible, and the casters with wooden wheels are simply stunning. I can’t help it but my heart goes pitter patter when I see casters on furniture!
Especially when those casters have wooden wheels like this repurposed old vanity has!
These vintage vanity nightstands can be used as bedside stands or as sofa end tables. They are a true testament to the beauty that can be found in reinventing and repurposing vintage furniture.
Before and After Antique Vanity Makeover
The transformation of this antique vanity is truly remarkable. After some tender loving care, the once scattered furniture parts now form a beautiful piece of furniture.
- Before the makeover, the vanity was in pieces.
- After the makeover, the vanity is a stunning piece of furniture.
More Repurposed Cabinet Ideas!
Tap the titles below to see the post!
Join our Repurposing Journey
I invite you to follow our journey of transforming vintage and antique furniture. Breathing new life into old wooden furniture like this vintage vanity is a joy. Furniture makeovers can bring such character to your home!
Pin the image for inspiration and join us on Instagram and Facebook for more fun projects. Don’t forget to subscribe to our email list so you never miss a project. Check out our latest project, a gorgeous vanity transformation!
Recreate and Decorate
Join the Facebook Group


Cindy Rust
Cindy has been decorating her home with thrift store finds for 40 years. She is an avid thrift store shopper who loves to makeover the items she finds into vintage-inspired home decor and furniture. When she isn’t thrift shopping or painting a piece of furniture, you can find her making homemade butter, working in her garden, or painting with watercolors.
Frequently Asked Questions
How can I repurpose an antique vanity into a nightstand or side table?
Repurposing an antique vanity into a nightstand or side table is a great way to add a touch of vintage charm to your bedroom or living room. To do this, you can remove the mirror and any other unnecessary parts, and then cut the vanity down to the desired height. You can then add legs or wheels to the bottom of the vanity to make it easier to move around. Finally, you can add a coat of paint or stain to match your decor.
What are the best techniques for refinishing an antique vanity for modern use?
When refinishing an antique vanity for modern use, it’s important to be careful not to damage the original finish. Start by cleaning the vanity thoroughly with a mild soap and water solution. Once it’s dry, you can use fine-grit sandpaper to gently remove any scratches or imperfections. Then, you can apply a coat of primer to help the paint or stain adhere properly. Finally, apply your chosen paint or stain, making sure to let it dry completely between coats.
How can I maintain the original charm of an antique vanity when converting it?
To maintain the original charm of an antique vanity when converting it, it’s important to be respectful of the piece’s history. Avoid making any major alterations to the structure or design, and instead focus on enhancing its natural beauty. You can do this by using a paint or stain that complements the existing finish, or by adding decorative elements that highlight the piece’s unique features.
What type of paint or stain is recommended for an antique vanity makeover?
When choosing a paint or stain for an antique vanity makeover, it’s important to consider the type of wood and the desired finish. For a natural, rustic look, a clear coat or light stain may be the best option. For a more modern or colorful look, a bold paint color or darker stain may be more appropriate. Always choose a high-quality, durable product that will stand up to regular use.
What are creative ways to incorporate storage into a repurposed antique vanity?
Repurposing an antique vanity into a nightstand or side table doesn’t have to mean sacrificing storage space. Depending on the style of vanity you have, you can add shelves or drawers to the inside of the vanity, or use decorative baskets or boxes to store items on top. You can also add hooks or hangers to the sides of the vanity for hanging jewelry or other small items. Be creative and think outside the box to make the most of your repurposed piece.
Very well written. I wonder how much licking was completed during this transformation
Believe me – too much!! Our little fella loves scratching and licking!! ??
Hi Cindy! I’m glad to meet you through Thistle Key Lane! There’s a really nice group of ladies I’ve met through blogging, and Michelle is wonderful. Your work is beautiful! These night stands are simply stunning and so masterfully reinvented. I’ve been wanting to find night stands for our guest room, and I’m really set on the idea of doing something like this now. My husband does most of our woodworking, but I like to…shall we say…provide input! 😉 Pinning this to my DIY furniture/decor board!
Omgoodness Crissy!! This is the first time anyone has pinned something from my blog!! Well except for my husband and me ?? Thank you so much for the kind words! I hope to get to know many new friends in the blogging world! I would love to know if you get an opportunity to do a project like the nightstands – it is such a fun project! Thanks again for reading, commenting and pinning?
These came out SO great, Cindy! I am also a rub n buff fan – that stuff works miracles!
Rub n Buff for the Win! Thanks for stopping by Janet!
Cindy – You always put together such fabulous tutorials and “how to” posts. This one was no exception. I really appreciated how you walked the reader through each step you took and took photos. Of course, the end result is unbelievable! These night stands are absolutely stunning!
We were pretty happy with the results too Anna. So glad you enjoyed the tutorial 🙂