
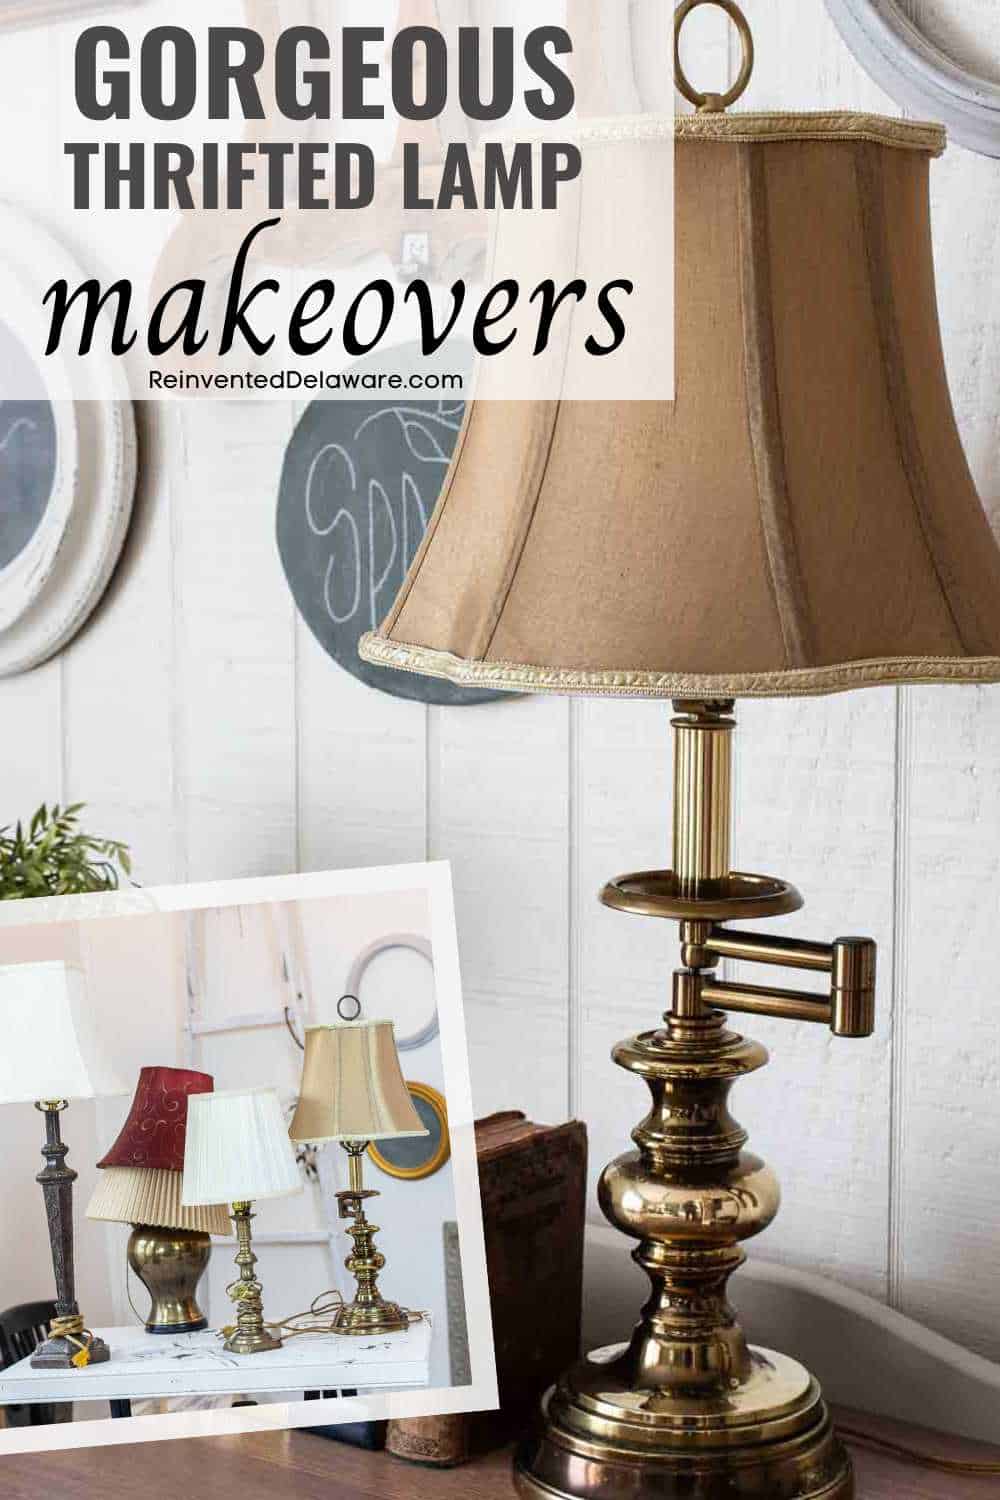
Easy DIY Thrifted Lamp Makeover Ideas
Transform your space with these simple, budget-friendly DIY thrifted lamp makeover ideas. Discover creative ways to revamp old lamps effortlessly!
In this post, we will explore creative and budget-friendly ways to transform ordinary thrifted lamps into stylish home decor pieces. Whether you’re a seasoned crafter, a thrift store makeover expert, or a novice DIY enthusiast, you’ll find inspiration and step-by-step instructions for giving new life to old lamps.
From decoupage and painting techniques to embellishments and shade updates, we’ll cover a range of makeover ideas to help you personalize your thrift store lighting fixtures. By the end of this post, you’ll have a collection of creative ideas to revamp your space with unique, upcycled lamps that reflect your style and creativity.
Let’s get started!
The following post may contain affiliate links. That means if you click and then buy something, I will make a small commission at no additional cost to you! Thank you for supporting my blog. full disclosure here.
Where to Find an Outdated Lamp
You probably love to shop at your local thrift store, am I right? Then you are in the same club as me! Visiting my local Goodwill and Salvation Army is a common activity around here. You can find outdated lamps at stores like:
- Goodwill
- Salvation Army
- Habitat for Humanity Restore
- church charity shops
- small individually owned thrift stores
- small chain donation-based stores

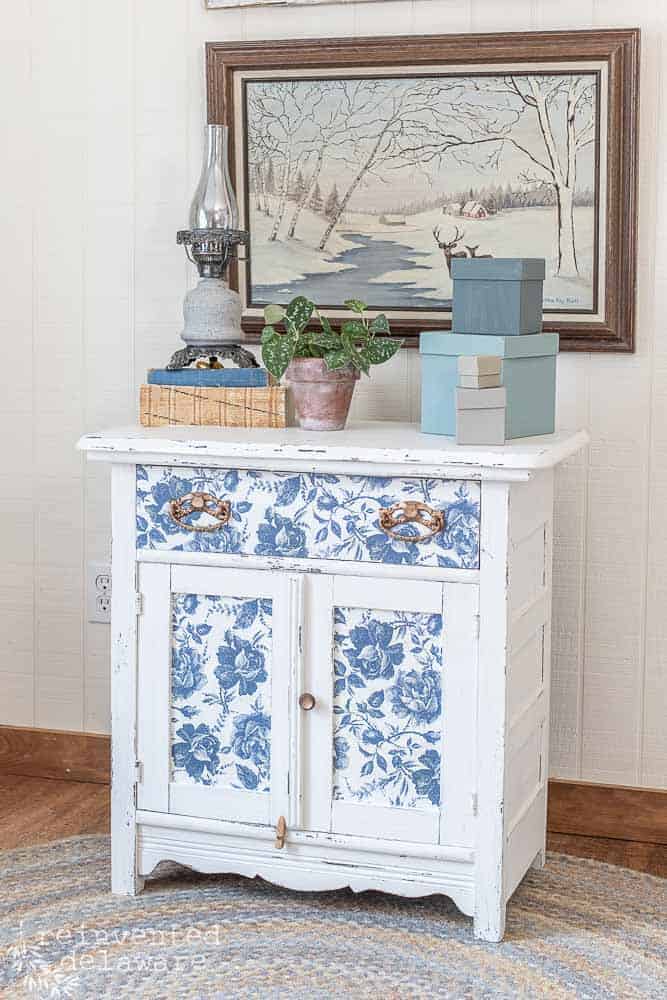
One of the things I love to look for when I visit thrift stores is a cheap lamp. I often head straight to the lamp aisle of whatever thrift store I visit. You can find an old lamp, a floor lamp, a little lamp (one of my faves!) and sometimes even new lamps for a great price. Often these lamps do not have shades so be sure to check out those while you are shopping. Often you can pick up a shade for under $5.
The last few months I have kept my eye open for a good brass lamp. I recently found a pair of brass lamps that would look amazing with another brass lamp I have in our living room. The lamps were marked $8 each but on that day, they were half-price! Instead of paying $16 for the pair of lamps, I paid a whopping $8 for both!
I have also managed to pick up several other amazing brass lamps while out thrift shopping. I also tested them to see if they are real brass.
Needless to say, I have a lot of thrift store lamps in our home!
Handy tip: Shop Often
One of the best ways to find thrift store lamps to refresh is to frequent your local thrift stores. The inventory changes daily! Try to shop in the mornings to find amazing pieces!
Thrifted Lamp Makeover Step-by-Step
Now that you have some lamps, let’s give them a little refresh. You can choose the look you are going for according to your decor. If you happen to sell your upcycled and repurposed items as we did for six years, choose finishes that your type of customer will like.
I will have all of the supplies I used linked at the bottom of the post for you!
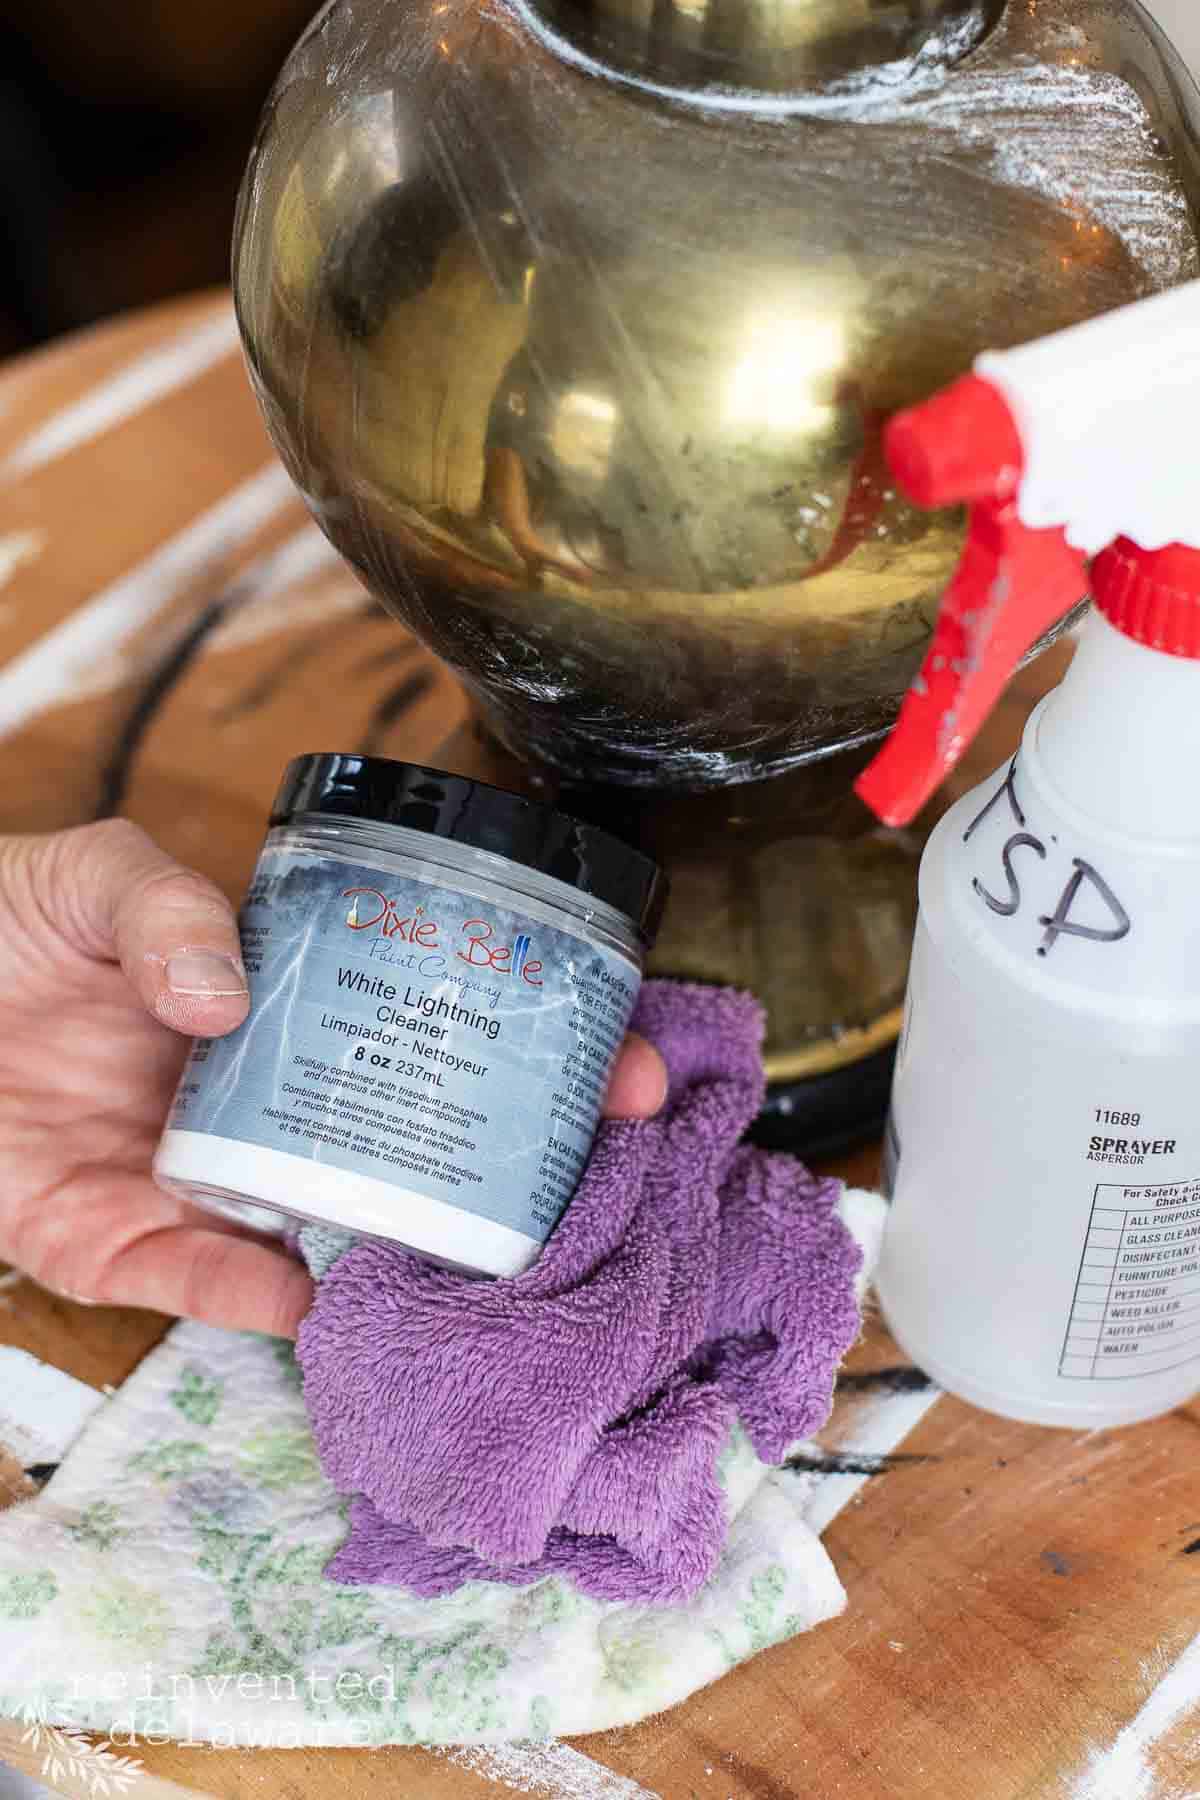
Step One Clean the Lamp
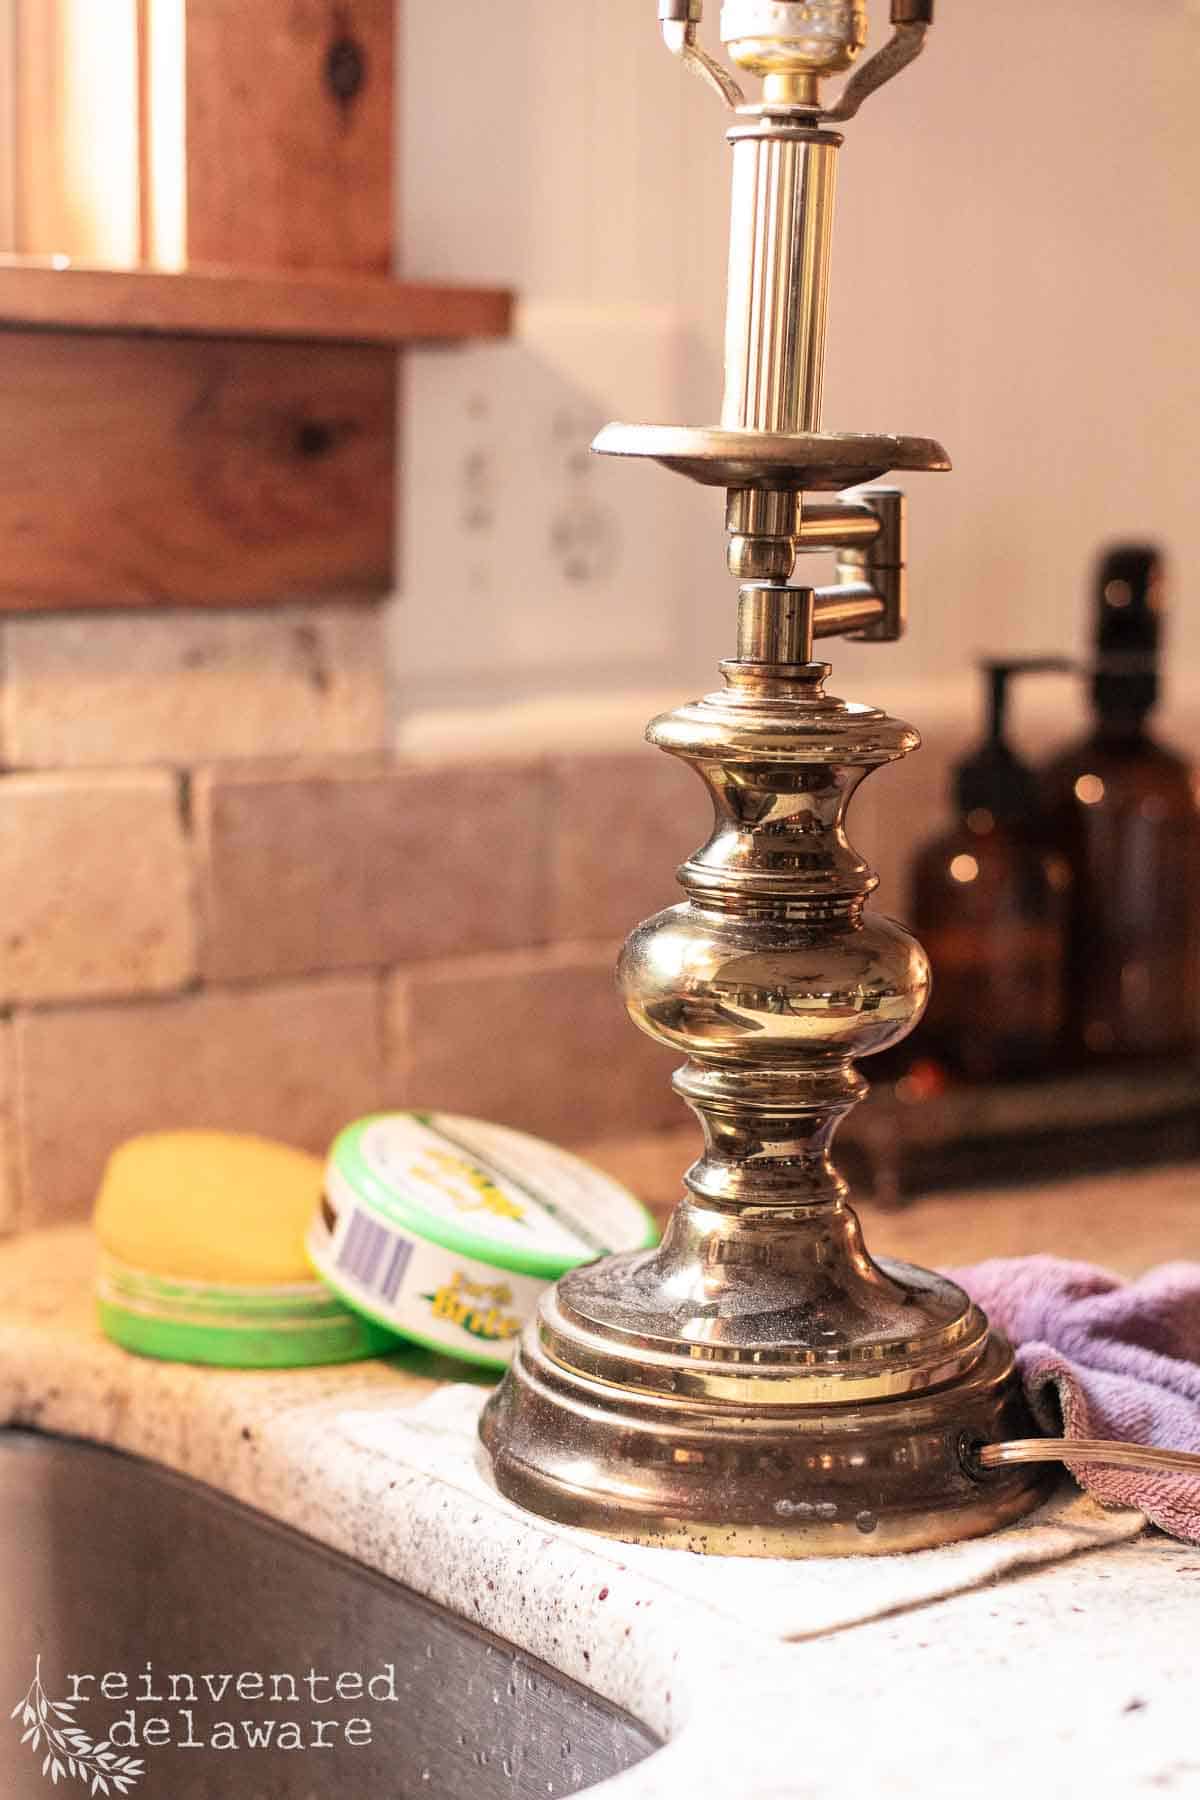
The first thing that needs to be done is to give the lamp base a good cleaning. Old lamps can be filthy even if you don’t see the filth! I used a TSP alternative called White Lightning to clean the lamp bases. I have it mixed up according to the instructions on the container and keep the solution in a spray bottle. After spraying the entire surface of the lamp base, I grabbed a damp microfiber cloth and wiped it down. Next, I used a clean damp microfiber cloth to remove the TSP residue.
If your lamp has a texture like this tall dark lamp, use a nylon brush to get into the grooves. I don’t recommend you use a wire brush on surfaces like resin because it could cause some damage.
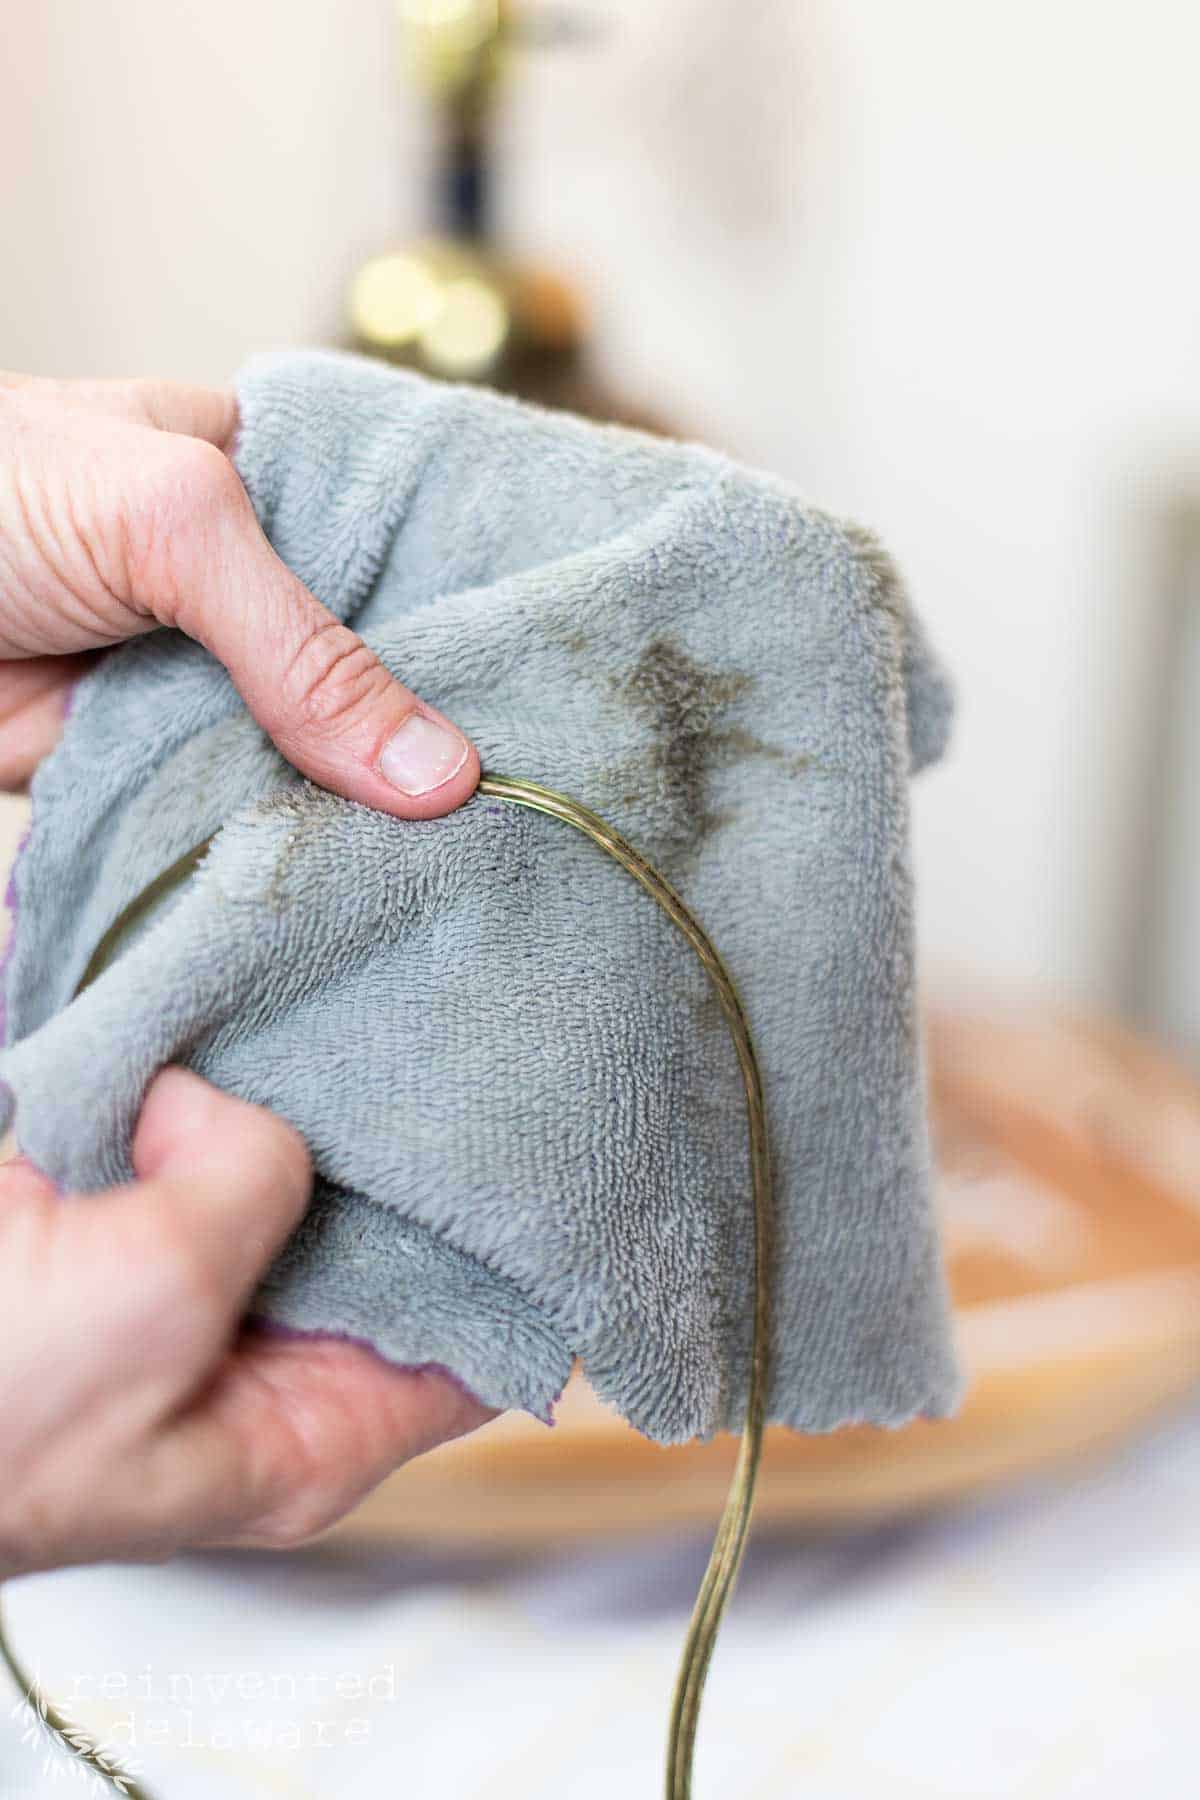
Did you know that cord cleaning is a thing? I asked my subscribers over on YouTube and in my Facebook group if they cleaned cords on thrift store lamps and I got a resounding yes! The cords can get so dirty!! So I used the same TSP soaked cleaning cloth to clean them. I grabbed the cord with my fingers and pulled down the length of the cord towards the plug. I had to do this several times to make sure the lamp cords were clean. They were so dirty! You’ll see when you watch the YouTube video later in this post.
thanks for being here!
I hope you are enjoying this project! Let me know if you have any questions. Or leave me a comment to tell me about your project and ideas!
thanks, Cindy 😀

Step Two Update on the Lamp Base
There are so many ways to update a lamp base. I’ve chosen a couple of ways to show you. I will share more ideas later in this post.
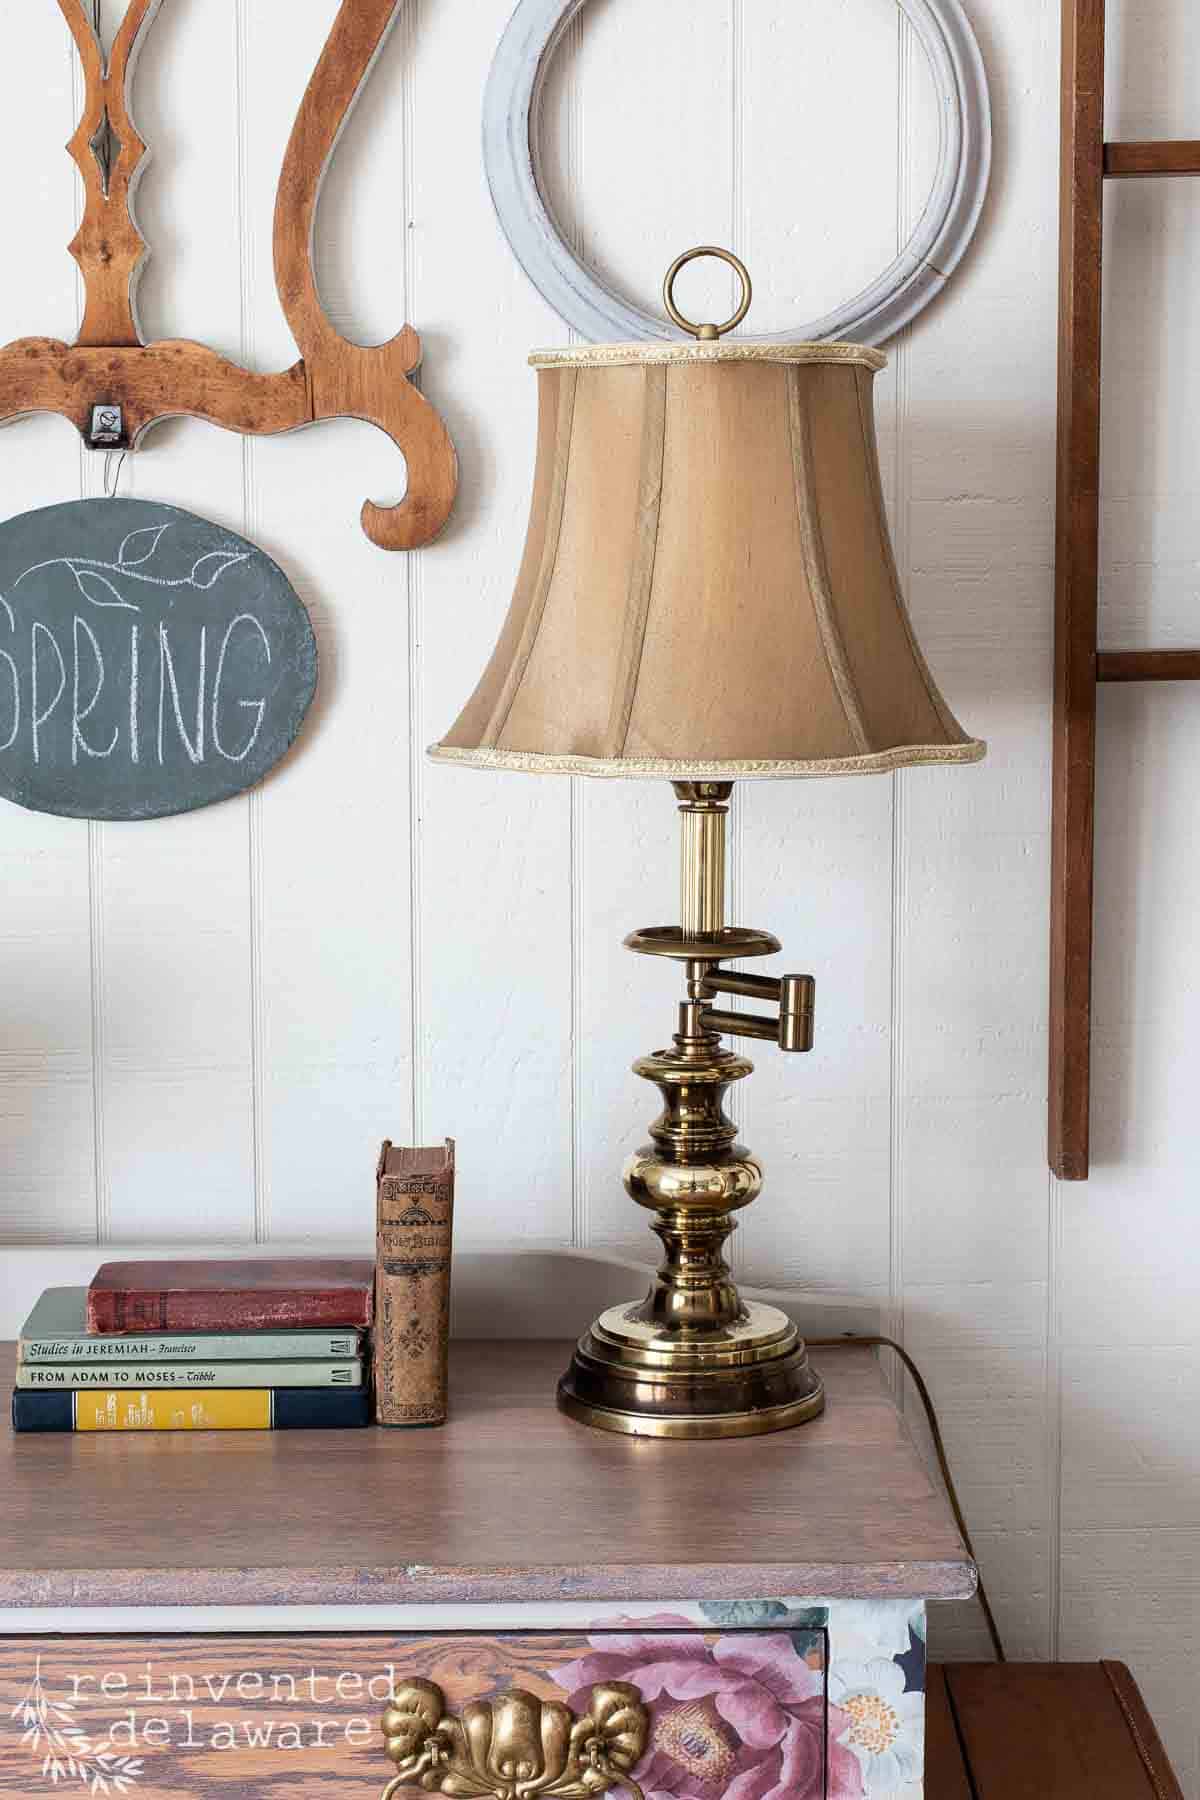
Brass Lamps
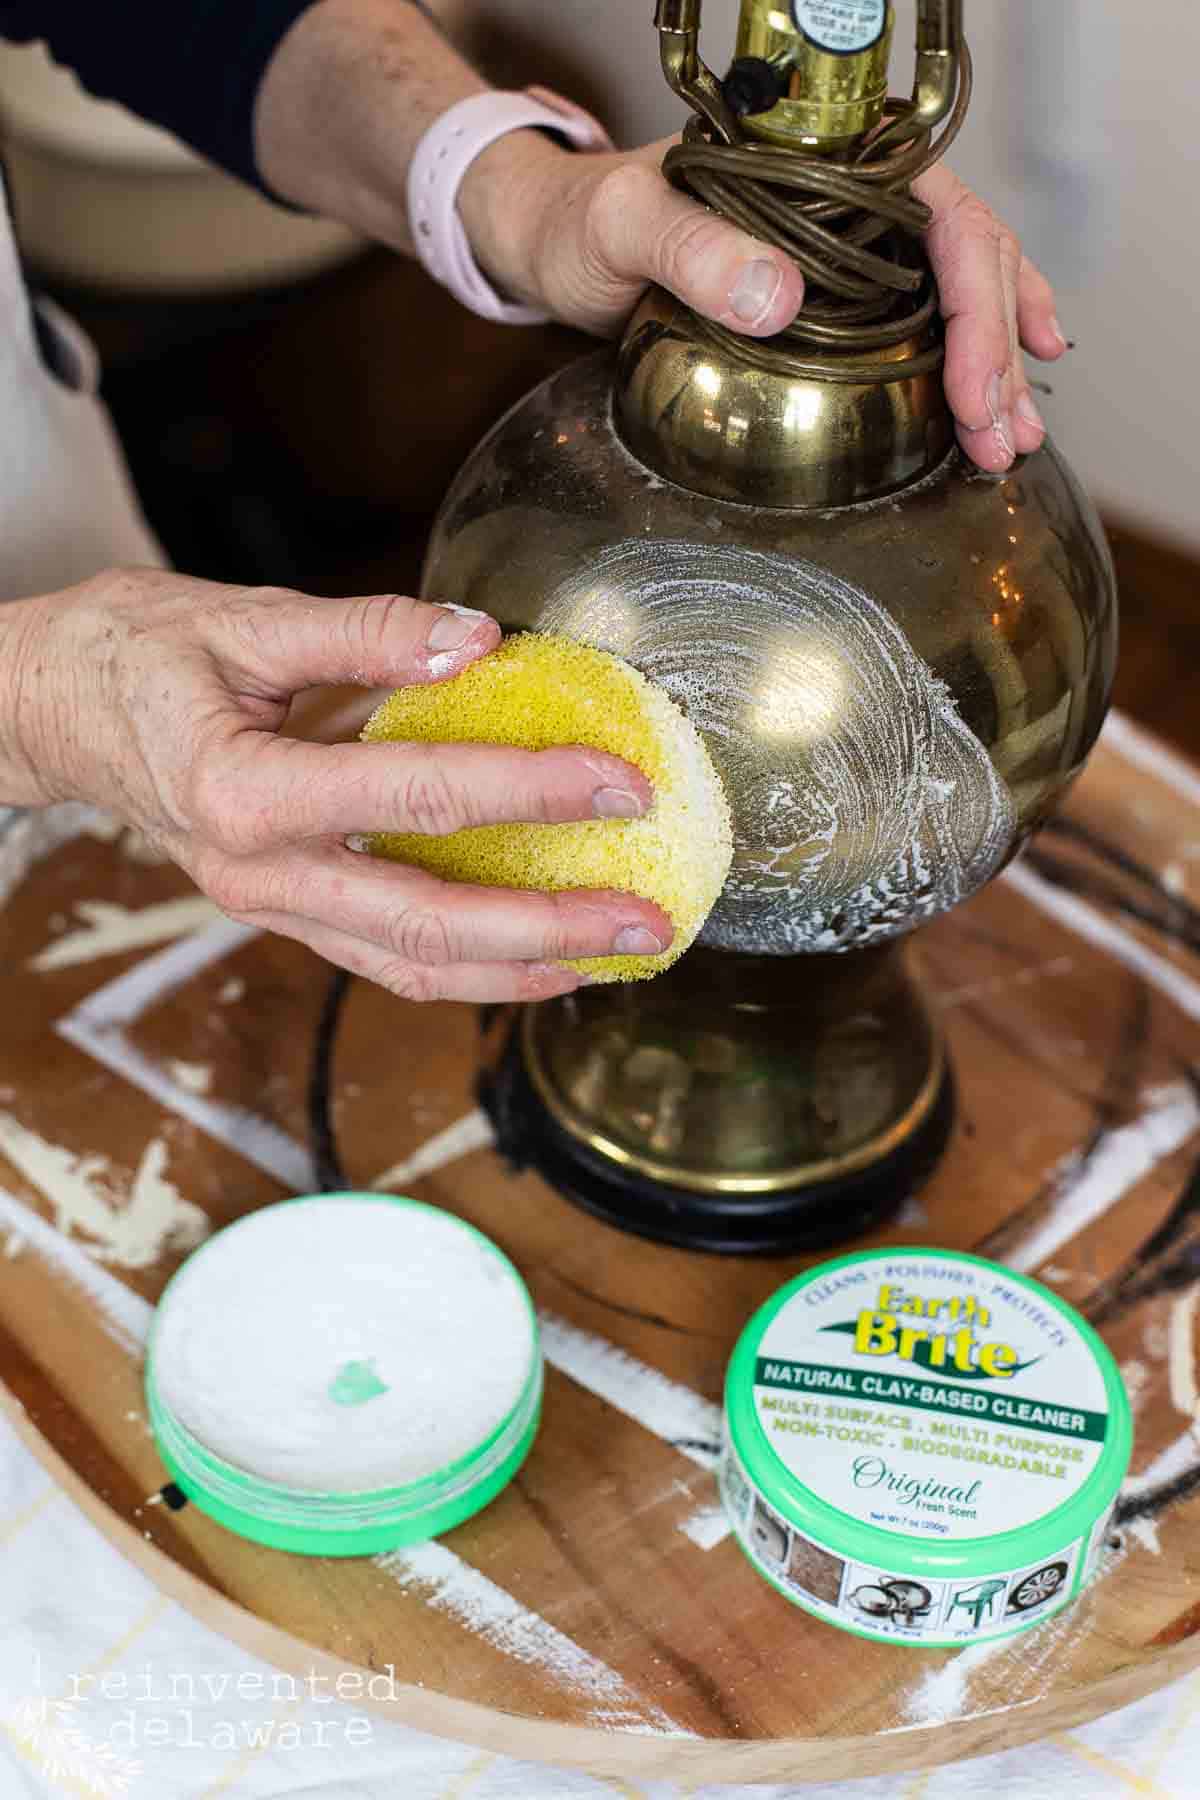
An easy lamp makeover for an old brass lamp like this mid-century lamp requires a good polishing. Brass lamps can often have a coating of lacquer or varnish to give them shine. The tarnishing can happen under that coating and it’s not a pretty look.
That was the case with this lamp. The entire surface felt like fine-girt sandpaper! It had to come off.
At first, I tried a product I love called Earth Brite. I had recently used it to polish copper pieces and cookware. But I wasn’t getting through the lacquer coating. I didn’t want to break out any chemical cleaners so I grabbed #0000 steel wool (BTW, in the video I misspoke and called it stainless steel! Agh, ole, lady brain in action!)
Anyway, the steel wool didn’t work either. So I grabbed the Earth Brite again and decided I needed to put some more muscle behind polishing the brass lamp. For me, Earth Brite is the easiest way to clean brass and other metals like silver and copper.
You might be wondering why I didn’t grab some Brasso or Bar Keepers friend. Those products work well but they tear up my hands. Yes, I could wear gloves but I would have to remember to put them on! Haha!
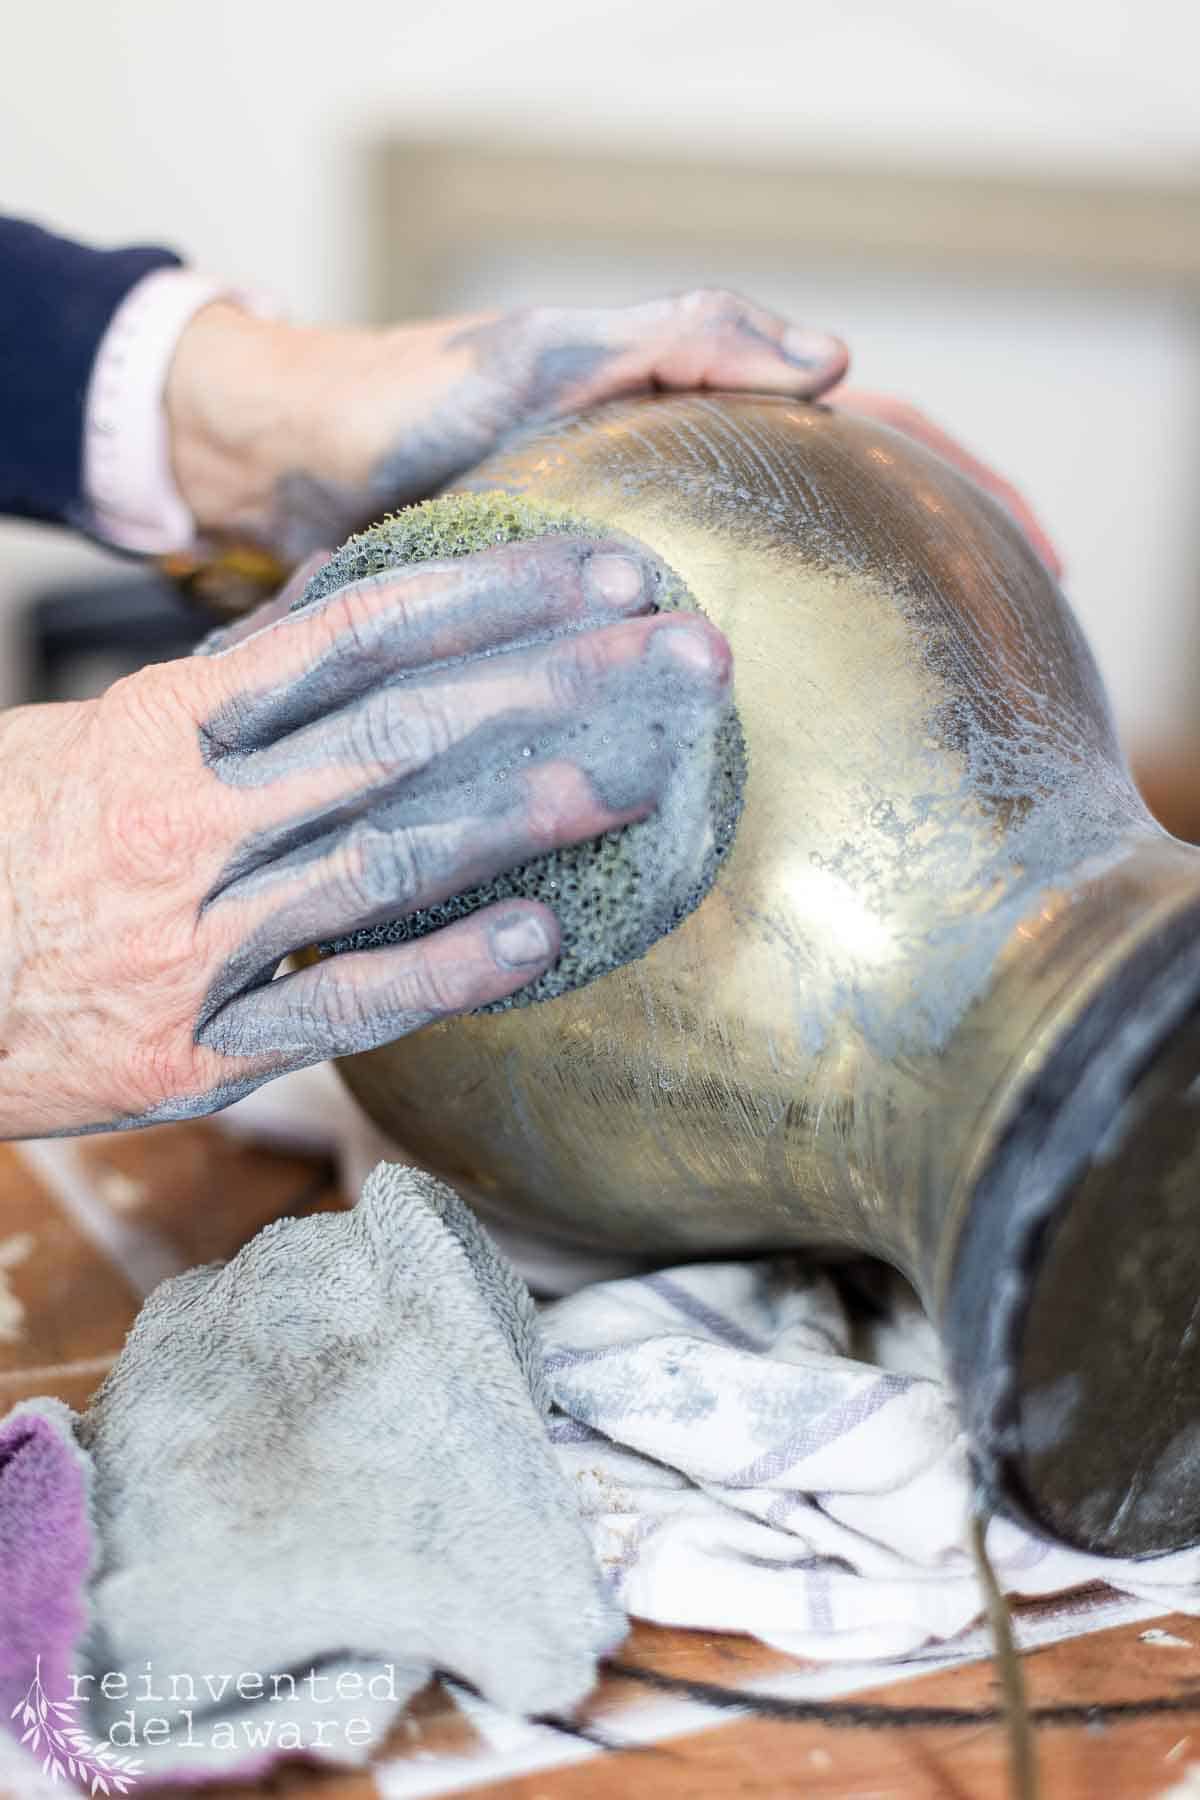
I cleaned another lamp with Earth Brite but decided to leave some of the tarnish in the deeper areas of the decorative lamp. I think it adds some age and character to the lamp. when you see the finished lamp in the reveal images at the bottom of the post, let me know in the comments if you like that look!
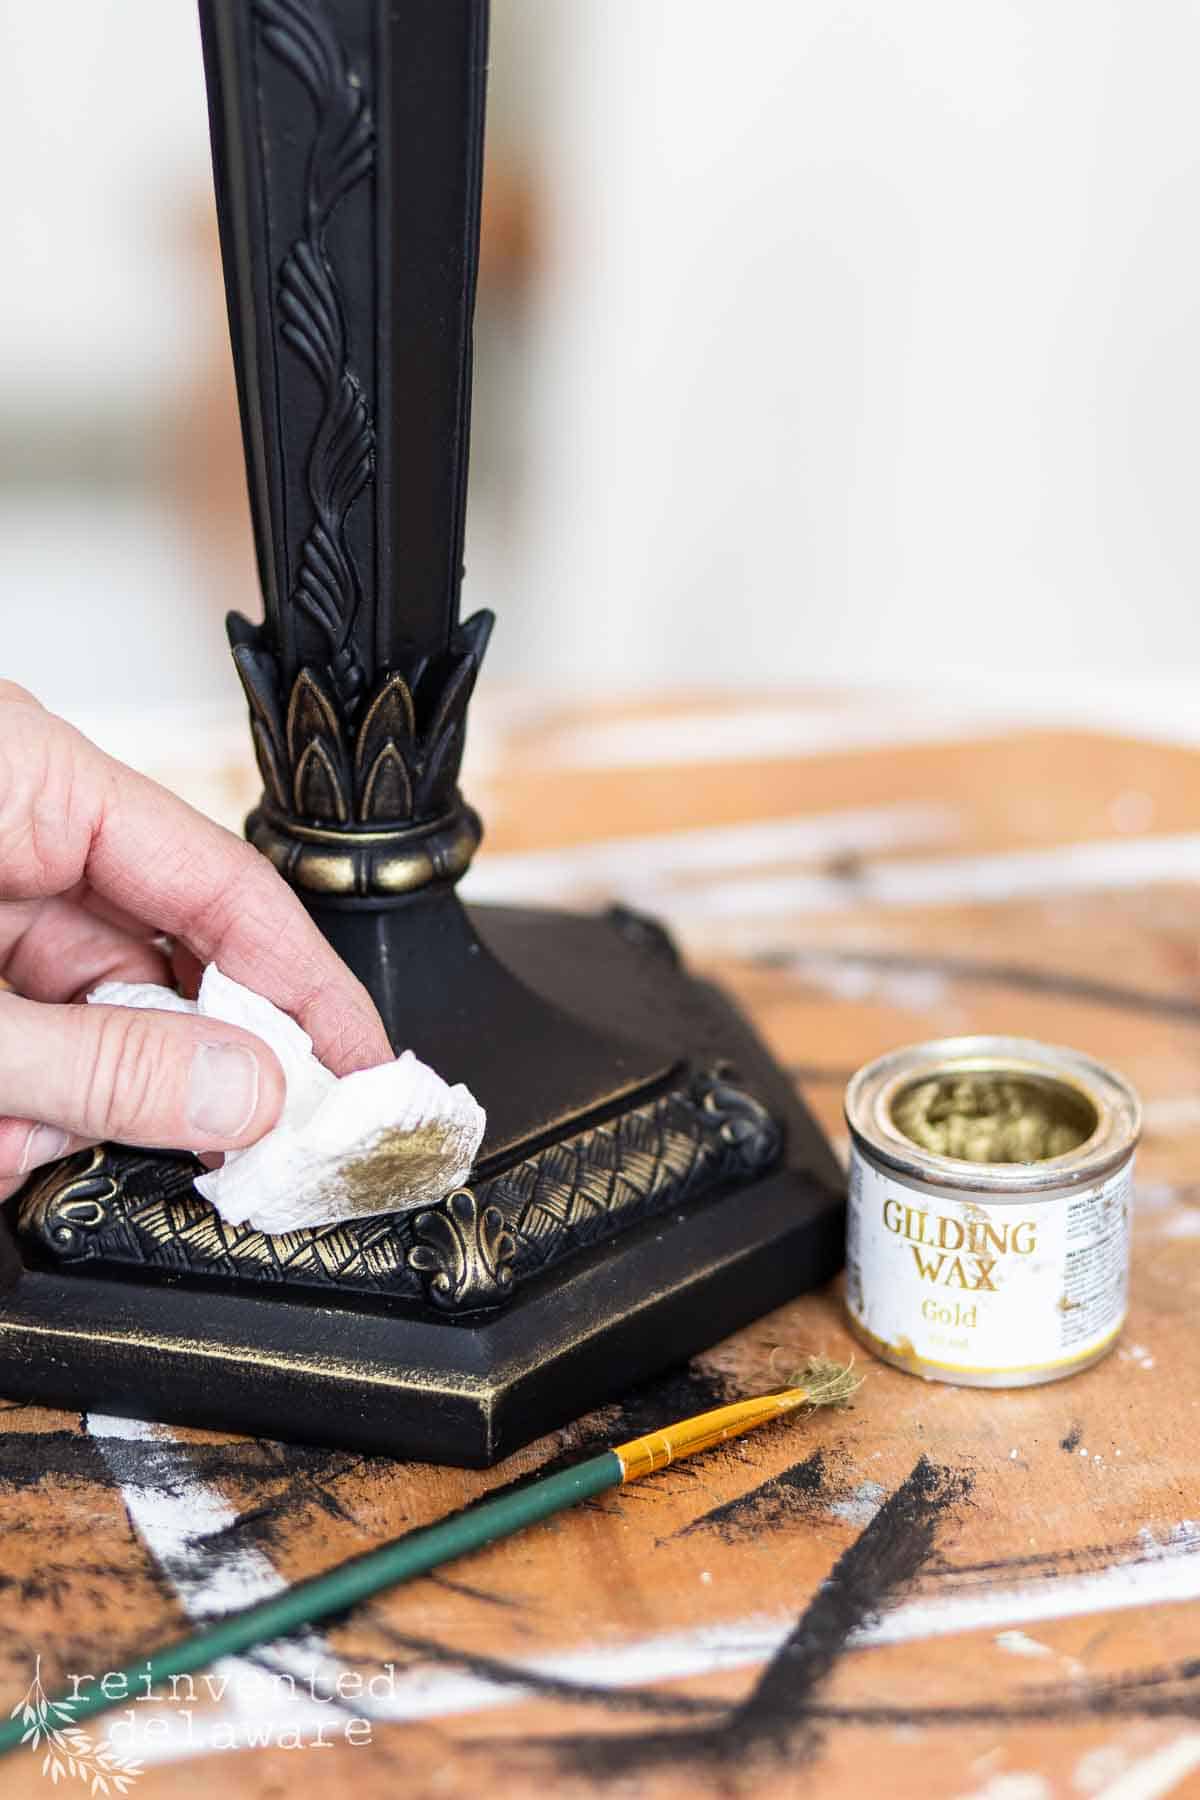
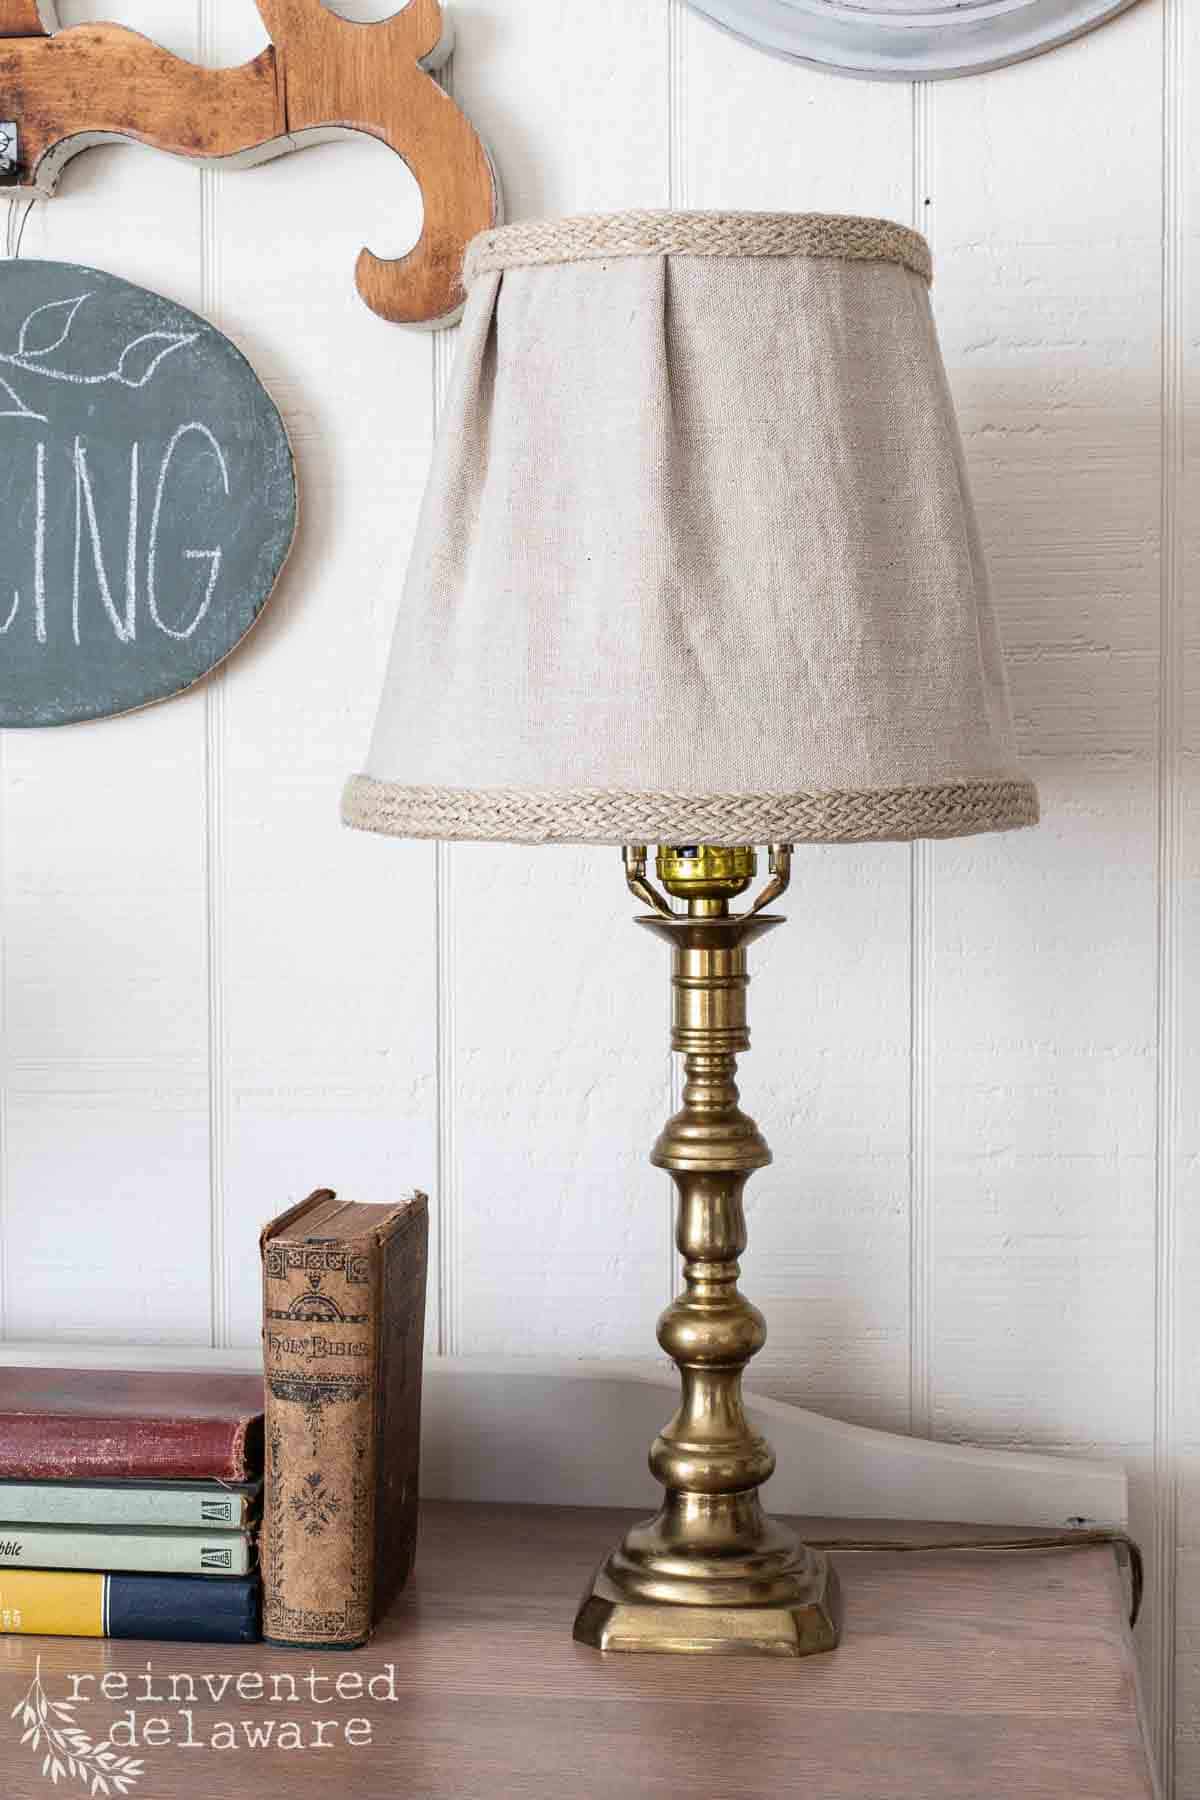
On the small brass lamp, I decided to use gold gilding wax to lightly buff the lamp base. It’s easy to apply with a small artist’s brush. Then I lightly wiped it back with a clean paper towel. This created a lovely soft brass look without being too shiny!
Resin Lamps
Resin lamps are easy to paint so I grabbed a gorgeous Dixie Belle black color called Anchor and painted away! It only took a couple of light coats to cover the already dark surface of the skinny lamp base. In hindsight, I should have used painter’s tape to protect the cord close to the base of the lamp. I was careful to not get paint on the cord.
Once the paint was completely dry, I applied a little bit of gold gilding wax to the high places with a paper towel. This technique is so easy to do on so many other kinds of decor like framed wall art! You will be hooked on this look! I also applied the gilding wax to the harp and finial that holds the shade. It looked like new again!
If you choose different colors for your paint selection you could use dark wax to create low lights on the lamp base. This would be so pretty! It would create an aged look on light-colored paints. It is best to apply clear wax before applying the dark wax to prevent areas that are too dark. The clear wax helps to control how much the dark wax will darken the paint.
Step Three Consider the Lampshade
Here are some great ideas for the lampshade! The lampshade might have been included with the lamp base or you might have to purchase one separately. I often have a stack of lampshades waiting for makeovers.
Usually, I like to purchase lampshades that have a metal frame for shape. Drum shades usually have a metal circle at the top and bottom without ribs or framing to join them. They are not my favorite to makeover.
If you can’t find a lampshade that suits the lamp at the thrift store, you could always purchase a new lampshade. Of course, I’m always looking to save money so a new shade is not my first choice. Besides, giving an old lampshade a refresh is fun!
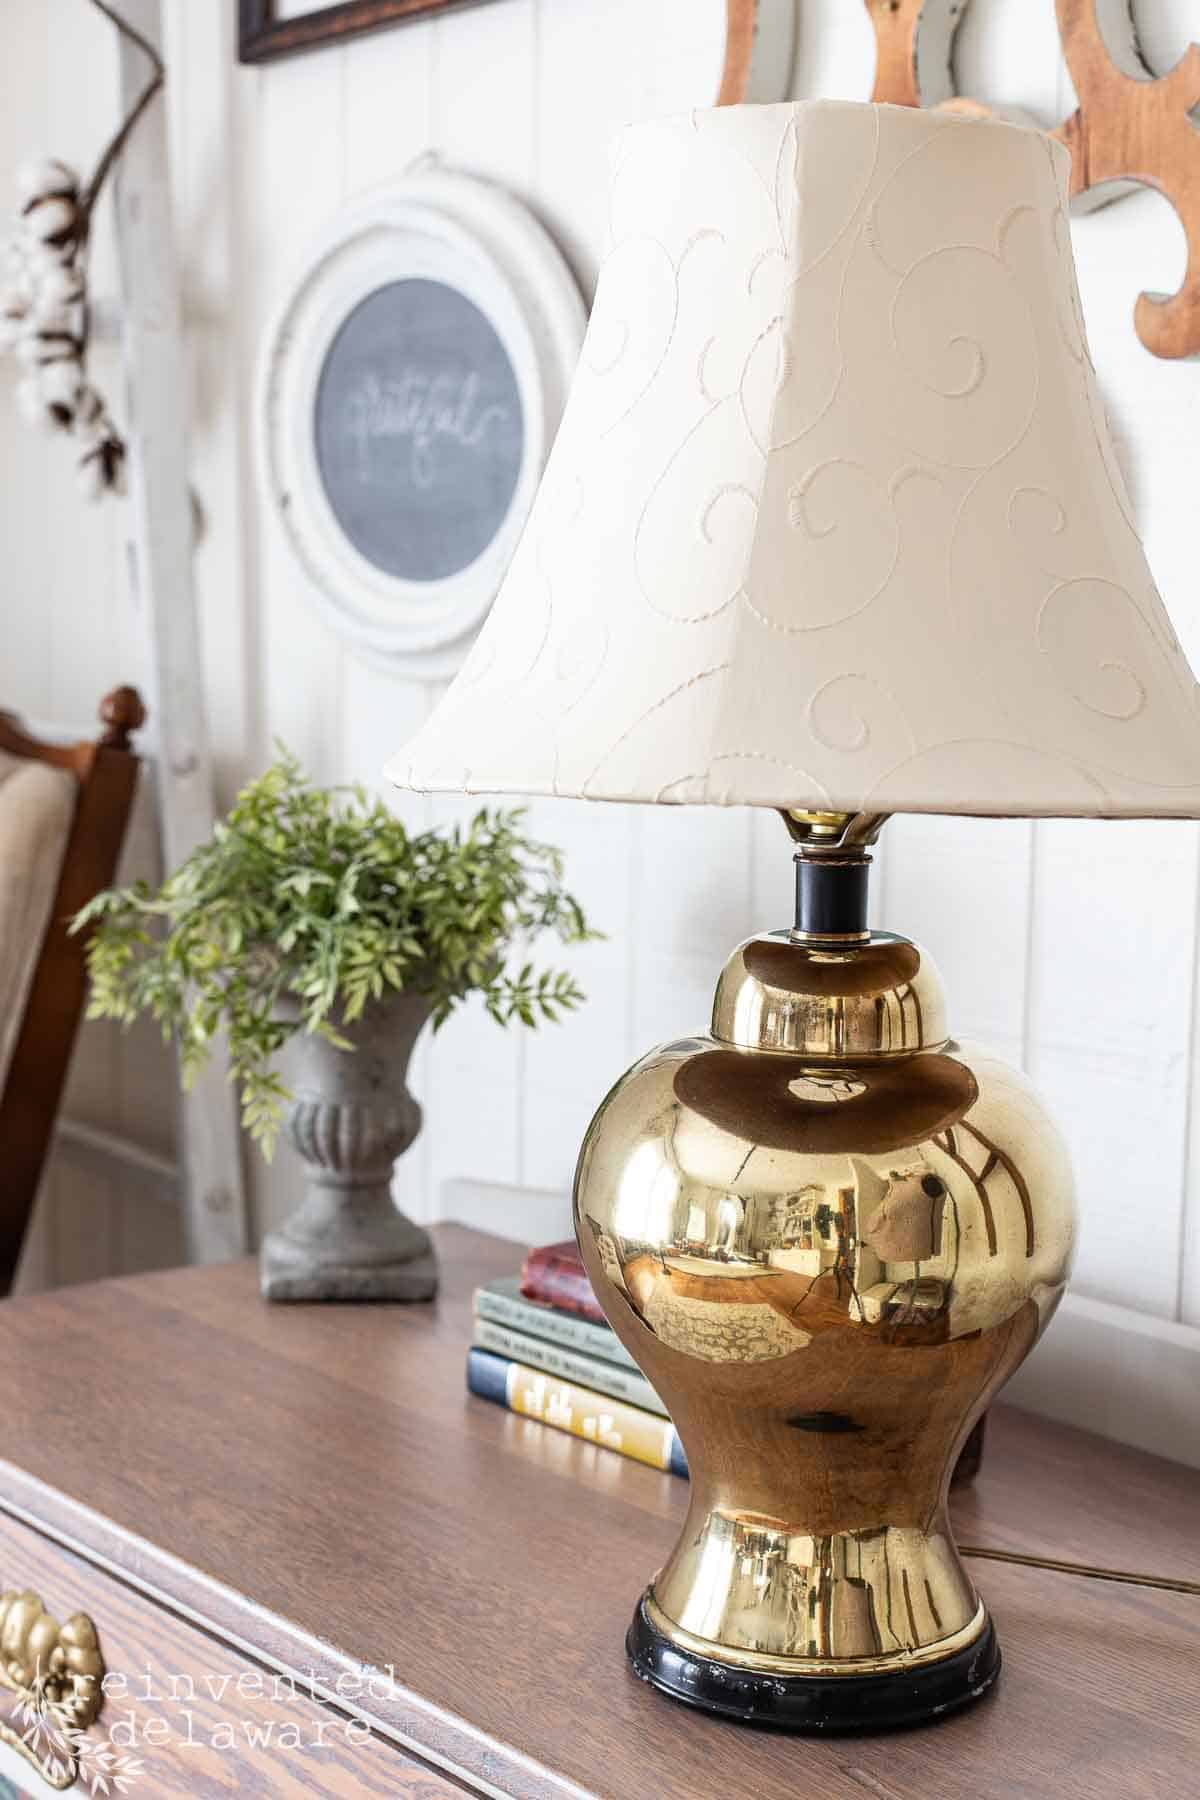
The pretty gold colored lampshade was in pristine condition so all I needed to do was wipe it down with a clean damp microfiber cloth. The cloth grabbed all of the dust and then I allowed it to dry completely. It was as good as new!
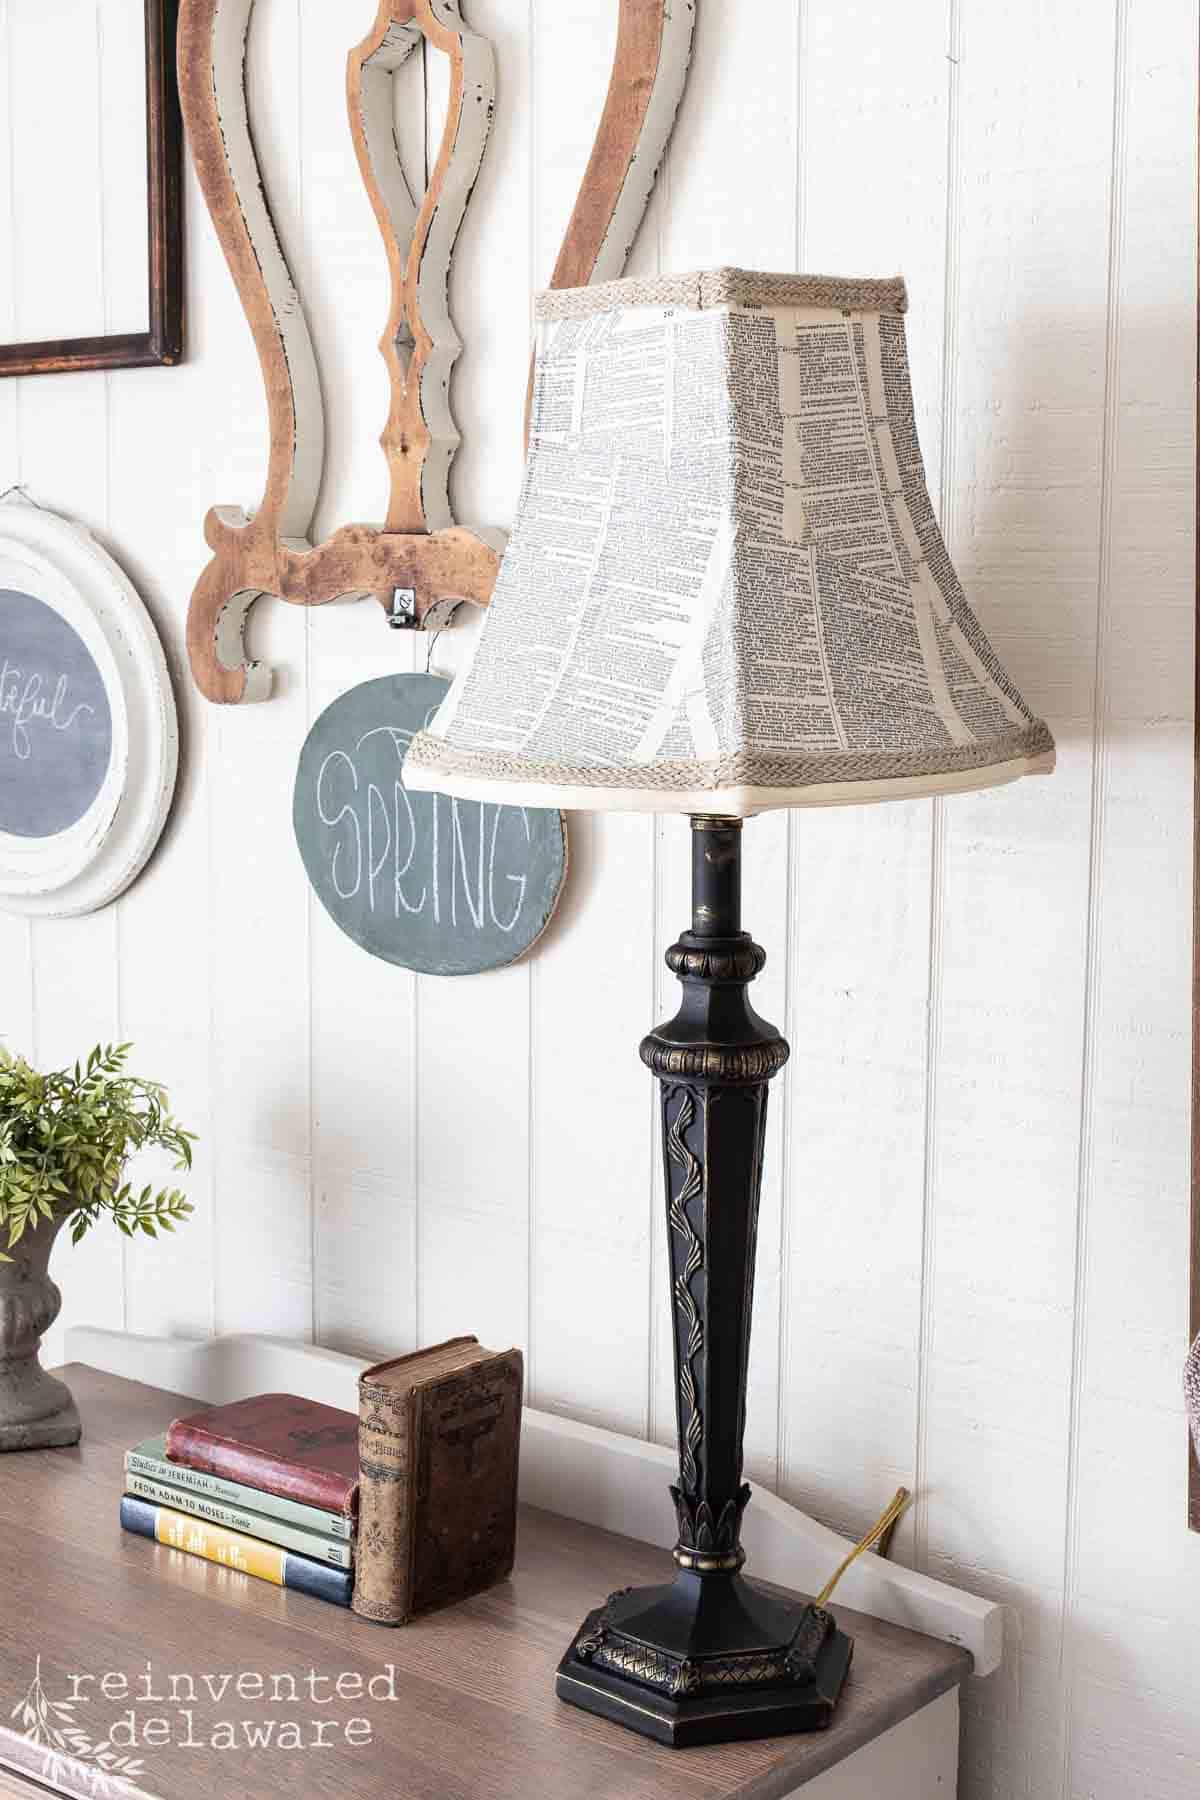
DIY Decoupage Lampshade
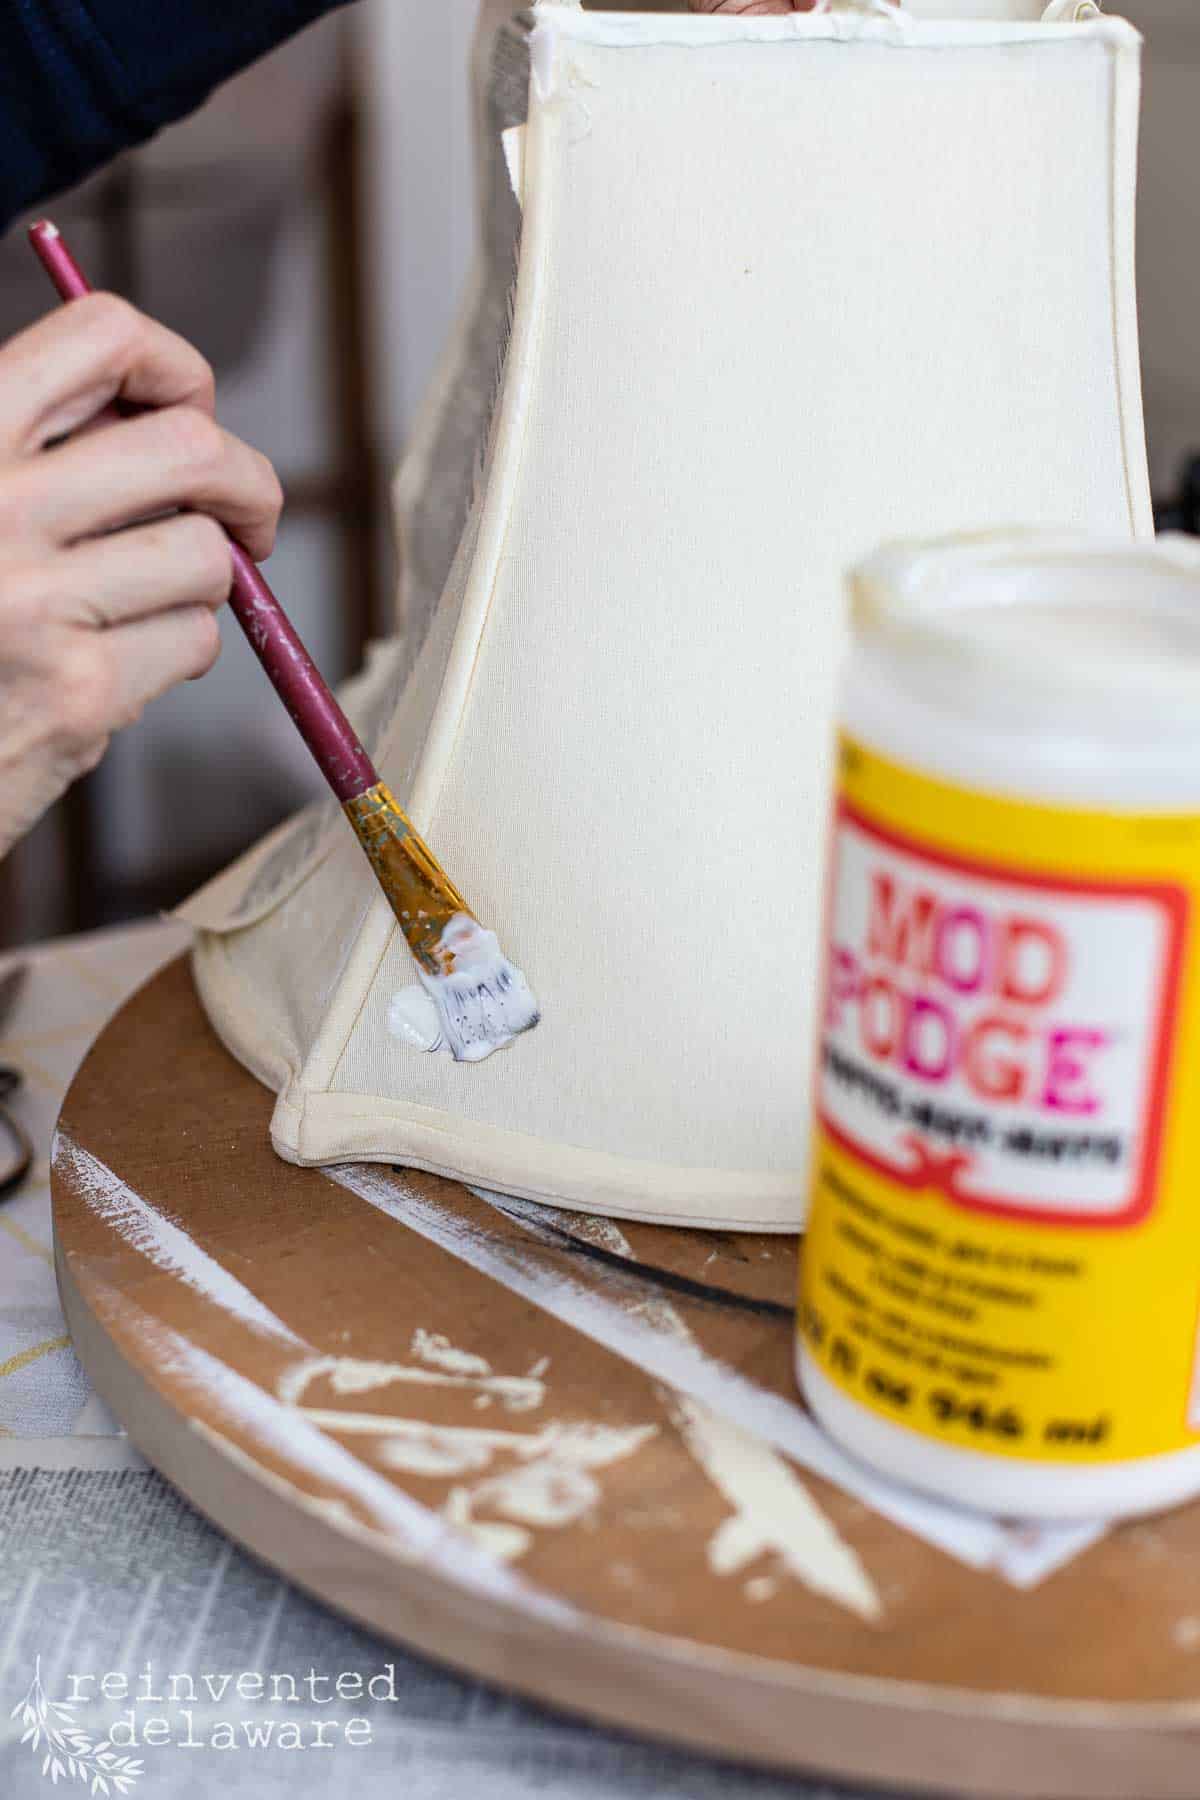
This gorgeous lampshade was dirty. I could have simply washed it in hot soapy water, rinsed and then allowed it to dry in the sun. But it was a rainy day and I wanted to get out the Mod Podge! if you choose to simply wash it, double-check to see if the fabric has come unglued. Adding a bit of glue to secure the fabric is simple and easy!
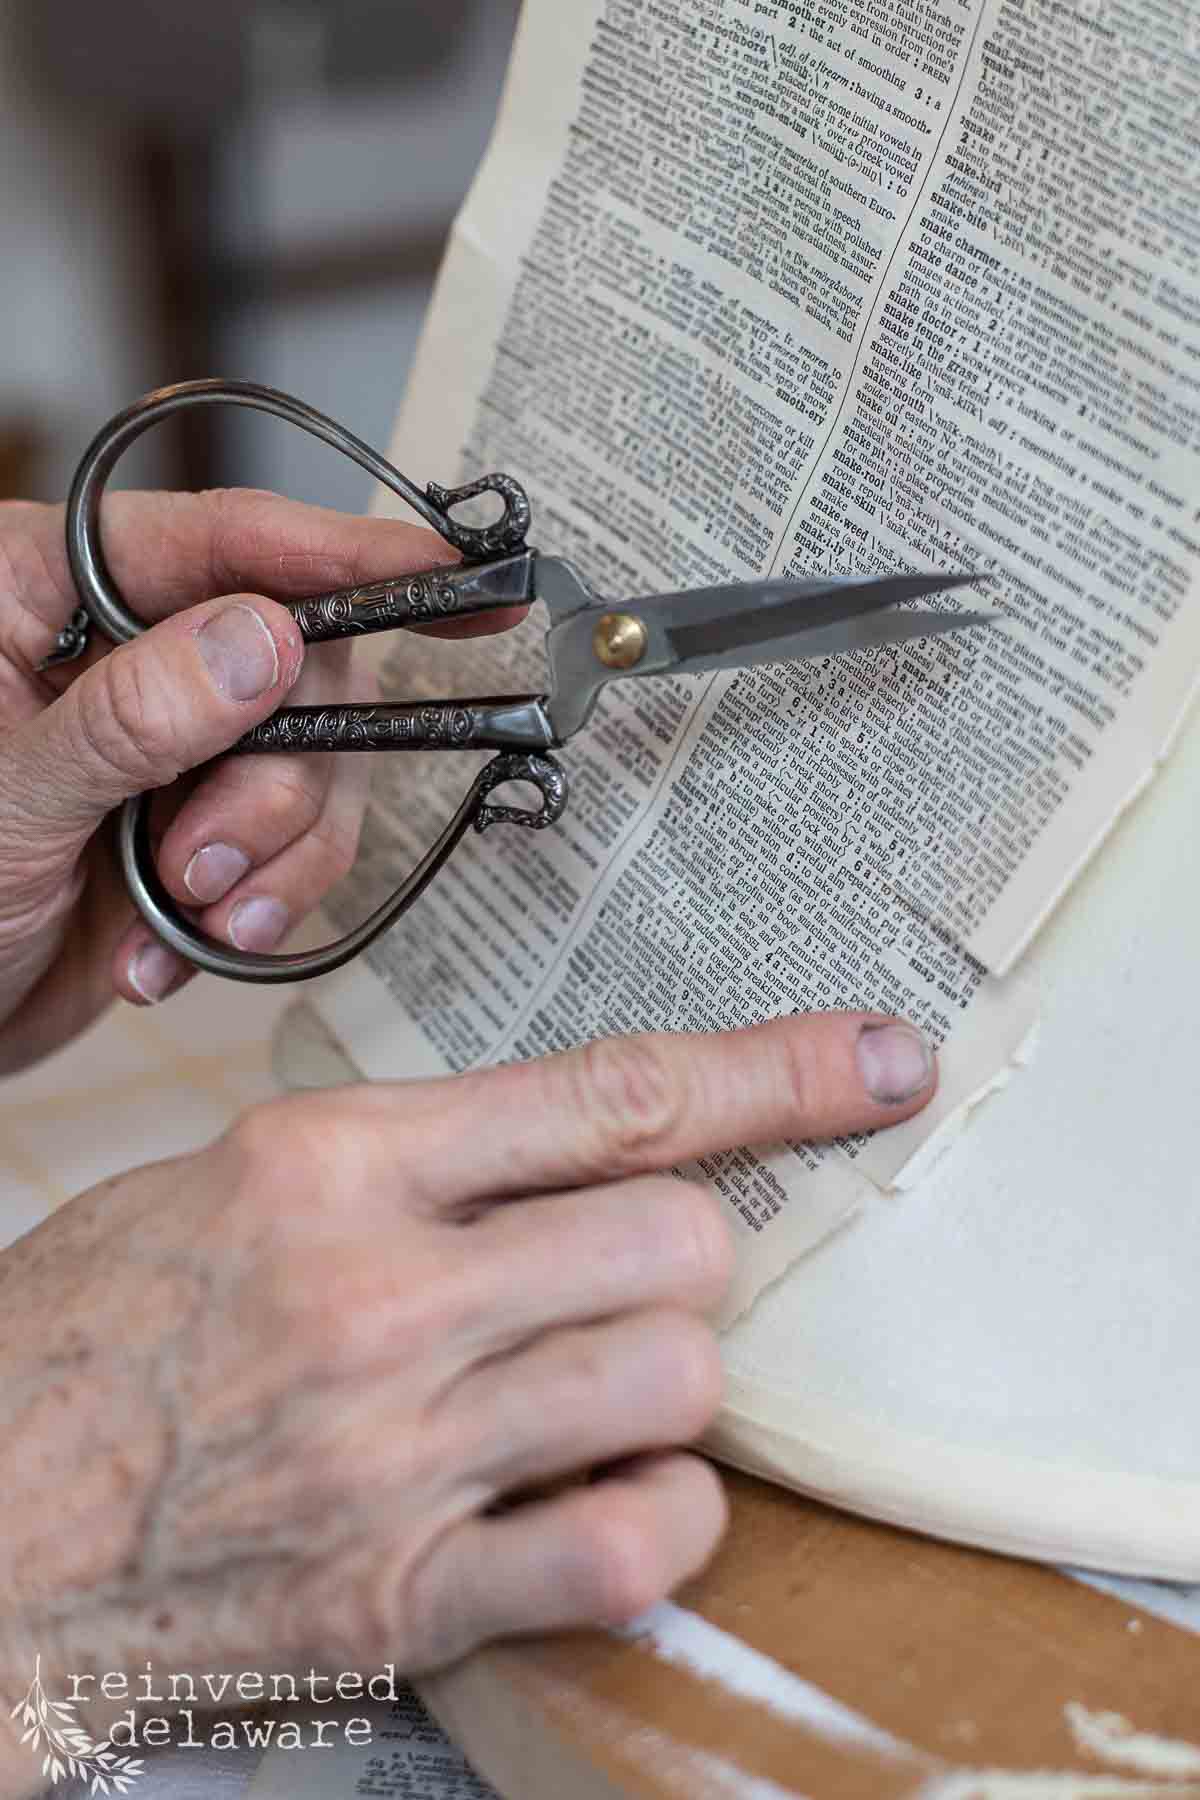
To decoupage the shade, I wiped it down to clean off any dust, then applied a layer of Mod Podge to a small area. The next step is to apply the decoupage paper of choice. I used old dictionary book pages. When I had my booth business, I sold a ton of this style of lamp. People love the look! Be careful if you use dictionary pages – some of the words might not be suitable!!
Working with a single sheet of dictionary paper at a time, I moved around the lampshade until I got to the other side. Apply the Mod Podge, lay on the paper, and smooth it out.
Some areas had to be overlapped. Bear in mind, that when the light is on, you will be able to see the overlap. If you don’t want that look, then cut the paper as you move around to butt up the edges of the paper to prevent overlapping.
I also cut small slits in the paper to work around the curve of the lampshade. You’ll see the whole process in the YouTube video I created for you!
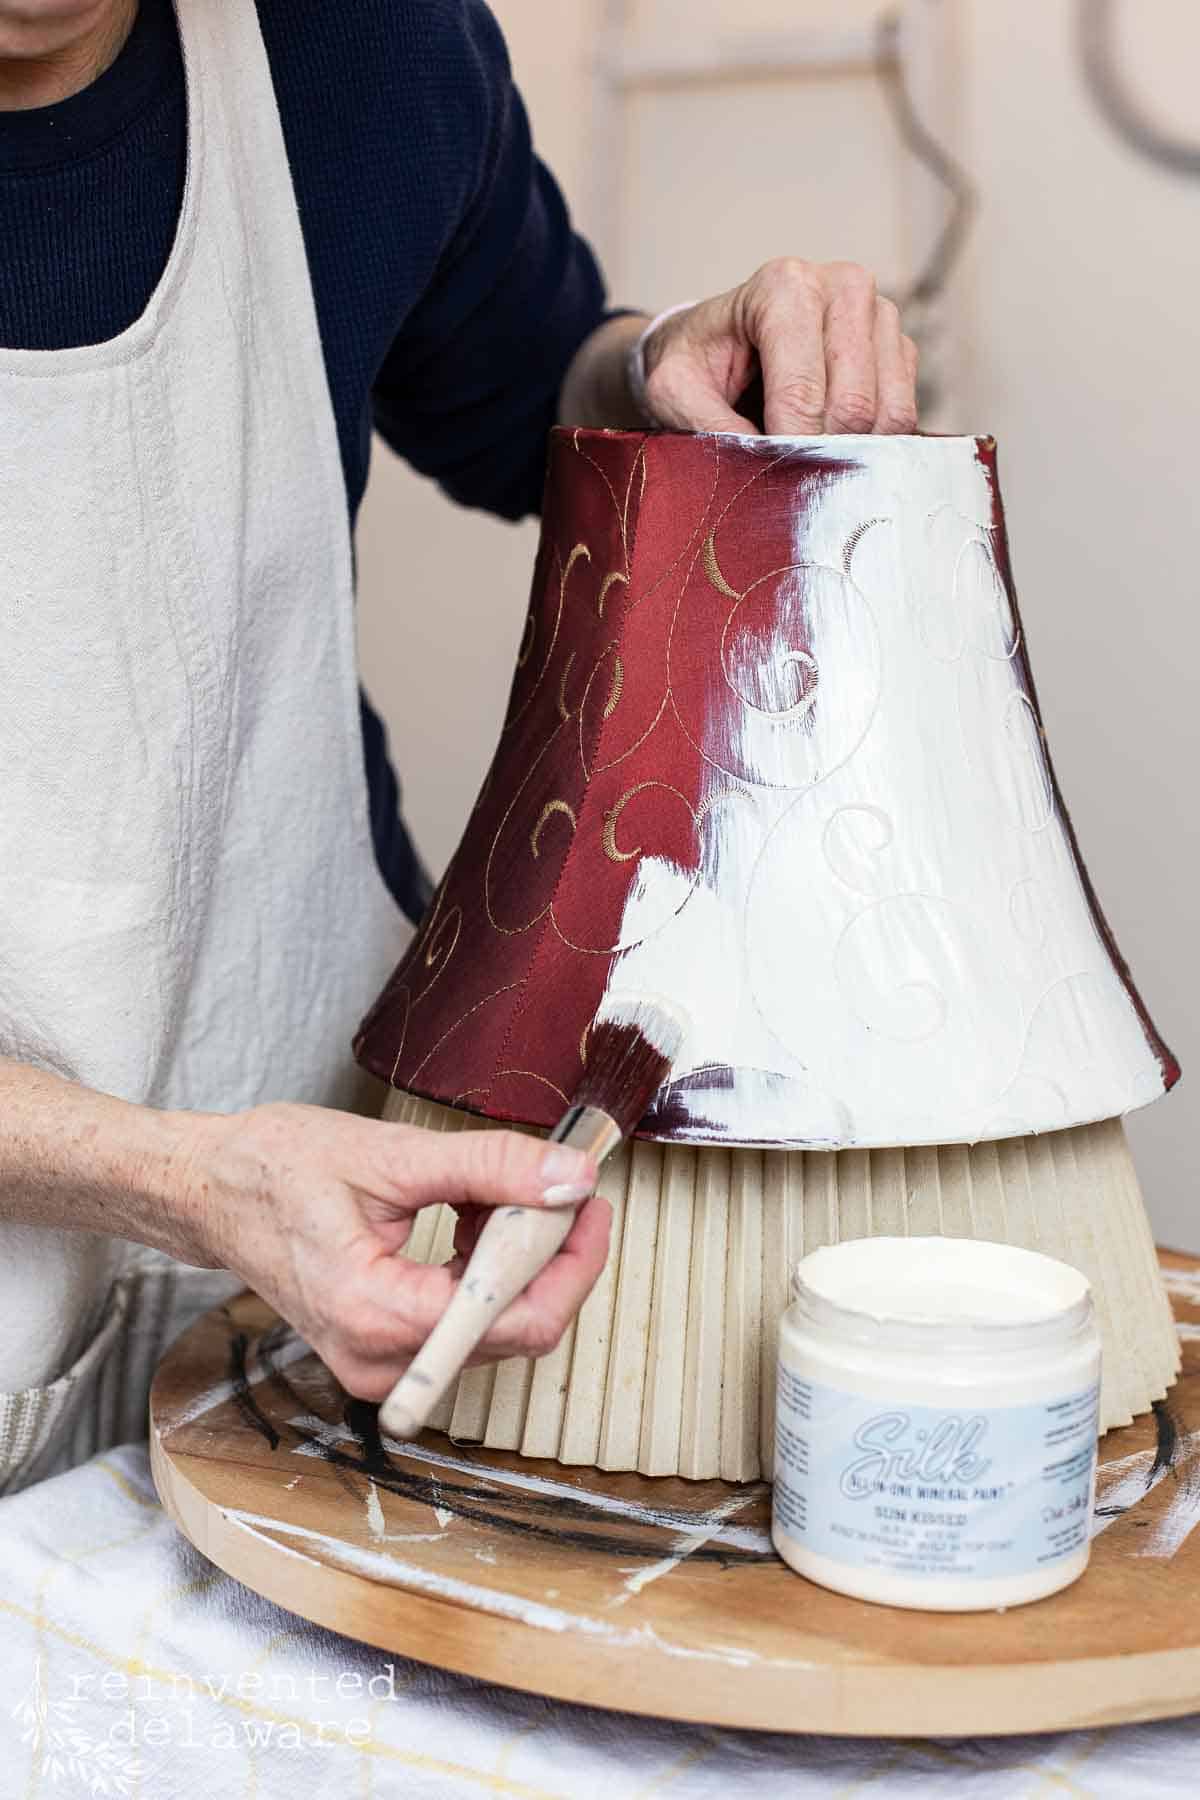
Painted Lampshade
Adding a couple of coats of chalk paint to an old lampshade couldn’t be easier! Even on this dark red 1980s lampshade! I applied the first coat of paint, allowed it to dry completely then, applied a second coat. The trim was on the inside of the lampshade and I had removed it before painting. That way, I could reattach the trim and cover over the messy painted edge. You could also purchase new trim for the shade.
I applied an almost white paint on this shade called Sun Kissed which looked amazing with the polished brass on the lamp base. The pretty stitched design on the shade looked great too!
Some people have used spray paint or acrylic paint on their lampshade makeovers. I used chalk paint because that is what I had on hand. Let me know if you use spray paint or another kind of paint on your lampshade makeover!
Pleated Lampshade
The last shade needed some help. The original shade was made with fabric that felt like a disposable plastic tablecloth. The pleating was pretty but that fabric wasn’t. The fabric was in good shape so I created a similar look with a scrap of linen fabric from another project. It’s easier to watch the process rather than describe it, so be sure to watch the video I have for you.
The process was simple: I used my hot glue gun to secure the pleats on the shade. I glued it directly over top of the outdated lampshade and then added a new trim. It looks much better than it did!
YouTube Video
Some of us like watching the process in action so I made this DIY lamp makeover video for you! Tap to watch and while you are there, be sure to hit the subscribe button! I would love for you to join us over there!
Comment below the video and tell me about your thrift store lamp makeover ideas! Tap to watch the video!
Facebook Group Ideas
You can also share your creative makeover ideas in my Facebook group called Recreate and Decorate with Reinvented Delaware. We are a group of thrift-loving and upcycling friends who share inspiration with one another! Hop over and join us!
I asked my Facebook group for their ideas to makeover lamps and this is what they shared:
- Verna shared her idea to breathe new life into an old lamp: she tossed the lampshade, attached a terra cotta saucer to the top of a tall lamp base, and made a cute bird feeder for her garden.
- Sherry used long strips of colorful fabrics and ribbon to replace the original fabric on the shade. She painted the base in vibrant colors. She shared several pics of her lamp makeovers. You have to see them!
- Ema-Leigh mixed baking soda and paint and applied the mixture to a lamp base creating a concrete look.
- Jackie likes to decoupage little lamps (a girl after my own heart!)
- Cindy (that’s me, I had another idea!) likes the idea of ceramic table lamps made to look like an earthenware lamp using a technique she used on a thrift store upcycle for spring (soooo cute!)
Recreate and Decorate
Join the Facebook Group
Repurposed Lamp Transformation
Let’s look at some ideas for using and decorating with your thrifty lamp makeover!
- Place your beautiful lamp in the living room on a side table between two chairs for additional light.
- Place your pair of lamps on two end tables next to the sofa.
- Paint two different lamps with a similar shape in the same color and use them on your nightstands in your master bedroom.
- Place small lamps on the kitchen countertop to add a little bit of light to a dark corner.
- Use a small lamp with a nightlight-sized base in a bathroom for those middle-of-the-night trips.
Some of my blogger friends shared their great ideas for upcycling thrift store lamps! These ladies bring so many creative ideas!
DIY Lampshade with a Hidden Design
Pottery Barn Inspired Wood Bead Lamp
Unique Denim and Vintage Map Lampshade

Thanks for joining our journey!
Thanks so much for joining us for this post! Join our journey so you don’t miss any of the fun projects, tutorials, and inspiration that we share with you each week! You can follow us on Instagram, Facebook, and YouTube. We share even more inspiration on Pinterest!
Visit my Amazon Storefront!
Click the button below and head over to our online shop on Amazon!


Cindy Rust
Cindy has been decorating her home with thrift store finds for 40 years. She is an avid thrift store shopper who loves to makeover the items she finds into vintage-inspired home decor and furniture. When she isn’t thrift shopping or painting a piece of furniture, you can find her making homemade butter, working in her garden, or painting with watercolors.


Wow! The lamp makeovers are truly wonderful. It’s hard to believe they are the same pieces you thrifted. You did a great job!
I love a good lamp makeover! Thanks Wendy!