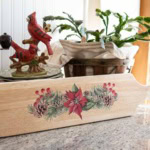
Upcycled Breadboard DIY Project
Transform a thrifted breadboard with this easy upcycled breadboard DIY project using decorative transfers. Perfect for adding charm to your holiday home decor!
Servings: 1 breadboard
Cost: $10
Equipment
- 1 thrift store wooden cutting board
- 1 hand sanding tools
- 1 power sander this is optional!
Ingredients
- spray wax
- decorative transfers of your choice
Instructions
- Clean the breadboard or cutting board with a solution of hot water, lemon juice and salt. Scrub thoroughly and allow to dry.
- Sand the wooden cutting board either by hand with sandpaper or by using a power sander. Wipe away the dust created by sanding.
- Apply the decorative transfer: Cut the design from the main sheet while keeping the backing sheet intact.
- Next, place the transfer in the spot where it looks best on the piece. Lift the transfer remove the white backing sheet and apply the transfer to the surface.
- Use the wooden stick that comes with the transfer and rub it across the design. The design will begin to adhere to the surface.
- Lift the clear top sheet as you go to make sure the transfer is completely applied to the surface. If a spot is missed, lay it back down and rub over that area again until it is completely transferred.
- Lightly burnish the design using the clear sheet. This helps the transfer design to adhere completely.
- Seal the wooden breadboard with a couple of coats of spray wax allowing the wax to dry and cure for 2-4 weeks.