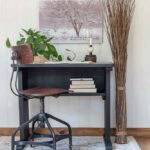
How to Upcycle an Old Desk with Chalk Paint and a Stencil
Transform a thrift store or yard sale desk into a gorgeous furniture makeover using Dixie Belle Chalk Mineral Paint and a stencil! This beginner-friendly DIY gives an old desk a stunning new look - without breaking the bank!
Equipment
- orbital sander
- Sanding Block
- shop vac
- Small Artist's Brush
- Synthetic Paintbrush
- wax brush
- Water Misting Bottle
Ingredients
- Old Desk (thrift store, yard sale, Facebook Marketplace
- 220-grit Sandpaper
- White Lightning Cleaner (TSP Alternative)
- Chalk Mineral Paint in Caviar
- Chalk Mineral Paint in Fluff
- Sponge Applicator
- Masking Tape
- Furniture Wax
- Microfiber Cloths or Blue Shop Towels
Instructions
- Step 1 – Find Your Desk: Head to your local thrift store, yard sale, or check Facebook Marketplace for an old desk with good bones. It doesn't need to be pretty - just sturdy! I paid $2 for mine and it turned out to be one of my all-time favorite furniture makeovers!
- Step 2 – Clean the Desk Thoroughly. Give the desk a good vacuum with your shop vac to remove loose dirt and dust. Mix White Lightning with water according to the label directions and wipe down the entire piece with a microfiber cloth. Rinse with clean water and let it dry completely before moving on.
- Step 3 – Scuff Sand the Surface: Using 220-grit sandpaper on your orbital sander or by hand with a sanding block, lightly scuff the entire surface. This gives the chalk paint something to grip onto for a finish that will last for years. Vacuum away any dust when you're done!
- Step 4 – Apply the First Coat of Chalk Paint. Stir your Caviar Chalk Mineral Paint really well before you start - don't skip this step! Apply the first coat with a good-quality synthetic paintbrush using smooth, even strokes. For an ultra-smooth finish, lightly mist the surface or your brush with water before painting. Allow it to dry completely.
- Step 5 – Apply the Second Coat of Chalk Paint. Once the first coat is fully dry, apply a second coat of Caviar the same way. Two coats give you that rich, beautiful, true black coverage that makes the stencil design really pop!
- Step 6 – Plan and Secure Your Stencil. Do a dry run with the stencil first to plan your placement on the desktop. Lightly mark the center of the desk with a pencil, line up the center of the stencil, and secure it with masking tape. Working from the center outward gives the most balanced, professional look!
- Step 7 – Stencil the Desk Top: Dip your sponge applicator into the Fluff (white) chalk paint and offload most of the paint onto a paper towel before pouncing it onto the stencil. Less is more here - thin, light coats prevent bleeding under the stencil. Allow to dry, then apply a light second coat before moving the stencil to the next section.
- Step 8 – Touch Up the Edges: Using a small artist's brush, touch up any stenciled areas that spilled over the edges of the desk for a clean, polished finish. This little step makes such a big difference!
- Step 9 – Seal with Furniture Wax: Apply furniture wax over the entire desk using your wax brush in circular motions. Buff back with a soft cloth or a blue shop paper towel. The wax protects your beautiful finish and gives the piece a gorgeous, subtle sheen!
- Step 10 – Clean Your Stencil. Don't skip this last step! Wash your stencil with hot soapy water and a Scrubby Soap pad on a flat surface. This preserves the edges and keeps it ready for your next project. A clean stencil lasts for years!
Notes
Thrifting Tip: Don't pass up a desk just because it's dirty or missing a piece! A $2 thrift store find with good bones is the perfect candidate for this project. My hubby cut a new piece of luan wood to replace the missing back panel and painted it black to match - problem solved for just a few dollars! Also, this chalk paint and stencil technique works on so much more than desks - try it on dressers, console tables, entryway tables, and more!