How to Apply Transfers to Furniture
A step-by-step tutorial showing you how to easily apply transfer to furniture!
Cost: $30
Equipment
- decorative transfers
- burnishing tool
- sharp scissors
Ingredients
- decorative rub on transfers
- sharp scissors
- water based clear sealer
- chalk painted furniture
- painter's tape
Video
Notes
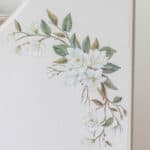
- Separate the transfer designs using sharp scissors
- Lay out the designs in a way that looks good to you. Hold the pieces in place with painter's tape.
- Carefully remove the backing sheet when you are ready to apply the transfer to the surface.
- Lay the design on the surface and do not pick it up! Use the burnishing tool to apply the transfer design onto the surface.
- Use the clear plastic sheet to rub over the design to ensure it is completely adhered to the surface.
- Seal the transfer with a clear water-based sealer to protect the transfer design.