
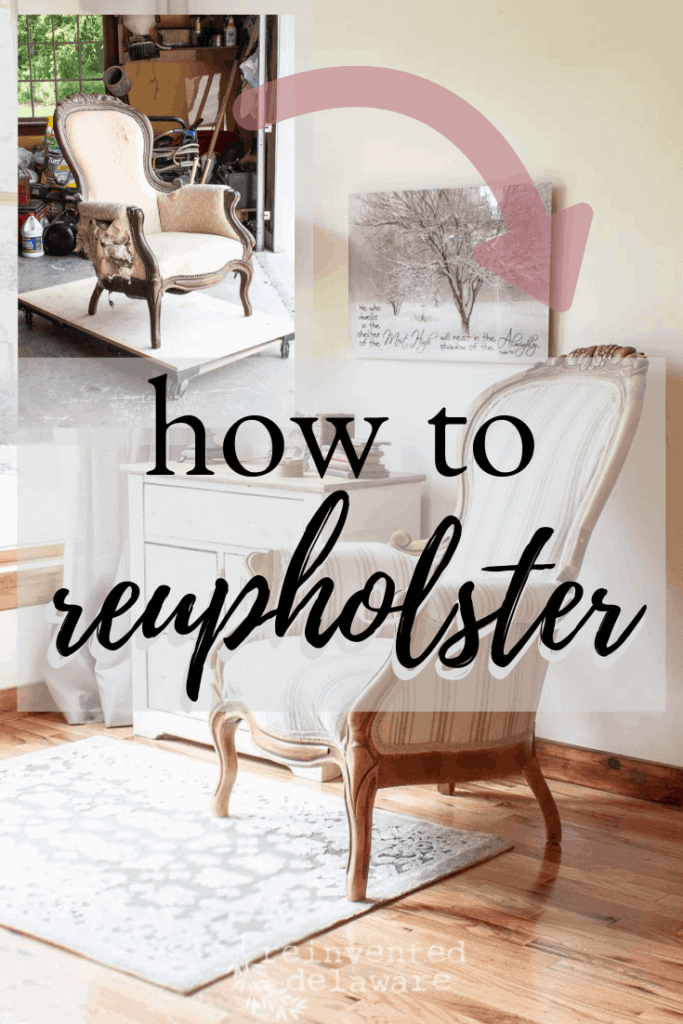
Before and After Reupholstered Chair Your How-to Guide
Transform an antique chair with our upholstery project how-to guide. See stunning before and after photos and learn expert tips!
I’ve been on this journey to breathe new life into a Victorian chair, pouring care and meticulous effort into its reupholstery. The transformation has been quite remarkable, and I’m thrilled to guide you through the same process so that you can take even the most outdated chair and update it for your home.
Reupholstering isn’t just about the aesthetic upgrade; it’s a way to preserve the charm of old furniture, like a cherished wingback chair or a beautiful Victorian-style chair that has seen better days. It’s so rewarding to reimagine old pieces of furniture.
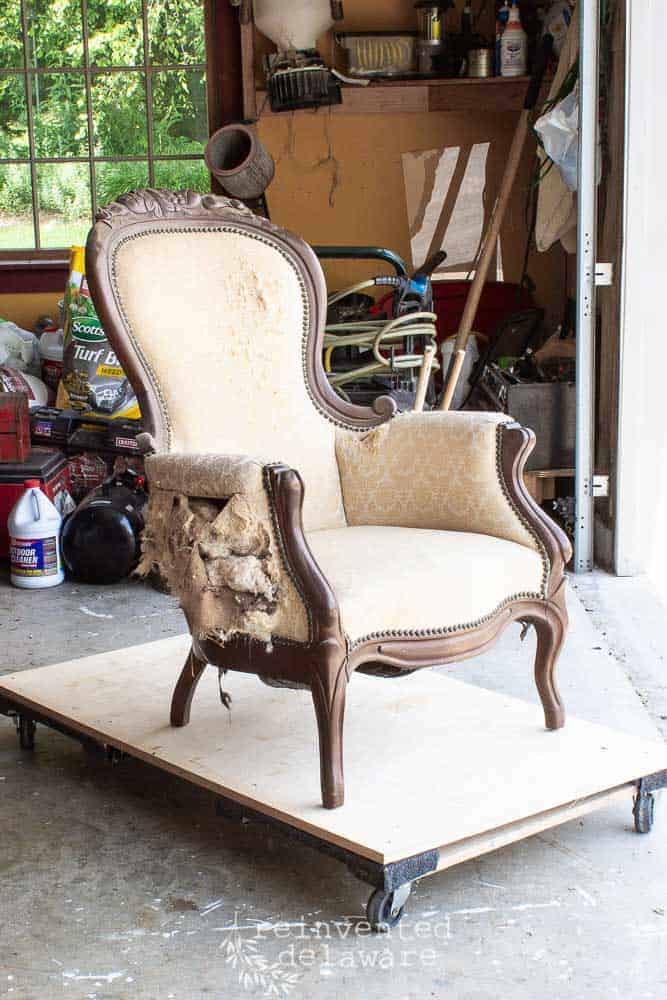
Let’s continue with this old chair. I’m finally at the end of this DIY project and I’m thrilled to show you the end result!
The following post may contain affiliate links. That means if you click and then buy something, I will make a small commission at no additional cost to you! Thank you for supporting my blog. full disclosure here.
How to Reupholster a Chair Step by Step
Let’s review the steps I took to makeover this antique chair. Later in the post, I will share individual posts that go into even more detail. I also have a full upholstery video series to share with you later in this post!
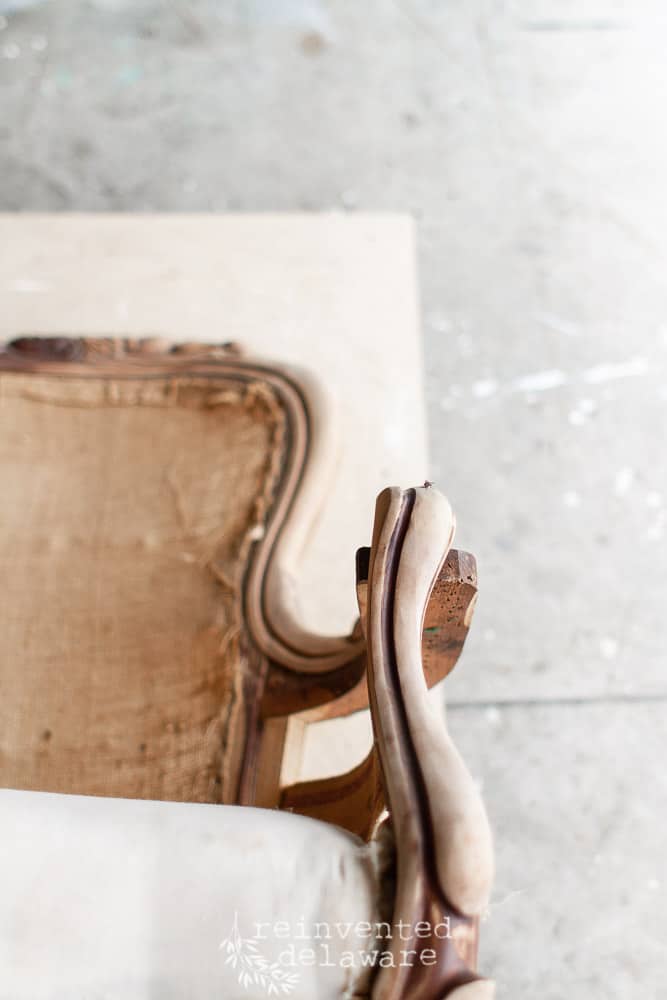
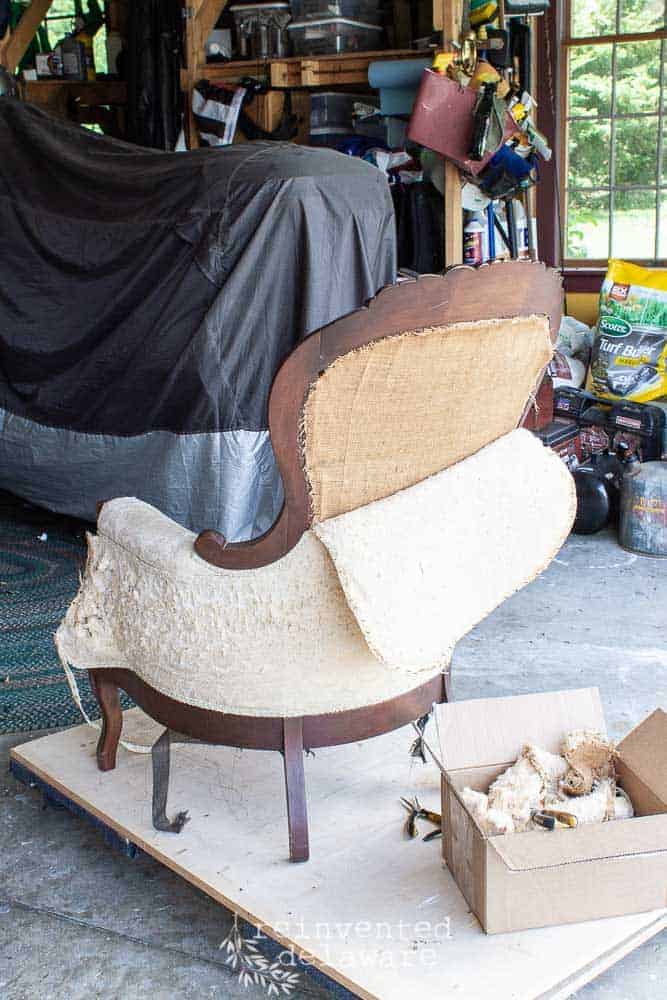
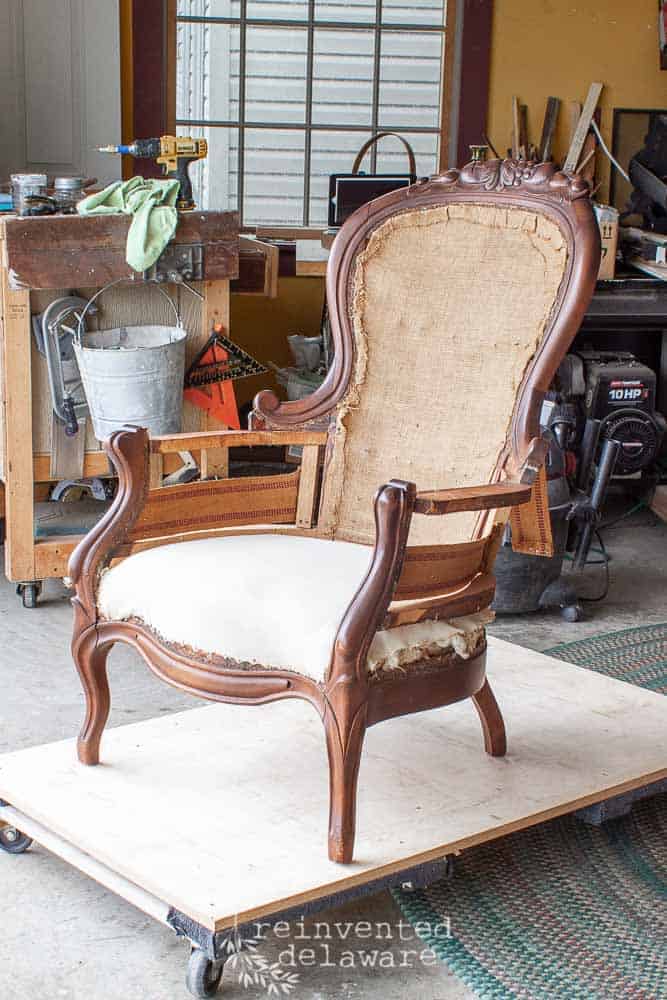
remove the old fabric
I carefully removed the old fabric and staples using an upholstery staple remover, and spring-loaded needle nose pliers, ensuring the wooden base remained intact. Then, I sanded and waxed the wood frame, enhancing the chair’s aesthetic.
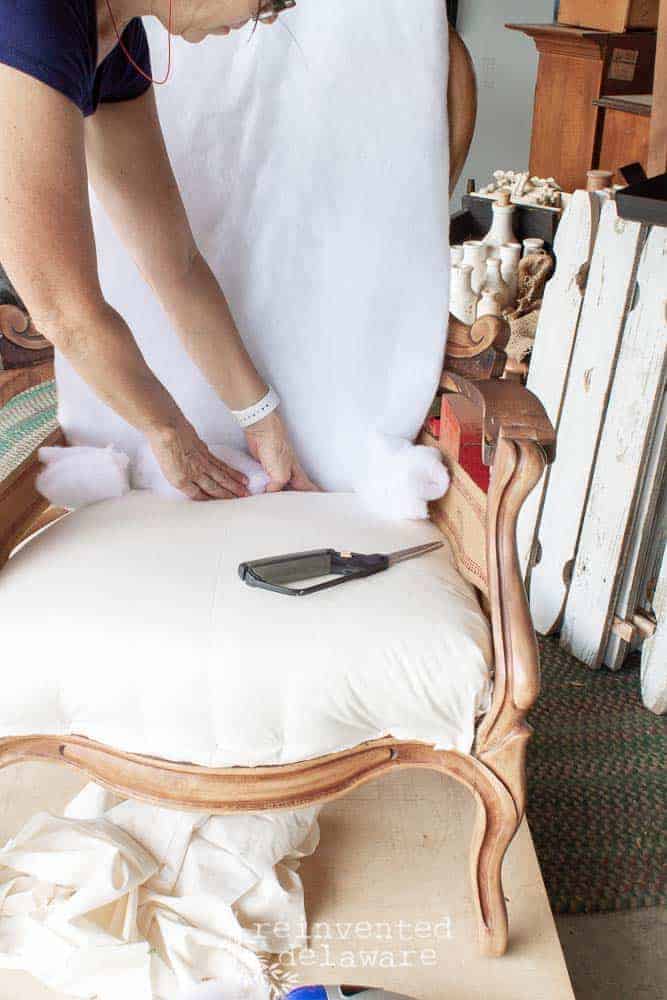
add the batting
Once the wooden frame was finished, I tackled the upholstery part of this DIY project. I added the sections of batting to each area of the furniture including the back of the chair, the chair seat, the top of the chair (also called the inside back), and the sides of the chair (inside and outside of the arm area). The batting is just tacked down to hold it in place.
add the fabric underlayer
The second layer on upholstery pieces is often a medium-weight fabric that adds durability to the batting and the decorative fabric. You’ll see step by step how I added this extra fabric to this Victorian chair in my post about upholstery basics. This layer isn’t necessary but many in the professional upholsterer occupation take this measure so I thought it was best to do it too!
I tacked this layer down to hold it in place. It’s not the final layer so I went easy on the staples.
add the upholstery fabric
The steps are the same for the upholstery-grade fabric. Both are a process of measuring the fabric and cutting extra so that the fabric can be pulled tight creating a neat appearance.
Secure this layer well using the pneumatic staple gun. Think of this step as stitching the fabric to the wood base and using as many staples as needed to secure the fabric to the wood. I like to add staples side by side.
Each section of the chair is approached the same way.
- Remove Old Upholstery: Use proper tools to remove all of the upholstery tacks.
- Prep Frame: Sand as needed and apply furniture paste wax to preserve the wood.
- Cut New Fabric and Batting: Cut a fabric piece for each section allowing for plenty of excess.
- Attach Batting: Staple batting taut over the seat and backrest and secure with a few staples to hold in place.
- Attach Fabric: Secure underlayer first, pulling taut and adding a few staples. Secure decorative fabric and secure well with staples. Use tack strips in areas where upholstery trim cannot be used to hide staples.
- Final Touches: Use hot glue to attach braided trim to cover the staples and secure a dust cover to the bottom of the chair.
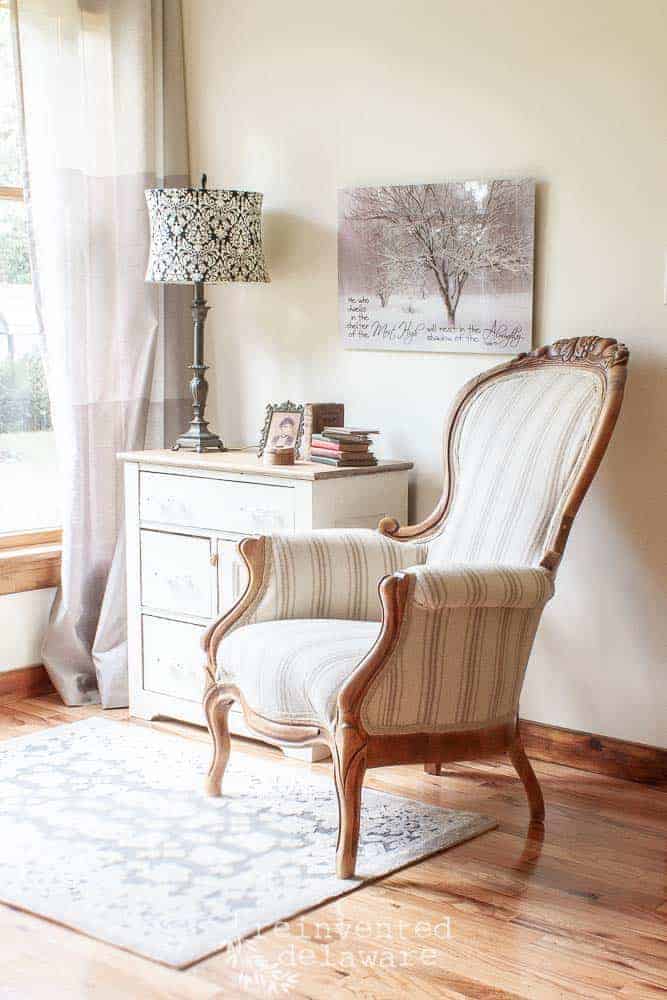
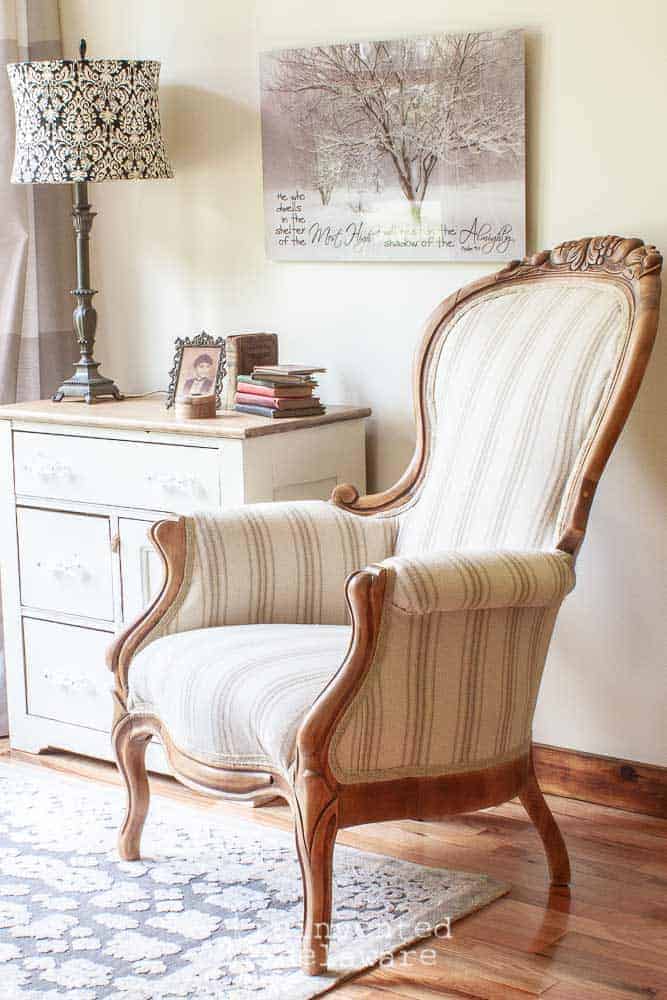
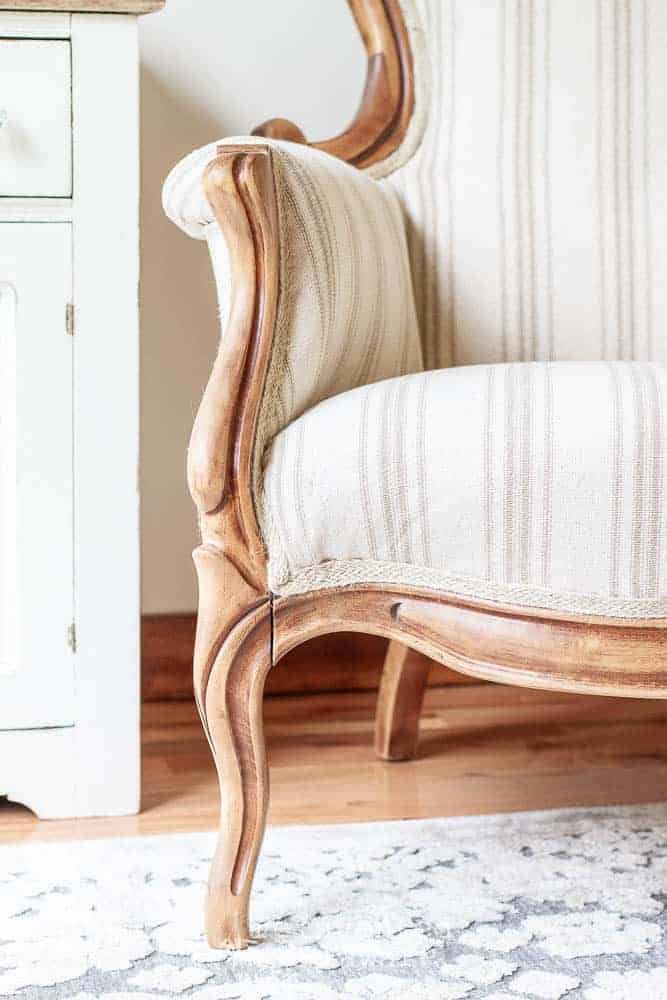
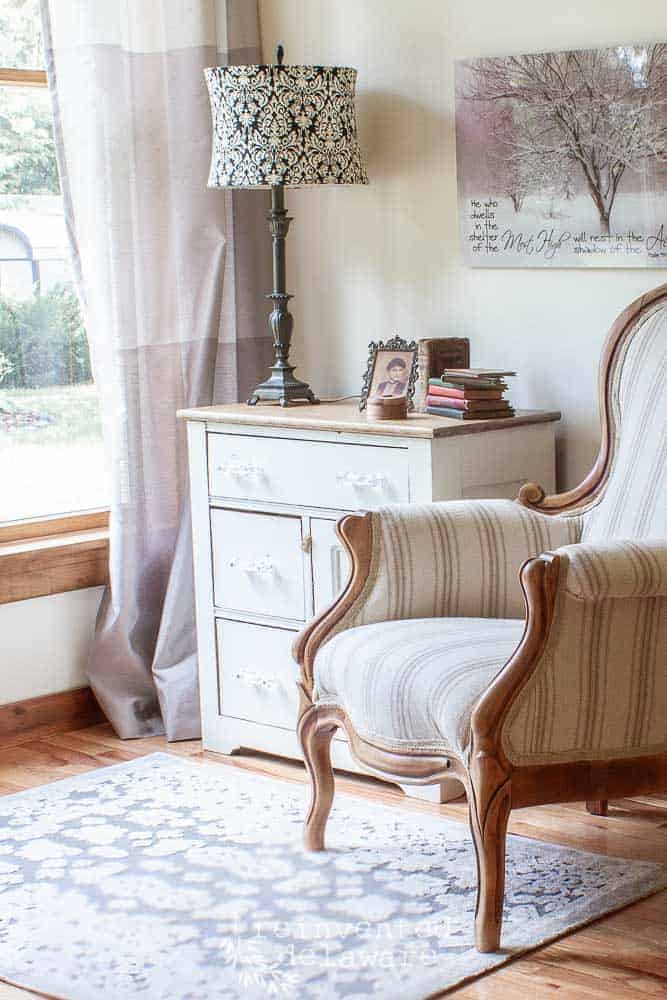
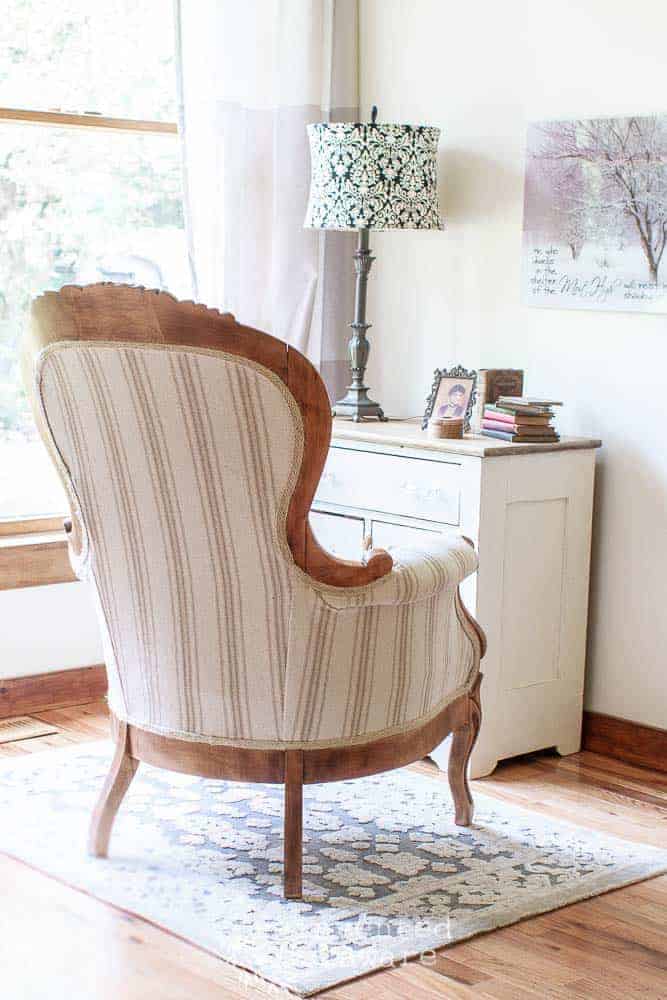
before and after reupholstered chair
Here is the final result! Surprisingly, for my first attempt at reupholstering a Victorian chair, it turned out pretty good, don’t you think?
This Victorian chair was certainly a challenge to work on but it was worth every bit of the effort I put in! Completing the reupholstery on the chair gives it a fresh new look and will last for years!
My efforts paid off. This chair has many more years of life in it! With a couple weeks of work, not much fabric, and an old chair in relatively good shape, I’d say my job is done here!
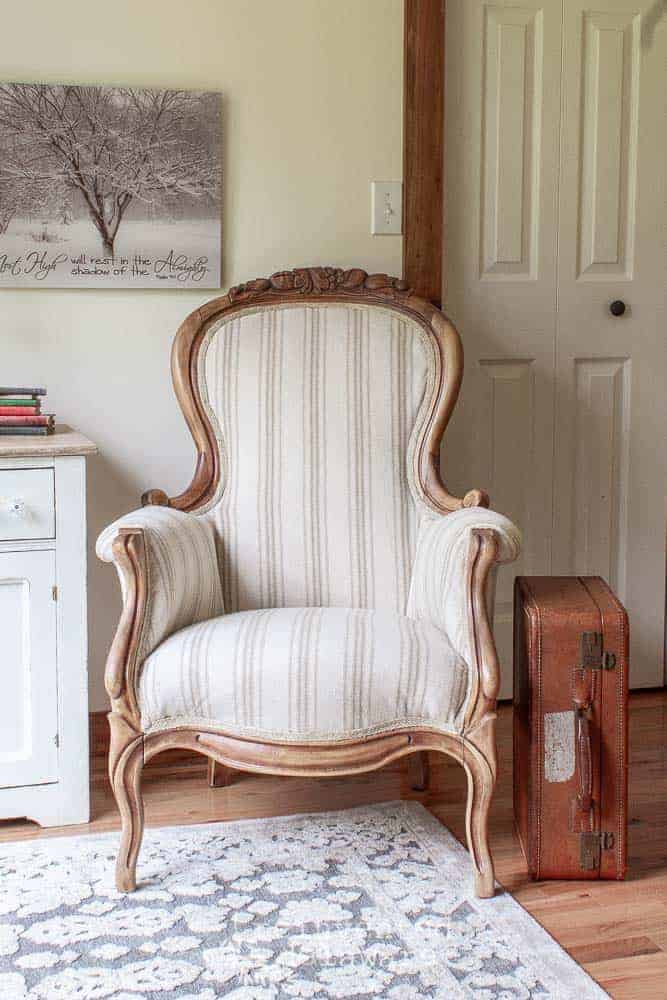
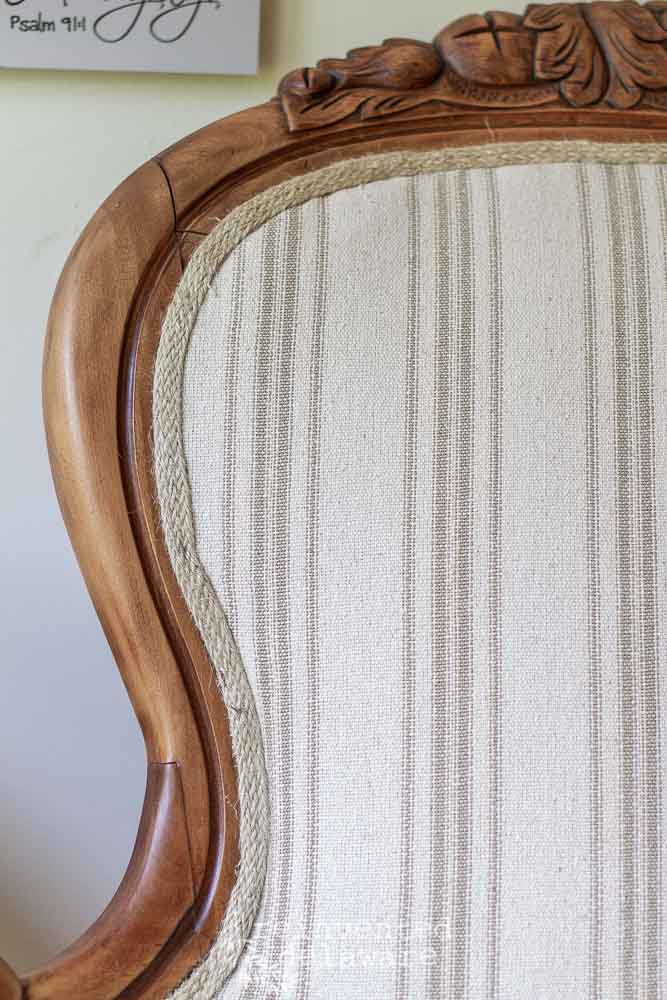
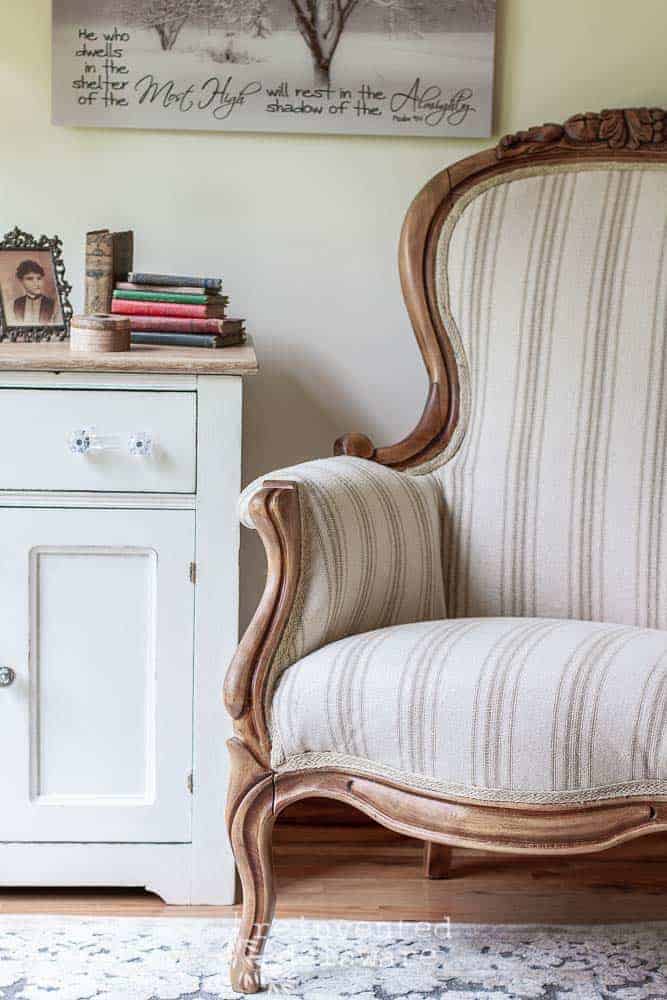
Let’s look closer at the details of this beautiful chair.
antique chair upholstery details
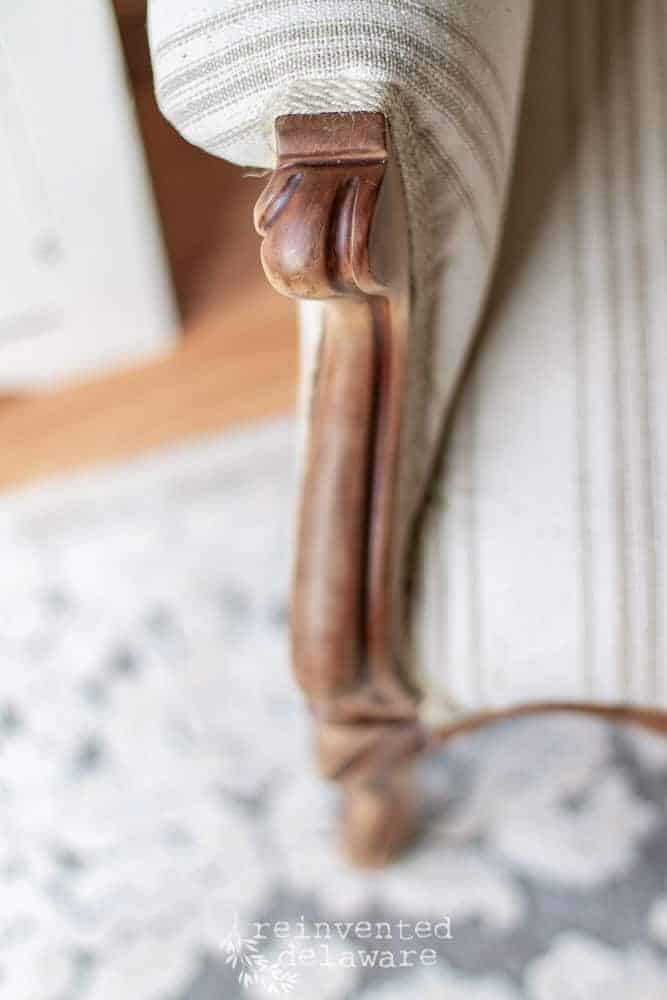
The addition of jute braided trim around this Victorian chair not only conceals the upholstery staples but also shows off its elegant contours. The trim’s texture contributes a sense of depth and interest, especially along the top where the wood’s carved details are prominent.
- Carved Wooden Features:
- The chair’s ornate wooden elements demonstrate classic Victorian craftsmanship.
- The grain sack-style fabric pairs perfectly with the wood’s natural beauty.
- Jute Trim Application:
- Applied with a touch of hot glue for secure placement.
- Encircles the chair, framing the vintage design.
- Aesthetic Enhancement:
- The trim’s rustic appearance contrasts the chair’s plush upholstery.
- Highlights the chair’s unique silhouette, a testament to vintage charm.
The contrast between the fabric, trim, and wood carvings truly brings out the beauty of this vintage chair.
is it worth it to reupholster a chair?
Yes, yes and yes! Here are some of my thoughts about recovering an old chair for your home:
- Sentimental Value: My choice to preserve some original stain in the crevices reflects a reverence for the chair’s history.
- Character: As I worked, the chair’s unique features, such as its carved wooden details, were enhanced, adding depth and narrative to the story of this beautiful piece of furniture.
- Repair: Careful sanding was an essential step in the repair, revitalizing the wood without erasing its storied past.
- Traditional Craftsmanship: The furniture maker’s dedication to detail is evident; it stands as a testament to traditional craft.
- Perfection: Although seeking perfection in restoration, I embraced the imperfections that contribute to the chair’s character.
I believe it is worth the time and effort to preserve our history and the craftsmanship of fine furniture pieces like this antique Victorian chair.

interior design ideas
I’ve paired this particular chair with a charming oak washstand, which received a delightful makeover. In my opinion, vintage chairs look best next to vintage side tables, dressers, and of course, washstands.
Together, they bring a sense of harmony, as if they were destined to complement each other’s elegance. Pairing them is a great way to bring a vintage look to any room.
thanks for being here!
I hope you are enjoying this project! Let me know if you have any questions. Or leave me a comment to tell me about your project and ideas!
thanks, Cindy 😀

This furniture vignette adds texture with the grain sack fabric and wood tones and, ambiance with the painted washstand. The stack of vintage books and framed art add personality and a timeless touch. This look would be perfect in a guest room.
For me, it’s the little details that turn a piece of furniture into a storyteller, making my living space a collection of narratives.
a fresh look for chair projects
Grain sacks possess a unique aesthetic appeal with their blend of rustic charm and sturdy functionality. I’ve always appreciated how they can juxtapose their practicality with sheer beauty — especially when repurposing them in creative ways.
I purchased the reproduction grain sack fabric from a small fabric store on Etsy, Sweet Annie Acres. The shop owner is based in Michigan and has great customer service. The fabric is of amazing quality. The straight lines of the grain sack contribute to the striking contrast of the curved lines on this Victorian chair.
The piece of fabric arrives right off the bolt so it needed to be pre-washed. This step should not be skipped over if you want to prevent ripples in the fabric, especially on the seat.
One of the aspects of my job that I love the most is taking a piece and loving on it until it is brought back to life! Honestly, every step of this project was a joy!
more helpful reupholstery info
Nothing compares to the satisfaction of breathing new life into a bygone piece of furniture. I cherish every moment spent transforming a dated item into something beautiful that can be used in someone’s home.
Be sure to read each post in this step-by-step guide for upholstering an old chair. They all lead up to this amazing result! Links to supplies and tools are in the posts. You can also shop for supplies in my Amazon store.
FAQs
How much does it cost to reupholster a chair?
Here are the costs of my reupholstery project. Your cost could be different since there are many factors to consider.
- Victorian chair: $50-$80 My chair had been gifted to me by one of my followers
- grain sack fabric: approx 4 yards of fabric at $16.99 per yard, a total $68
- new batting: approx 3 yards of batting, total $18
- jute trim: approx 10 yards, total $6 (I purchase a 23-yard roll of the trim at a time, my measurement is approx!)
- jute upholstery webbing: 2-3 yards at approx $1 per yard (I purchase this in a large roll also)
- furniture wax: $12
DIY reupholster vs professional reupholstery
If you decide to pay for a professional to reupholster an antique chair, expect to pay big money. The price can vary so much depending on issues like the condition of the chair, the underlayer fabrics and batting condition, the cost of the new fabric and supplies, the price per hour, or price per piece the professional charges, and any unexpected repairs that might pop up during the process.
You can send pictures of the chair or furniture piece that needs to be recovered to the professional you find to get an estimate of the time it will take and the cost of the labor. Send enough pictures that they can give you a good quote. From there, the cost will be determined by the cost of the fabric per yard. The upholsterer will tell you a rough estimate of how many yards of fabric you will need. This can help you to find fabric that fits your budget.
Reupholstering a chair can range in cost depending on materials and whether you hire a professional or do it cheaply by yourself. I found that sourcing materials efficiently and doing the work personally can be quite economical. The total cost for this chair project was well under $100.
TIP: Have you decided to tackle this reupholstery work on your own? My advice is to take pictures of the tear-down process as you remove the old fabric. This will help you put the new fabric back on in the correct order. Be sure to watch the playlist of videos I have to explain this even further!
If you recover the chair yourself, you will see why it costs so much to pay someone else to do the work!
where to purchase an antique chair to reupholster
I’ve discovered that often the best Victorian chairs come from individuals who are downsizing and seeking to pass along their cherished antiques. Telling friends and family about your search can lead to word-of-mouth discoveries.
Here are some other options to consider:
Local Online Marketplaces
- Craigslist: Search in the furniture section for Victorian chairs being sold locally.
- Facebook Marketplace: Local community groups often list antique furniture for sale.
Printed Classifieds
- Local Papers: Keep an eye out for listings in publications like The Guide, where antiques are listed by locals within a 50-75-mile radius.
- Small-town local newspapers: The classified ads are another great place to look.
In-Person Sales
- Local Thrift Store: Visit nearby shops for hidden gems.
- Auctions/Estate Sales: Great for finding unique Victorian chairs with a history. Make sure to check for local event schedules.
what is the best fabric to reupholster a chair?
When selecting the perfect fabric for reupholstering a chair, I prioritize upholstery-weight fabrics due to their strength and durability. These materials can withstand the tension necessary during the reupholstery process and offer lasting resilience for frequent use.
- Fabric Type: Opt for new fabrics designed for upholstery.
- Strength: Ensure the fabric can endure pulling and stretching.
- Durability: It should be able to sustain regular usage.
You can use drop cloth in place of new upholstery fabrics. I recommend you use the highest quality of drop cloth you can afford, preferably 12 oz. This is a strong and durable piece of fabric that has a relatively lost cost.
I often choose a reproduction grain sack style fabric for my projects, a more affordable yet sturdy alternative to traditional grain sacks. It’s available in various colors and patterns, catering to different design preferences.
- Patterns and Colors: Grain sack styles are available in multiple hues—bright or darker colors.
- Width and Yardage: The width of the fabric usually meets upholstery needs, and yardage depends on the chair size.
I’ve gathered the supplies I used for this project for you. These are the products I have used time and again on many of our upholstery projects. Tap the button below to shop!
chair reupholstery summary
- remove original fabric
- determine if the original batting is in good shape
- replace or add additional batting
- make any necessary repairs
- restore original wood with furniture wax
- attach upholstery fabric with a pneumatic staple gun
- attach jute trim to raw edges of upholstery fabric
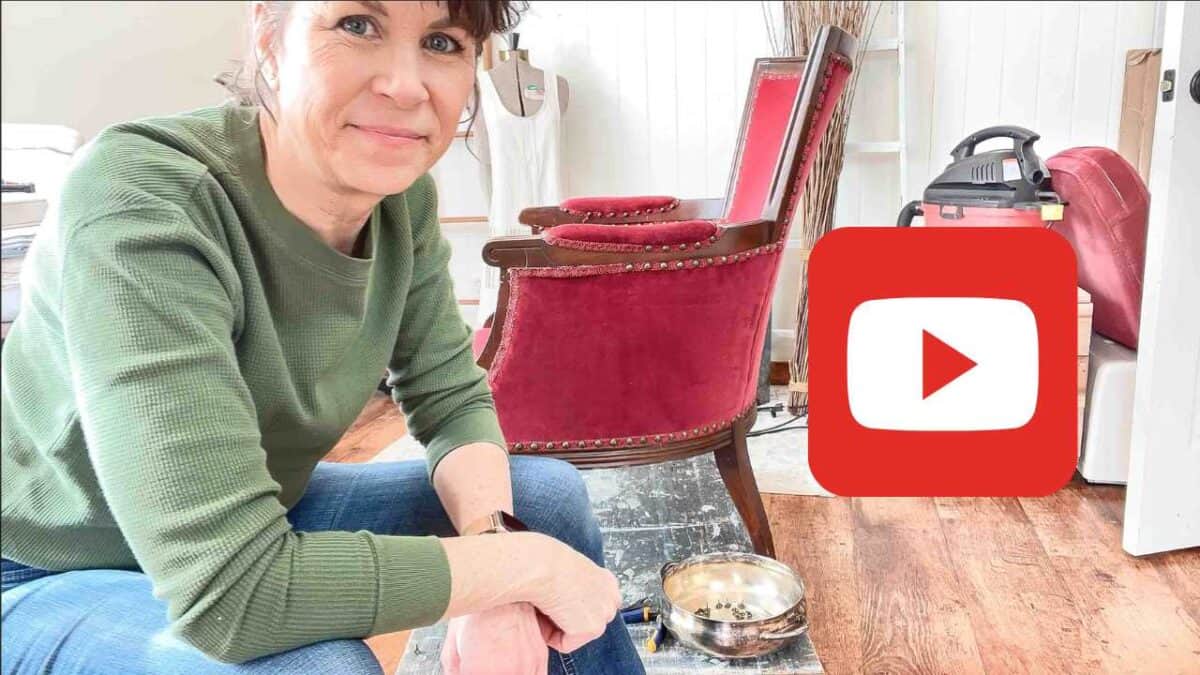
YouTube video series
I have created a full chair upholstery series on YouTube that will be helpful for you as your upholster a chair. Many of the methods and techniques are similar to this Victorian chair. If you have any questions, feel free to reach out on YouTube or here down in the comments! I would love to help you the best I can!
Tap the image below for the full series so you can learn tips and techniques for your next chair upholstery project!

Thanks for joining our journey!
Thanks so much for joining us for this post! Join our journey so you don’t miss any of the fun projects, tutorials, and inspiration that we share with you each week! You can follow us on Instagram, Facebook, and YouTube. We share even more inspiration on Pinterest!


Cindy Rust
Cindy has been decorating her home with thrift store finds for 40 years. She is an avid thrift store shopper who loves to makeover the items she finds into vintage-inspired home decor and furniture. When she isn’t thrift shopping or painting a piece of furniture, you can find her making homemade butter, working in her garden, or painting with watercolors.
Wow, Cindy! That’s beautiful!
Thanks Jenn!! I really enjoyed this project?
Where is the footage captured by the professional (and handsome, I might add) photographer?
We had a minor problem with that particular footage?
Hi Cindy!
I have been waiting for this reveal, and as I expected, the chair turned out gorgeous! You did a fabulous job! I love both the curves of that chair and the grain sack fabric! I do hope you’ll share this at Homestyle Gathering this week! Hope to see you there!
>>> Kim
Kim, thanks so much for your kind words! I really enjoyed each step of this project? and I will be sure to share on HG!! ??
Cindy, what a beautiful result. I will be starting a similar project soon and I am wondering about the color the sanded wood will be. Is this chair made of mahogany? Thanks Beatrice
Thanks for the sweet words Beatrice! My hubby’s best guess on the wood is cherry. The chair is very old – probably from the 1920’s so the wood has aged to it’s current lovely patina. Good luck with project and feel free to contact me with any questions! ?
Hi Cindy! thank you for sharing your step by step. I have never reupholstered anything but now i hope i get the chance to. This chair is so lovely. I love all of it.
Thanks Cheryl! If you get a chance to and have any questions, feel free to ask!
I love how your chair turned out! Beautiful! How did you finish the wood after sanding it? I love the finish!! Great job!
Hi Karen! Sorry I didn’t say how I finished the gorgeous wood on this chair! After sanding and cleaning the dust, I waxed it with Miss Mustard Seed Furniture Wax. Hope that helps. Feel free to ask any more questions you have and thanks for stopping by!
Loved the Victorian chair job. The best videos I’ve seen on tackling this kind of work! Many thanks for taking the time to describe all of the cuts & adjustments you made in the process!
Thanks, Meg! I’m so glad you enjoyed the chair upholstery videos on YouTube. Thanks for your kind words, for watching the videos and for coming over to my blog! I appreciate it so much 🙂